
Single or dual syringes for precise metering and small-scale bonding or repairs. Mix thoroughly where required and observe pot life. Use filters to refine by chemistry and cure speed. Always consult the product page and TDS/SDS.
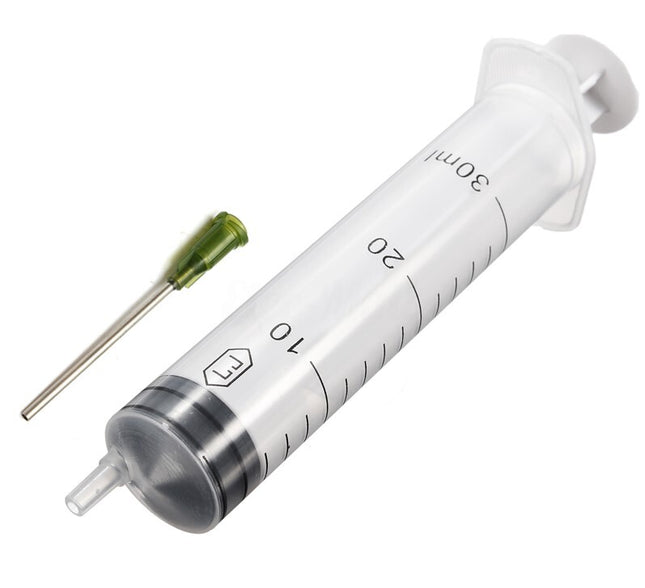
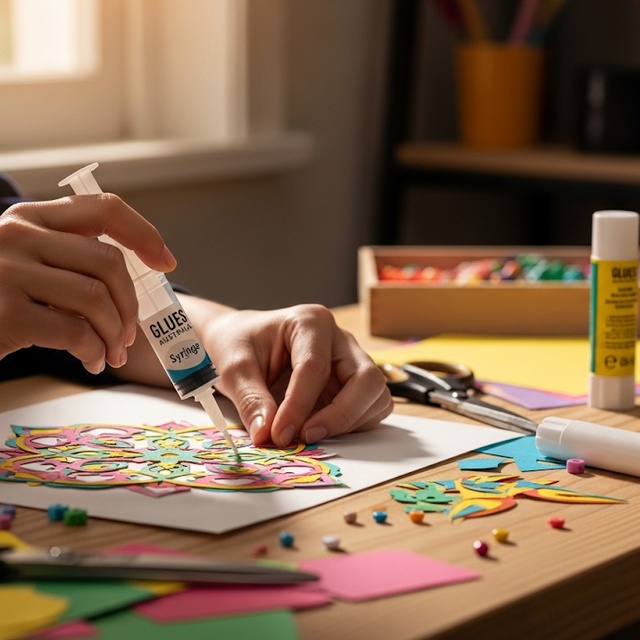
Get clean, precise application of glues, epoxies, resins, oils, inks, and other liquids with this easy to use 30 ml syringe and blunt tip fill needle. Ideal for workshop, craft room, electronics bench, and on site repair jobs where accuracy matters and mess is not an option. Why you'll like it Controlled dispensing for dots, lines, seams, and small cavities 30 ml capacity for longer runs without constant refilling Graduated barrel with clear volume markings for repeatable dosing Luer lock connection keeps the needle securely attached during use Reusable barrel when used with compatible liquids and cleaned after use Blunt tip needle for safe, non piercing filling and application Common uses Injecting Fix-A-Floor through grout lines to re bond hollow or loose tiles Precision placement of two part epoxies and cyanoacrylate gels Applying PVA wood glue into tight joints and dowel holes Wicking thin adhesives along hairline cracks Filling small voids and seams before clamping Electronics work with flux, solder paste, and conformal coatings Craft, model making, leatherwork, and jewellery repairs Tile repair tip: A blunt tip of about 2 mm to 3 mm fits most grout lines. Drill a small hole in the grout as directed by the adhesive manufacturer, inject until the cavity is filled, then clean any squeeze out promptly. What is included 1 × 30 ml syringe barrel with plunger 1 × blunt tip fill needle with luer lock hub 1 × protective cap for storage Specs Capacity 30 ml Connection Luer lock Needle style Blunt tip, non piercing Barrel material Transparent polypropylene Plunger seal Latex free elastomer Use For adhesives and shop liquids only, not for medical use How to use Attach the blunt tip needle by twisting it onto the luer lock until snug. Pull back the plunger, draw in your adhesive, then tap the barrel to release trapped air. Dispense with slow, steady pressure for consistent beads and dots. For Fix-A-Floor, inject through the grout holes until filled and follow the cure steps on the product label. After use, expel remaining liquid if suitable, then flush the barrel and needle using a cleaner compatible with your adhesive. Dry completely and cap for storage. Compatibility tips Works well with PVA, polyurethane, epoxy, acrylic, latex, and many hobby liquids. For solvent based products, confirm compatibility with polypropylene before use. Do not store reactive two part mixes inside the syringe after they begin to cure. Safety Not sterile and not for medical, food, or body use. Wear gloves and eye protection when handling chemicals. Keep out of reach of children. FAQ Can I reuse itYes, if your adhesive and cleaner are compatible with polypropylene and the luer lock needle. Clean immediately after use for best results. Will it work with thick glueYes, but very thick products may require more pressure and a wider blunt tip size. Does it come sterileNo. This set is for industrial, workshop, and hobby applications only.
$18.00


Loctite Epoxy Instant Mix 5 Minute is a two-part adhesive consisting of an epoxy resin and a hardener. When mixed in equal volumes, the resin and hardener react to produce a tough, rigid, high strength bond, which starts to set in 5 minutes and reaches handling strength in 1 hour. The static mix nozzle delivers a uniform mixture of resin and hardener every time. It can be used as an adhesive for a wide range of materials or as a versatile filler for gap bonding, surface repairs and laminating. Loctite Epoxy Instant Mix 5 Minute does not shrink and is resistant to water and most common solvents. It can be tinted with earth pigments, cement or sand for color matching and can be sanded and drilled. Recommended on: Bonding metal, glass, ceramic, wood, many rigid plastics, china, tile, fibreglass, concrete and stone Can be combined with fibreglass cloth for a durable patch Great for crafting projects Properties Will not crack when drilled Can be tinted to match surrounding materials Water resistant: can be used outdoors Does not shrink One-time application Convenient instant mix syringe Consistently dispenses equal, uniformly mixed amounts of each component Sets in 5 minutes Quick completion of the project How to Use: Step 1: Safety Precautions Well-ventilated area, gloves. Step 2: Preparation Protect work area. Surfaces must be clean, dry and free from oil, wax and paint. For better adhesion, roughen smooth surfaces prior to cleaning. Pre-fit parts to be joined. Remove plastic cap from the centre of the plunger. Turn nozzle end up and pull the plunger back slightly allowing air bubbles to rise to the top. Snap off and discard end of the syringe. Insert nozzle opening and push past prongs. Rotate nozzle 90° to lock into place. Step 3: Application Depress plunger to dispense equal amounts of hardener and resin directly onto the surface to be filled or bonded. Remove and discard nozzle. Wipe syringe tip immediately. Retract plunger slightly and close with the cap provided. Place objects together within 40 seconds of adhesive application. Bond sets in 40 to 60 seconds at 20°C to 25°C. Remove any excess adhesive immediately with mineral spirits. Usable strength is obtained within 5 to 10 minutes. Warmer temperatures will shorten the set time and cooler temperatures will lengthen it. Step 4: Cleanup Clean excess glue immediately with mineral spirits. Cured adhesive may be cut away with caution using a sharp blade. Prolonged immersion in paint stripper will soften the cured adhesive to aid removal.
$9.23

Selleys Araldite Rapid Epoxy Adhesive 14 mL Fast-setting, two-part epoxy for quick, durable repairs at home, in the workshop, or on site. The self-mixing syringe makes application clean and precise, setting in about 90 seconds and reaching handling strength soon after. Dries translucent for a neat finish. Key benefits Sets in approximately 90 seconds for rapid fixes High strength bond up to 75 kg/cm² when fully cured Dries translucent for low-visibility repairs Self-mixing nozzle for easy, accurate application Versatile bonding across common materials Best for Everyday repairs and small assemblies Fixing chipped ceramics and china Metal, glass, leather, rubber, and many plastics Suitable materials China, metal, glass, leather, rubber, and most plastics. Not suitable for PTFE, polyethylene, or polypropylene. How to use Prep Abrade, clean, and dry both surfaces. Attach nozzle Remove cap, fit and lock the self-mixing nozzle, then purge a small amount until evenly mixed. Apply Spread adhesive on both surfaces and join within 1 minute. Hold Support the bond for about 10 minutes to prevent movement. Cure Maximum strength develops after about 16 hours. Allow longer in cold conditions. Clean up Wipe away uncured adhesive with acetone. Remove and dispose of the used mixing nozzle before the adhesive sets in the tip. Technical details Technology Two-part epoxy Set time About 90 seconds Handling time Approximately 10 minutes Full cure About 16 hours Colour when dry Translucent Temperature resistance Up to 60 °C Pack size 14 mL self-mixing syringe Good to know Bond may soften above 60 °C and regains strength when cooled. Pre-test on leather and rubber to confirm suitability. May discolor with prolonged UV exposure. Store in a cool, dry place. Replace cap after removing the used nozzle. Safety Follow the safety directions on the packaging. Use in a well-ventilated area and avoid skin contact. Keep out of reach of children.
$19.26

Tarzan's Grip 5min Epoxy is a two-part all purpose adhesive. When mixed equally together it provides a tough, rigid, high strength bond to tackle the toughest DIY projects. Its also fast - sets in 5 minutes and reaches initial handling strength in 30 minutes. Easy mix Durable bond Dries clear Water resistant
$12.29

Imagine a liquid epoxy that is clear – A liquid epoxy with strength rivalling that of heavy duty paste epoxies – A liquid epoxy that has flexibility and is shatter resistant – A work time of 4 minutes and 1 hour cure time. Imagine NO LONGER! PC-Clear ™ Epoxy is a medium viscosity liquid epoxy system with greater clarity than other epoxies. This product is excellent for repairs and projects that must be less visible such as art objects or collectibles. PC-Clear™ epoxy is fast curing but allows ample time to apply and position the repair. After curing the epoxy does not become brittle, instead cured PC- Clear™ forms a tough resilient bond. PC-Clear™ can be used on more than just cosmetically critical repairs and in addition, it can be used for automotive, construction and facility repairs. Use PC-Clear™ when you are concerned about the appearance of your repair and a liquid epoxy is what you are looking for. Work time is about 4 minutes and cures in 1 hour. Here are just a few specific uses (there are hundreds of other uses): Fasten galvanized steel to a concrete floor. Bond sheet metal to wood or masonry. Seal and insulate electrical connections and electronic boards. Protect electronic components from vibration and moisture. Repair porcelain or sculptures. Reattach multiple broken pieces in a vase. How to prepare a surface for bonding with PC-Clear™ Epoxy Remove contaminants such as dust, dirt, oil and grime with a solvent such as Denatured Alcohol (ethanol), Acetone, Rubbing Alcohol (isopropyl alcohol) or Lacquer Thinner. A mild detergent solution in water is also good for removing contaminants. Use a clean paper towel or rag for wiping. Do not use Mineral Spirits or Paint Thinner for removing contaminants. Remove rust and loose paint with sandpaper or wire brush. Epoxy typically sticks to most paints. If there is a concern of the paint’s adhesion then remove it with sandpaper, wire brush or paint stripper. Smooth, glossy and shiny surfaces should be roughened using sandpaper to increase adhesion. How to clean-up after PC-Clear™ Epoxy application Clean up mixed epoxy before it cures with paper towels and solvent. Denatured Alcohol (ethanol), Acetone, Rubbing Alcohol (isopropyl alcohol) or Lacquer Thinner are suitable solvents for removing uncured epoxy. Cured epoxy can be removed with paint stripper or remover. FAQ Is PC-Clear™ Epoxy different from other clear epoxies? Some epoxies claim to be clear but they have a strong yellow tint that develops after it cures. PC-Clear™ Epoxy has a very slight hint of yellow that does not increase after curing. How does PC-Clear™ Epoxy’s strength compare to other epoxies? PC-Clear Epoxy™ is a strong adhesive with Lap Shear Adhesion strength on steel of 2500 psi. Is PC-Clear™ Epoxy brittle? PC-Clear™ Epoxy is slightly flexible and more resilient than other liquid epoxies. How does outdoor exposure affect cured PC-Clear™? Ultraviolet light will cause cured PC-Clear’s™ appearance to change and may cause yellowing. What is the best way to mix PC-Clear™? How you mix PC-Clear™ Epoxy will affect the length of working time. Flat surface mixing spreads the epoxy over an area minimizing the exotherm’s effect on the curing reaction and maximizing the length of work life. Mixing in a container concentrates the exotherm contributing to an increased rate of reaction and decreasing the work life. Why does PC-Clear™ Epoxy have a strong odor? The epoxy resin is nearly odorless. The hardener is the smelly part. It has an odor described as smelling like sewer gas or hair treatments. This odor comes from the polymercaptan but goes away upon curing. Does PC-Clear™ Epoxy self-level? PC-Clear Epoxy™ is a liquid and is self-levelling. How many feet of does the PC-Superepoxy® 50 ml cartridge nozzle dispense? PC-Superepoxy® can dispense approximately 20 feet of 1/8 inch bead. Can PC-Clear™ Epoxy be colored or tinted? PC-Clear™ Epoxy can be tinted.
$14.34


Gorilla takes epoxy to a new level—the Gorilla Tough level. With its superior solvent and water resistance, Gorilla Epoxy adhesive is incredibly strong and durable for household and automotive repairs alike. The easy-to-use syringe keeps the epoxy resin and hardener separate, so it is easy to dispense and won’t harden over time. The two-part, gap-filling formula easily bonds steel, aluminum, glass, wood, ceramic, tile and most plastics. Plus, it dries in an ideal, crystal-clear finish that makes projects look spotless. Features: Dries Clear: Ideal for clean, easy finishing 5 Minute Set: Plenty of repositioning time for the perfect fit. Gap-Filling: Fills voids and bonds uneven and vertical surfaces. Water Resistant: Withstands moderate exposure to water Solvent resistant Non-Toxic once cured Easy-to-use syringe: Separate barrels of epoxy resin and hardener keep epoxy from hardening, plus syringe dispenses evenly and includes a cap for multiple uses. Directions Prepare your work area: It is recommended to use Gorilla Epoxy in a well-ventilated area. Be sure your work area is protected from spills. Gather your mixing tray and stir sticks so that all your supplies are together. Prepare the surface: To improve adhesion, roughen smooth surfaces before gluing. Then clean and dry all surfaces to be bonded. Prepare Your Work Area and the Surface If you’re using Gorilla Epoxy for the first time, or bonding a new type of material, we always recommend trying a test piece first. Prepare your work area: It is recommended to use Gorilla Epoxy in a well-ventilated area. Be sure your work area is protected from spills. Gather your mixing tray and stir sticks so that all your supplies are together. Prepare the surface: To improve adhesion, roughen smooth surfaces before gluing. Then clean and dry all surfaces to be bonded. Mixing Gorilla Epoxy Remove the black cap from the two syringes. With tip pointing upward, cut or snap the end from tip of the syringes. With the tip still pointing upward, eliminate air and ensure even dispensing by slowly pushing the plunger until both the resin and the hardener are at the tip Push the plunger to dispense even amounts of resin and hardener onto a clean, disposable, contained surface. The package itself can be used as a mixing tray. If you flip the plastic blister shell over, you can use the small well as a starter dish to begin dispensing until both the resin and hardener are flowing equally. Once the flow is even, move to the larger mixing well to dispense your even ratio. Mix the two parts for about 20 seconds, until the mixture is uniform. Apply within 5 minutes.As you mix, you will notice that the epoxy warms up. This is a reaction that occurs as the resin and hardener combine. Application After mixing is complete, apply Gorilla Epoxy within 5 minutes. The epoxy mixture will continue to thicken and the bond strength will decrease the longer you wait to apply. Clamping To reach maximum bond strength, clamp project together and leave undisturbed. Important Cure Times Set: 5 minutes to apply and position Handling: Allow to cure for 30 minutes undisturbed (no weight or handling) Final Cure: Allow 24 hours for load-bearing weight Storage: To close, pull plunger slightly back. Wipe tip clean with dry cloth and align notch on tip and cap. Close tightly. Visit our FAQs for more information on what surfaces Gorilla Epoxy will bond, clean up information and more. FAQ Is Gorilla Epoxy gap filling? Yes. Gorilla Epoxy is gap filling. It will fill voids and bond uneven and vertical surfaces. If filling gaps outdoors, note that Gorilla Epoxy may yellow over time with exposure to sunlight. What is the shelf life? Are there storage tips to extend the shelf life? Shelf life for Gorilla Epoxy is a maximum of two years. The adhesive is not activated until the resin and hardener come in contact with one another, so the shelf life is likely to be much longer if the epoxy tip is wiped clean after each use and the cap is securely replaced. Make sure you notice the notch on the cap and be sure to align that with the notch on the syringe tip. This will further ensure the two parts do not accidentally mix. What is the best application temperature? For best results, apply in room temperature situations. Application in cold temperatures will slow the cure time of Gorilla Epoxy, while application in hot temperatures can speed up the cure time. Gorilla Epoxy’s cured bond withstands temperatures ranging from -23° to 82°C Do I need to use clamps with Gorilla Epoxy? How long? Clamps are recommended for use during setup to ensure the bond sets correctly. Set Time: 5 minutes to mix, apply and position Handling Time: Leave 30 minutes undisturbed (clamping is recommended) Full Cure Time: 24 hours for load-bearing weight How much Gorilla Epoxy do I apply? Gorilla Epoxy is a very strong adhesive. It does not take a lot to get a strong bond. Average coverage from our 25 mL epoxy syringe will cover 100 square inches. What can I use as a mixing tray or stir stick? A mixing tray and stir stick will be included in your Gorilla Epoxy package. Other ideas for mixing trays include aluminum foil trays, cardboard, or paper/plastic plates. Try using popsicle sticks, plastic utensils or straws for mixing. What is Gorilla Epoxy? Gorilla Epoxy is a two-part formula that requires equal parts of resin and hardener mixed together for activation. For best strength results, mix a 1-to-1 ratio of resin and hardener. Once mixed, Gorilla Epoxy is capable of bonding many materials and offers high strength results. How do I remove Gorilla Epoxy? Gorilla Epoxy is a very strong adhesive and is solvent resistant. Removing dried adhesive is difficult to do. Acetone will soften the epoxy; however, full removal will require mechanical means, such as scraping, rubbing, or sanding. Uncured Removal: Skin: Acetone, isopropyl alcohol, 2–3 washings with soap and water. Reminder: Cured glue requires mechanical means, such as rubbing or washing with exfoliating soaps. Hair: Isopropyl alcohol Clothes and Carpet: Isopropyl alcohol. For clothes and carpet, avoid acetone, soap and water, and mineral spirits, as they will not work well on fabric. What surfaces will Gorilla Epoxy bond? Gorilla Epoxy is very versatile. It boasts high-strength results for steel, wood, aluminum, ceramic, tile, glass, most plastics, pressure-treated lumber and much more! What surfaces will Gorilla Epoxy bond? Gorilla Epoxy is water resistant, which means it will resist moderate exposure to water but should not be fully submerged. If you need an adhesive that is 100% waterproof, check out our Original Gorilla Glue®. How do I dispense Gorilla Epoxy? Make sure all surfaces are clean, dry and free of oil. To improve adhesion, roughen up smooth surfaces with sandpaper before gluing. Remove black cap from the middle of the plunger. With tip pointing upward, snap end from the tip of the syringe. Slowly push plunger until resin and hardener are at the tip, then dispense evenly. The package blister can be used as a mixing tray. Mix for at least 20 seconds until the mixture is uniform. Apply to surface within 5 minutes. Clamp surfaces together or leave undisturbed for 30 minutes. To close, pull plunger slightly back. Wipe syringe tip with a clean, dry cloth then snap the black cap on tightly.
$19.89

Overview Tired of unreliable glues that fall apart? Meet our game-changing Epoxy Adhesive, a powerhouse in bonding technology. In just a single 25mL package, this epoxy adhesive promises unparalleled durability and convenience. It dispenses effortlessly, ensuring a precise ratio for maximum strength. With a fast-acting formula that's perfect for bonding a variety of materials, your DIY or repair projects just became hassle-free! Features Automatic Self-Mixing Nozzle No more guesswork! Our self-mixing nozzle automatically dispenses epoxy and hardener in the exact ratio for optimal performance. Fast Setting & Long-Lasting Sets in just 5 minutes. Can be safely handled within 30 minutes. Attains full strength after 16 hours. Versatile Usage Ideal for bonding ceramics, glass, leather, wood, plastic, and metal. Your go-to solution for a myriad of projects. Superior Formulation 50% Epoxy Resin 50% Modified Amine Produces a high-strength bond resistant to temperature fluctuations between -40°C and 80°C. How to Use Preparation Safety First: Always wear protective gloves and safety glasses. Surface Preparation: Ensure the surface is clean, dry, and free from dust, oil, and grease. Application Air Removal: Hold the dispenser, nozzle end up, for 30 seconds to release entrapped air. Cut the tip carefully. Dispensing: Press the plunger slowly to dispense equal parts of resin and hardener. Mixing: Mix thoroughly before applying. Bonding: Apply adhesive to the surface and hold until set. Use tape or clamps if necessary. Post-Application Cleanup: Use acetone for cleaning. Storage: Store in a cool, dry place with the nozzle end up.
$9.95

A very fast setting two part epoxy adhesive. Initial bonding achieved in 90 seconds with maximum bond strength after 16 hours. Features Araldite is stronger than other glues due to the chemical reaction of the two parts Bonds a variety of surfaces Dries Clear Very quick setting in 90 seconds No clamping necessary Moderate water resistance Forms a rigid, durable bond Can be used for gap filling Good chemical resistance Where can this product be used? General small household repairs Fixing gemstones to mounts Repairing metal toys Not suitable for bonding plastics such as Polypropylene and Polyethylene Bond strength weakens above 65°C but strength is regained when temperature drops What materials is this product suitable for? Glass Metal Wood Fabric Most Plastics How to use this product General Use Before applying the Araldite mixture, all surfaces MUST be thoroughly clean and dry. All traces of grease, rust paint, etc. should be removed. For best results smooth surfaces should be roughened by mechanical abrasion after solvent cleaning. Onto a clean, disposable surface (e.g. polyethylene or cardboard), dispense equal volumes of Part A and Part B. Thoroughly mix together with a spatula, nail or stick. When using the tubes it is essential to use the correct mixing ratio, i.e. 1 part each Apply adhesive immediately to both surfaces and press together. Scrape off excess adhesive and wipe mixing utensils immediately. Ensure correct caps are replaced on each tube or they will adhere. Handy tips Note: For information on how to identify plastics refer to the Selleys plastics guide. For maximum working time, mix in small quantities. Large quantities accelerate the curing process and reduce working time. To extend product life replace caps immediately after use. Ensure you wipe excess from nozzle with a tissue dipped in acetone (or nail polish remover) before replacing cap. When using the tube variant, ensure you replace the correct cap on the correct tube. Placing the wrong cap on the wrong tube will cause the tube to harden. (lids and tubes are colour coded to help) Wipe off any uncured Araldite with acetone or nail polish remover. To remove product after cure, mechanical action (scraping or sanding) is recommended. Since the product is chemically resistant solvent will NOT dissolve this product. To reposition the bond once cured, check that the item is heat resistant. If safe, heat the item slowly, e.g. in an oven, to at least 150oC. The product will soften and liquify slightly. Scrape off any excess then reposition the joint carefully using appropriate safety equipment. Allow the item to cool down in the correct position. The product will reharden once returned to room temperature. Clamping recommended for a stronger bond. Singles are great for those unexpected household breakages, so keep a couple at home just in case. Keep a box of Selleys Sugar Soap Wipes around for quick & effective clean up For cleaning surfaces prior to application of adhesive, if the surface is porous, we would recommend using Selleys Liquid Sugar Soap. If the surface is non-porous eg glass or metal, firstly clean the surface with Methylated Spirits. If there is old difficult to remove residue such as cold paint, we recommend using paint stripper such as Selleys Kwik Strip Smart. Ensure the surface is dry before applying the product.
$19.26
Single or dual syringes for precise metering and small-scale bonding or repairs. Mix thoroughly where required and observe pot life. Use filters to refine by chemistry and cure speed. Always consult the product page and TDS/SDS.