
Products that level to a clean, smooth surface with minimal tooling, ideal for visible seams and cosmetic repairs. Use filters to refine by chemistry, viscosity and cure profile. Always review the product page and TDS/SDS.
![Timbermate Woodfiller putty crack filler Interior 2Kg [Jarrah]](http://gluesaustralia.com.au/cdn/shop/files/9315284002000.jpg?v=1754811488&width=645)
Timbermate Wood filler is an Interior grade 4 in 1 Wood Putty, Grain Filler, Edge Filler and Crack Filler. When thinned slightly with water can also be used as a sanding sealer. Timbermate does not shrink, sink, crack or fall out and has an indefinite shelf life. It is non-flammable, non-toxic and can be used to the last gram. The secret ingredient of Timbermate is tap water, therefore, containing no Acrylic, Latex or Solvents. Timbermate comes in 13 premixed colours plus Natural Tint Base. Timbermate takes all types of known stains, varnishes and coatings. The Timbermate formula is over 85 years old and is the only genuine water-based formula in the world proving that the formulation has stood the test of time. Features & Benefits of Timbermate No Waste, Usable to the last drop. If tub dries out just add water to soften. Won't Shrink, Sink, Crack or Fall Out. Suitable for use in all Timbers including Particle Board M.D.F. (Custom Wood) *Plaster Board, Flooring, Panelling etc. Can be used as Wood Putty, Sanding Sealer, Prime Coat, Grainfiller, Crackfiller, Undercoat & Edge Filler all in one. Available in 13 Timber Tones plus Natural. Use White for top coats only. Can be tinted in wet state or overstained when dry. Use any type of Colorant i.e. Water Based Spirit based ochers etc. Easy sanding, will not clog paper when DRY Sanded dust can be mixed with water for re-use. Fast drying approx. 20-30 min, but can be heat dried with a heat gun or lamp for faster drying. Temperature can affect drying time. Clean hands or tools with water. Non-Flammable, Non-Toxic, Non-Yellowing. Solvent, Latex and Acrylic Free. Heat Proof and Freezeproof. Provides a strong foundation for all top coats inc. Single & two pack products polyurethane's, oils, acrylics, french polish wax etc. Takes nails, screws, planing, sawing, drilling and routing Can be used on Metal, Plastic, Fibreglass and in Foundries. 100% Australian Made and Owned. Available in pack sizes of 250g, 500g, 2Kg, 8Kg, 20Kg and 200Kg. Interior Grade. Edgefiller Apply TIMBERMATE with a spatula or knife using hand pressure to force into the Edge or End of the grain. For spray gun use stir 10%-15% water into TIMBERMATE fit a 2mm mozzle and set pressure to 60psi. Boards can be stacked for easy spraying. Allow to dry and sand with a fine grit paper and apply topcoat. Woodfiller/Wood Putty Fills cracks, knots, pin and screw holes, splits, blemishes, etc. Fill deep holes in layers allowing time for each layer to dry. Will not blind natural wood grain. Drying time is about 30 minutes. TIMBERMATE dries hard and smooth without shrinking or sinking and can be belt or drum sanded as it is not affected by heat, the hotter it gets the harder and faster it sets and that means less "Down Time." You can speed dry TIMBERMATE by adjusting the surrounding air temperature. This can be done by using either hot air, heat lamps, or kiln ovens.TIMBERMATE can be mixed with any stains before or after the filler is dry. To match medium and darker shades mix with Natural, Pine or other light shades. Use white TIMBERMATE only for white top coats. Grainfiller Mix 10% to 15% water into TIMBERMATE to make a perfect Grainfiller, Sanding Sealer and Prime Coat all in one application. First sand surface and with fine grit sandpaper, then apply Grainfiller to surface with a spray gun, paint roller, hessian or a cloth rolled into a ball, rub across the grain in a circular motion finishing with the grain. Sand, once filler is dry, to perfection with either sandpaper or power sander, using a fine grit paper. Grain filer can be used in a Roller or Curtain Coater or Spray Gun using a 2mm nozzle and 60psi pressure. Can be further thinned down with water if required. MDF Due to the finishing system used to manufacture MDF, it is essential to seal the job with a water-based non-acrylic product before applying top coats. Therefore TIMBERMATE meets your needs. Flooring Preparing old floors: Scrape all dust and waste between boards and surface as well as from knot holes and nail heads, vacuum well and carry out first sanding to prepare for filling and coating. Ensure that floor is stabilised, dry and free of movement. Application new floors and prepared old floors: Fill cracks, knot and nail holes and all blemished with a putty knife. Fill deeper holes in layers of about 6mm allowing each fill to dry. Apply TIMBERMATE to the entire floor, as a sealant, using a squeegee, trowel or paint roller. Allow to dry and sand off with a fine paper - 120 to 150 grit is recommended for best results. The floor can now be stained or varnished. Frequently Asked Questions Question: Is TIMBERMATE toxic, flammable or harmful? Answer: It is advisable to carry out safe work practices, as you would when working with dust. (Use an approved dust mask and safety goggles). TIMBERMATE contains no harmful ingredients and is non-flammable. Question: Can TIMBERMATE be used externally? Answer: No, as TIMBERMATE® is resoluble in water it is not advisable to use it outdoors. TIMBERMATE IS RECOMMENDED FOR INTERIOR USE. For external use, we recommend Earls MulTFill, Powder Putty or Porion Flexible Filler. Question: Can TIMBERMATE be used with stains and other finishes? Answer: Yes, TIMBERMATE® will take all types of known stains, coatings and colourants which can be Water based, Oil based, Solvent or Spirit based and even Acid Catalysed Lacquers. Question: Can TIMBERMATE be grainfilled? Answer: Yes, TIMBERMATE is a non-solvent based filler and is ideal for grainfilling. Mix 10-15% hot water to thin the Timbermate, then rub over the grain or spread thinly (see below for more detailed instructions). TIMBERMATE will: *Not raise the grain *Not damage the grain TIMBERMATE is: *Easy to sand when dry *Easy to stain when dry *Heat proof so you can speed the drying time by heating with a hair dryer, heat gun, lights etc. Question: How is the grainfiller applied? Answer: Take some TIMBERMATE out of the tub and place it in a separate container. Add approximately 10-15% water, (1gm=1ml) and mix into a slurry like paste (like toothpaste). Use a LINT FREE CLOTH AND RUB ACROSS THE GRAIN. When grainfiller goes "whitish" and sands off easily like talc powder, it is dry. TIMBERMATE will not blind the sandpaper (ie. clog up). If sandpaper gets clogged the grainfiller is not dry. Sand off in the same direction as the grain. Stain or coat when dry. Question: When is the stain applied? Answer: You can stain before or after applying TIMBERMATE (see "How do I match colours"). Question: How are the colours matched? Answer: Colour matching is easy. You can do it either of the following ways: Add your colourant to the putty and match the exact colour whilst wet. TIMBERMATE will dry lighter, but coat back to its original wet colour once coated with clear finishes. The final result is what you see (wet) is what you get. You can stain TIMBERMATE once it is dry. To test if dry, just rub sandpaper over putty. If putty clogs the sandpaper the filler is still wet. Wait for TIMBERMATE to dry and then stain. Question: How long does TIMBERMATE take to dry? Answer: Depending on the weather and depth of fill, TIMBERMATE will dry as follows: In hot weather, TIMBERMATE dries quicker. In cold weather, the depth of fill will determine the drying time. You can speed up the drying time by using a heat gun, hair dryer or light. Question: What depth or width can be filled? Answer: Do not fill holes deeper than 6-8mm at a time. TIMBERMATE dries quicker when filled in layers. Allow TIMBERMATE to dry between layers. Question: Why is the tub hard some days and feels dry and soft on other days? Answer: TIMBERMATE is waterbased. It contains no harmful solvents or acrylics and is, therefore, temperature sensitive. The warmer the weather or environment the softer the putty. On hot days it will start to dry in the tub if not properly sealed. Add a few drops of water to re moisten. Question: How is TIMBERMATE softened? Answer: Add a few drops of warm water to the top of the tub. It will soften quite quickly. If tub is frozen, thaw out by standing tub in a tub of hot water or place in a microwave for 20 seconds. TIMBERMATE is freeze thaw stable. Question: Can TIMBERMATE be used for any other purpose other than wood repair? Answer: TIMBERMATE does not shrink, sink, crack or fallout and can, therefore, be used on Plasterboard, Masonry, Fibreglass, Plastic and any other surface. Bearing in mind that steel must be coated with a primer to avoid rusting. Question: Can TIMBERMATE go off or does it have a shelf life? Answer: TIMBERMATE has an unlimited shelf life and will last indefinitely. If contents become dry merely add a few drops of water to reconstitute. DO NOT add more water than is necessary or leave excess water in the tub for a long period of time. The trapped excess water in the tub will cause the putty to become contaminated and will start to degenerate. Question: Why are so many colours available? Answer: We manufacture 13 colours to match almost all shades and types of timber. If you are using a clear coat you must match your putty colour. If staining, use Natural (tinting base). Question: What is Tint Base (Natural) putty and why? Answer: Tint Base (Natural putty) is putty in its natural state uncoloured. You may add the lightest shade of tint to change its colour. Question: Can TIMBERMATE be used on floors? Answer: TIMBERMATE is ideal for filling cracks, gaps, and nail holes in floors. TIMBERMATE will enhance the grain on the floor. As it does not shrink, sink, crack or fall out it is highly recommended for all floors. Question: Can TIMBERMATE be used with French Polish and Waxes? Answer: You can use all types of Waxes, Shellac and Oils on TIMBERMATE. Question: How is an incorrect match or badly filled hole fixed? Answer: Errors can be fixed with ease. If TIMBERMATE is not coated then wash out. If already coated, then break the top coat and then wash out. Refill or rematch if necessary. Question: Is TIMBERMATE Australian owned and manufactured? Answer: Yes. TIMBERMATE is 100% Australian owned and manufactured. An all Australian dedicated workforce does all manufacturing in our Melbourne factory.
$10.29 - $239.00

Earl’s MulTfill is a premium, ready-to-use multi-purpose filler designed for fast, clean, and durable repairs across interior and exterior projects. The heavy-bodied formula spreads smoothly, levels cleanly, and dries hard without shrinking, sinking, cracking, or falling out. With zero VOCs and no acrylics, latex, or solvents, it’s a low-odour choice for homes, workshops, and job sites. Clean-up is simple with water, and once dry MulTfill sands easily to a fine, paint-ready surface. Why you’ll love it Ready from the tub: no mixing, no mess, no wastage — just open, apply, and close. Zero VOCs: stable, low odour and user-friendly. Non-sinking, non-shrinking: fills stay flush and true. Won’t fall out: dries hard for lasting repairs. Paintable finish: accepts most coatings for a seamless result. Sands like a dream: refined finish without clogging when sanded dry. Long shelf life: keep the lid sealed and it’s ready when you are. Where it works Use MulTfill on common building materials including wood (including weathered and damaged sections once sound), masonry, plasterboard, cement sheet, concrete, and primed metal. It’s ideal for nail holes, dents, shallow voids, corner repairs, skim touch-ups, and general surface preparation before painting. Colour options White, Teak (Cypress), Ebony, Grey, Jarrah, Merbau, Walnut. How to use Prep: Ensure the area is clean, dry, and sound. Remove loose material and dust. For best glide, lightly wet your putty knife. Apply: Press firmly to fill the defect and smooth off. For deep voids, apply in layers up to 6 mm per pass, allowing each layer to dry before the next. Sand: Once fully dry, sand with 120 grit or finer to achieve a smooth, level surface. Coat: Prime if required, then paint. For clear finishes, tint the filler with suitable colorants or oxides before application to harmonise with surrounding material. Cleanup & care: Clean tools with water. If product thickens in the tub, add a few drops of clean water and stir until smooth. Always reseal promptly. Pro tips Feather edges wide when blending across boards or wall patches. On exterior jobs, protect from rain during cure and overcoat appropriately for exposure. Tinting before clear coats helps the repair visually disappear on timber substrates. Specifications Brand Earl’s Product Type Multi-purpose paintable putty / filler (water-based) Use Interior and exterior VOC Zero VOC Contains No acrylic, latex, or solvents Substrates Wood, masonry, plasterboard, cement sheet, concrete, primed metal Application Thickness Up to 6 mm per layer; allow to dry between layers Sanding Dry sand; 120 grit or finer Overcoating Accepts most paints; for clear coats, tint filler first for best colour match Clean-up Water Colours White; Teak (Cypress), Ebony, Grey, Jarrah, Merbau, Walnut Pack Sizes 140 g, 600 g, 1 kg, 2 kg, 3 kg (varies by colour) Shelf Life Up to 5 years if sealed and stored correctly Country of Origin Australia Storage Keep container tightly closed when not in use. Store in a cool, dry place out of direct sun. Avoid prolonged freezing. If product thickens, add a few drops of water and mix to restore spreadability. What’s in the tub A smooth-spreading, heavy-bodied filler that levels cleanly, sands easily, and delivers a paint-ready finish across interior and exterior surfaces — with no mixing, no fuss, and no strong odour.
$8.70 - $54.81
![Selleys No More Gaps Multipurpose Sealant Filler 150g [White]](http://gluesaustralia.com.au/cdn/shop/files/87cc1e989ee946138f896f38cf05e9d4.jpg?v=1757753073&width=645)
Selleys No More Gaps Multipurpose gap filler delivers a smooth finish and because of its superior flexibility and low shrinkage, those unsightly gaps and cracks won’t re-appear. Features Superior flexibility to cope with building movement, meaning the cracks and gaps will be hidden for longer. Has greater than 300% elongation/stretch and up to +/- 15% movement capability. Superior adhesion to a broad range of surfaces, resulting in a lasting finish. A smooth flawless finish and minimal shrinkage. Can be painted over with both water and oil based paints, after the surface has skinned (approximately 30 minutes* after application). Is formulated for long term resistance to cracking and crumbling. Easy water clean-up Will not stain building materials. Has good resistance to weathering. Low toxic, low odour, low VOC, less harmful to the environment Where can this product be used? Between window and door frames and the wall Along skirting boards Around cornices Between benchtops and tiles which are not exposed to water In corners or between walls and ceilings Between cabinets and cupboards Around air conditioning vents and the ceiling Where shrinkage or movement has caused rigid fillers to crack Gaps with the maximum width of 25mm and depth of 12mm What materials is this product suitable for? Timber Brick & Concrete Plasterboard, particleboard & fibre cement sheeting Masonry Ceramic Tiles Glass Aluminium Paint Many other building materials
$10.03
![Selleys Wet Area Silicone Sealant Kitchen Bathroom & Laundry 300g [Clear]](http://gluesaustralia.com.au/cdn/shop/files/add6c9293f9448a0b56570405080097d.jpg?v=1757756088&width=645)

High-Grade Neutral Cure Silicone A high-grade neutral (non-corrosive) cure silicone formulated for superior adhesion to cement (e.g., grout). The product also contains a fungicidal protector for excellent mould and fungal resistance. Features Superior adhesion to mortar, grout, and metals. As the product does not lift at the edges and adheres so well to cement and grout, dirt, mould, and fungus will not become trapped, preventing unsightly black mould spots. Superior silicone formulation forms a durable seal that locks out water and does not shrink when drying. Built-in fungicide to inhibit the growth of mould. Available in a range of colours to suit most wet areas. Non-corrosive neutral cure formula. Low odour, so can be used in any environment without discomfort. Easy to clean once applied, as it resists moisture, hot cooking oils, and steam. Superior flexibility with +/- 25% movement capability and up to 400% elongation or stretch. Temperature resistance: approximately -60°C to +150°C. 25-year guarantee – when used as directed, i.e., for private use and within 12 months of purchase, the product is guaranteed against crumbling, cracking, or drying. Where can this product be used? Showers and sinks Metal, copper, and brass fittings Perfect for use on or around: Showers Baths Spas Sinks Plumbing Fixtures Can not be painted over. Not suitable for building materials that bleed oils or solvents, such as impregnated wood. Not for use on polyethylene, polypropylene, or Teflon. Pre-test plastics before use. What materials is this product suitable for? Ceramic, glazed & porcelain fixtures Metal, copper, and brass fittings Plastic laminates Rubber Glass Stainless steel Concrete and grouts Many plastics including polystyrene How to use this product Thoroughly clean and dry the surface from oil, dirt, and grease with Mineral Turpentine first and then Methylated Spirits. Allow to dry completely before applying silicone. If there is old silicone that needs to be removed, we recommend using SELLEYS SILICONE REMOVER. This ingenious product makes removing old silicone easy. We also recommend sanding the surface back with a good quality sanding block, such as a ROTA COTA Sanding Block Medium/Course Grain, as the silicone will adhere more readily to a scratched-up surface. Ensure you tape both sides of the gap before applying the product. This ensures a neat finish and makes it easier to clean up. Cut the seal at the top of the cartridge and cut the nozzle at a 45° angle, to the size of the gap opening. Fit the nozzle to the top of the cartridge. Insert the cartridge into a caulking gun such as the SELLEYS LIGHT SPEED Caulking Gun. We recommend this caulking gun, as its new innovative pressure release design reduces the mess from run-on and stress on your hands, which is critical if you are doing a lot of sealing. Hold the caulking gun at a 45° angle. Press the nozzle opening against the joint, apply steady pressure to the caulking gun, and extrude the silicone sealant. Move in a pushing motion along the joint in one smooth action. For a smooth finish, smooth with a finger dipped in mineral turpentine or, for a professional finish, use a paint scraper such as a 50mm ROTA COTA Soft Grip Scraper dipped in mineral turpentine. Excess sealant must be cleaned up before it skins in 5-10 minutes. Wipe excess away with a cloth dampened in mineral turpentine or use a SELLEYS Hand Kleen Wipe. Remove tape before the sealant skins. Clean tools immediately with mineral turpentine. Avoid smearing on surrounding surfaces. The sealant will cure fully in 72 hours. At this point, any unwanted sealant can be removed by trimming with a sharp blade, but avoid undercutting the seal. Handy Tips Ensure you tape both sides of the gap before applying the product for a neat finish and easy cleanup. When first applying, extrude a small amount onto a piece of scrap material to ensure a smooth continuous flow of silicone sealant. Remove the tape before the silicone sealant skins. For a better finish, complete painting prior to using the sealant as it cannot be painted over. Use a spatula dipped in mineral turpentine or detergent and water to tool off the sealant for a better finish. Work in sections that can be completed before the sealant skins. Tooling off and tape removal must be completed before skinning occurs for a better finish. Keep a pack of SELLEYS Hand Kleen Wipes handy to wipe up spills and clean any material off the skin before it cures. Safety Tips Uncured product may irritate eyes. If in eyes, flood the eyes for at least 15 minutes and seek medical advice. Avoid contact with skin. If contact occurs, wipe off immediately and wash with detergent. It may irritate sensitive skin. Avoid breathing in vapours. Ensure you use a well-ventilated area as the product releases methyl ethyl ketoxime while curing. For advice, contact a Poisons Information Centre (AUS 131 126; NZ 0800 764 766) or a doctor. For further detail on the safe use of this product, please refer to the Material Safety Data Sheet, which can be downloaded from this site. Keep away from children. Storage and Re-Use Store in cool dry conditions, below 30°C. The sealant should be used within 6 months after opening. After use, keep the nozzle on the cartridge. Silicone is a reactive product and cures once exposed to humidity. For longer storage periods, leave the nozzle on and place plasticene or Blu Tack over the end of the nozzle. Tightly tape a piece of aluminium foil over the whole nozzle to exclude any air. When re-using, simply remove the foil and plug from the old nozzle, pull out the excess silicone, and re-pierce the tip of the cartridge. If cure has occurred inside the cartridge, the product is no longer usable and should be discarded.
$0.00 - $20.16
![Sikasil Pool Neutral-Cure Silicone Sealant 300 ml [White]](http://gluesaustralia.com.au/cdn/shop/files/Sikasil_pool_white.webp?v=1760227901&width=645)
Sikasil® Pool Neutral-Cure Silicone Sealant – 300 ml Cartridge Designed for use in demanding aquatic environments, Sikasil® Pool is a one-part, neutral-curing silicone sealant formulated specifically for swimming pools, wet areas, and permanently submerged joints. With exceptional resistance to chlorinated water, high elasticity, and outstanding fungal resistance, this sealant delivers durable, long-lasting performance. Key Features Excellent resistance to chlorinated water and common pool chemicals Movement accommodation of ± 25 % Neutral cure — non-corrosive, safe on most metals and tile systems High elasticity and recovery Very good resistance to fungal attack Suitable for interior and exterior applications Typical Applications Underwater joints in swimming pools Wet areas, such as spas, splash zones, and shower recesses Sealing between tiles, concrete, glass, and metal substrates Technical Highlights Service temperature range: –40 °C to +80 °C Shore A hardness (28 days): ~20 Elastic recovery: > 90% Typical curing speed: ~2 mm per 24 h Skinning time: ~5 minutes (23 °C / 50% RH) Available in White, Grey, and Transparent shades Shelf life: 15 months (when stored unopened between 5 °C and 25 °C) Usage & Application Tips Ensure surfaces are clean, dry, and free from contaminants (oil, dust, grease). Roughen smooth, non-porous surfaces (e.g. metal, glazed tile) before application. Use appropriate primers (e.g. Sika Aktivator-205, Primer-3 N) on metals, PVC, or porous substrates as recommended. Apply a closed-cell foam backing rod to control joint depth. Insert sealant by cartridge gun, avoiding air entrapment. Tool the bead within the skin formation time. Allow full cure (minimum 7 days) before filling pool with water. Limitations & Precautions This product is not suitable for: Joints in direct contact with potable food or drink Overpainting Use on substrates that leach oils, plasticisers or solvents (e.g. bitumen, EPDM rubber) Always consult the current Product Data Sheet (PDS) and Safety Data Sheet (SDS) for full technical, safety, and application details before use.
$29.76 $0.10/ml

Weldbond Universal Adhesive can be used in various applications as a glue, bonding agent, sealer or primer. It’s high solid content means that it can be easily diluted and therefore becomes a very economical alternative to traditional products used for specific applications. Same formula & product you trust, just better looking! Weldbond is a universal adhesive that bonds almost anything! It is non-toxic, non-flammable. Weldbond will dry clear and flexible and is therefore ideal for use with woods and fabrics as no glue lines will show and the glue will bend with movement. It is non-staining and will not become brittle with age. It is non-toxic, non-flammable & Solvent free 3-4 times stronger than standard P.V. High Solid content (51-53%) means more glue and it goes a lot further Does everything a P.V.A does, plus more Dries to a clear, flexible bond and can be used as a sealer, bonding agent or primer.
$103.00


Agnews Water Putty - Hard-Setting Filler for Wood, Plasterboard, Concrete & More Agnews Water Putty is a professional, powder-based repair and levelling compound for durable, long-lasting results. Mix only what you need with clean water, then patch, level or rebuild surfaces with confidence. Once cured, it sets rock hard, bonds permanently, and can be sawn, drilled and sanded to a smooth, paint-ready finish. Key features Brand: Agnews Unlimited shelf life when stored dry Non cracking, non shrinking, non sinking Won't fall out – adheres firmly and fills to any depth Interior & exterior grade (seal exterior applications after full dry) Non flammable and no VOCs Mix what you need for minimal waste Suitable substrates Plasterboard, concrete, wood/timber, cement sheet, masonry. Also suitable for minor floor levelling and feathering on concrete, timber and ceramic tile substrates. Typical applications Fill holes in wood: knotholes, nail and screw holes, dents, edge build-ups Wall patching: cracks and cavities in plasterboard and cement sheet Furniture repair: tighten loose joints, reset fasteners, rebuild profiles Floor levelling: ramp or smooth minor level variations before floor coverings Trim and fixtures: refit loose door bumpers and trims with reliable hold Architectural & hobby moulding: casting and shaping durable components Why choose Agnews Agnews Water Putty cures to a dense, stone-hard finish that resists shrinkage and cracking even in deep fills. It bonds securely, stays put, and finishes cleanly, delivering a stable base for sanding, priming and painting. From small touch-ups to larger restorations, it provides consistent, professional results. Directions (general guide) Surface prep: Ensure the area is clean, dry, sound and free of dust, oil or loose material. For very porous substrates, lightly dampen to reduce rapid suction. Mix: Add powder to clean water and blend to a smooth, lump-free paste. Adjust water to suit application (thicker for filling, looser for fairing/skim). Apply: Press firmly into cracks or voids with a putty knife or trowel. Overfill slightly so you can sand back flush. Cure: Allow to dry thoroughly. Dry time varies with thickness, temperature and humidity. Finish: Sand to profile. Prime and paint or seal. For exterior applications, always seal after full dry. Exterior use guidance This is a hard-setting, non-flexible compound. For exterior use, only apply over stable substrates with minimal expansion and contraction from temperature changes. Ensure the putty is fully dry before sealing with a suitable exterior-grade coating. Finishing & compatibility Paintable and sealable after full dry; prime as required for best results. Can be cut, carved, drilled and sanded after cure without crumbling. For stained timber finishes, test a small area first for colour and absorption. Pro tips Mix small batches and use promptly. For deep voids, apply in layers if needed, allowing each layer to firm before the next. Store powder in a cool, dry place to maintain its unlimited shelf life. Clean tools with water before material cures. At a glance Substrates: plasterboard, concrete, wood/timber, cement sheet, masonry Uses: patching, levelling, rebuilding, moulding Properties: non cracking, non shrinking, non sinking, non flammable, no VOCs Finish: hard, dense, smooth and paint-ready after sanding/priming
$8.77 - $86.00


Dunlop Ready-to-Go Coloured Grout is a premium, pre-mixed grout for fast, clean results on walls and floors. No mixing, no mess, just open, apply, and buff for a smooth, long-lasting finish. The formula includes Grout Shield for anti-mould and anti-bacterial protection to help surfaces stay cleaner for longer. Suitable for interior and exterior applications, and available in a wide colour range to match or contrast your tiles. Ready-mixed convenience, apply straight from the tub Contains Grout Shield for mould and bacteria resistance Use on walls & floors, indoors & outdoors* Ideal for joint widths from 1–5 mm Great for rejuvenating old grout (min. removal depth: 1 mm walls, 2 mm floors) *Always follow the data sheet guidance for your specific area and exposure. Where to Use Ceramic, porcelain and most glazed tiles Bathrooms, kitchens, splashbacks, laundries, living areas Light-duty exterior tiled areas (check exposure & substrate) This grout is designed for typical domestic and light commercial tiling where a smooth, uniform finish is desired. Colours & Finish Available in a contemporary colour palette (e.g. whites and greys) to complement most tile styles. Use Dunlop’s colour selector to visualise combinations before you start. Coverage Coverage varies by tile size, joint width and depth. As a guide (per kg) of grout: Tile size (L×W×Thickness) Joint width 1.5 mm Joint width 3 mm Joint width 5 mm 25×25×4 mm mosaics ≈1.04 m²/kg ≈0.52 m²/kg ≈0.31 m²/kg 100×100×8 mm ≈2.08 m²/kg ≈1.04 m²/kg ≈0.63 m²/kg 200×200×8 mm ≈4.17 m²/kg ≈2.08 m²/kg ≈1.25 m²/kg Tip: Allow an extra 10–15% for wastage due to technique, tile type and site conditions. Directions (Summary) Prep: Ensure joints are clean, dry, and free from dust, adhesive residue and contaminants. For rejuvenation, remove at least 1 mm (walls) or 2 mm (floors) of old grout. Apply: Using a rubber grout float, force grout firmly into joints at a 45° angle. Strike & shape: Allow grout to firm in the joint (~15 mins). Shape joints as required. Clean: Wipe diagonally with a dense, damp sponge, rinsing frequently. Use minimal water to reduce shade variation and shrinkage. Buff: When touch-dry (typically 6–24 hrs), buff tile faces with a clean, dry cloth. Drying & Use Initial set at ~24 hrs at 23 °C / 50% RH Shower walls can be exposed to water after ~24 hrs Clean-Up & Storage Clean tools and residue with water while the grout is still wet. Reseal the tub between uses to prevent skinning. Store upright in a cool, dry place. Safety Read the Safety Data Sheet before use and follow PPE guidance. Avoid contact with eyes and prolonged skin contact. Keep out of reach of children.
$20.18 $0.03/g
![Selleys No More Gaps Coloured Caulk Sealant 450g [Brilliant White]](http://gluesaustralia.com.au/cdn/shop/files/c306de337e4245d585ba9870c44c5c2b.jpg?v=1757756191&width=645)

No More Gaps Coloured Gaps No More Gaps Coloured Gaps offers a long-lasting, colour-matched finish, suitable for both interior and exterior use. It comes in a wide range of colours, with no need to paint over (although it is paintable if required). It provides superior flexibility to cope with building movement, hiding cracks and gaps longer, with greater than 350% elongation/stretch and up to +/- 20% movement capability. Key Features Long-lasting, colour-matched finish Suitable for Interior & Exterior use Available in a great colour range, with no need to paint over (Paintable if required) Superior flexibility to cope with building movement, hiding cracks and gaps longer Greater than 350% elongation/stretch and up to +/- 20% movement capability Good resistance to weathering Superior adhesion to a broad range of surfaces, resulting in a lasting finish Mould and mildew resistant Where can this product be used? Between window and door frames and the wall Along skirting boards Around cornices Between benchtops and tiles (not exposed to water) In corners or between walls and ceilings Between cabinets and cupboards Around air conditioning vents and the ceiling Where shrinkage or movement has caused rigid fillers to crack Gaps with the maximum width of 25mm and depth of 12mm What materials is this product suitable for? Timber Brick & Concrete Plasterboard, particleboard & fibre cement sheeting Masonry Ceramic Tiles Glass Aluminium Bare or painted surfaces Colorbond Many other building materials How to Use Ensure the surface is clean, dry, and free from dust, grease, flaking/powdery paint, and old or crumbling caulk. Cut the seal and nozzle, fit it to the top of the cartridge, and insert the cartridge into a caulking gun such as Selleys Light Speed Caulking Gun. Hold the caulking gun at a 45° angle and apply, forcing the product into the gap. Smooth with a wet finger or spatula. Clean up excess with a damp cloth immediately and clean hands and tools with water. Allow surface to skin thoroughly prior to painting with water-based paints. If using oil-based paints or for large gaps, allow the sealant to set for about 24 hours and ensure the product is completely cured. Avoid water contact until fully cured – 72 hours or longer in cold weather. Limitations Not recommended for foot traffic areas, gaps between tongue and groove boards, or weatherboard overlaps. Use Selleys No More Gaps Timber Flooring Flexible Gap Filler for gaps between tongue and groove boards, and Selleys No More Gaps Exterior & Weatherboard Gap Filler for weatherboard overlaps. Not suitable for areas in prolonged contact with water (e.g., showers, pools, & spas). Use Selleys Silicone Sealant for significant joint movement or areas of frequent water immersion. Do not apply or store below 5°C. Handy Tips Ensure you tape both sides of the gap before applying the product for a neat finish and easier cleanup. When first applying, extrude a small amount onto scrap material to ensure smooth, continuous flow of gap filler. If wiping off excess with a wet finger, wet it with water (not saliva) to avoid bacteria that can promote mould growth. Allow surfaces to skin before painting, approximately 30 minutes. Protect from rain until the surface is firmly skinned. Some water-based undercoats and flat paints may crack when drying. To reduce this, allow the product to cure for 24 hours in small gaps or 48 hours in larger gaps before painting. Keep a pack of Selleys Sugar Soap Wipes handy for easy cleanup. Clean Up Water-based, so clean up with water. Uncured product may be removed with water. Cured product can be removed by sanding and scraping. Size 450g Cartridge Colours Black Brilliant White Brown Cedar Charcoal Coffee Cream Ivory Light Grey Technology Water-Based Use Interior & Exterior
$0.00 - $19.38

A strong and durable, fast setting two part epoxy adhesive that dries crystal clear making it ideal for areas where an invisible bond is required. Mixed product gels in 5 minutes. Initial bonding is achieved in 20 minutes with maximum bond strength after 16 hours. Weather and yellowing resistant. Shock resistant. Features: -Araldite is stronger than other glues due to the chemical reaction of the two parts. -Bonds a variety of surfaces -Dries Crystal Clear so there’s no visible evidence of repair -Quick setting in 5 minutes -No clamping necessary -High water resistance -Forms a rigid, durable bond -Can be used for gap filling (Surfaces need not mate closely) -Good chemical resistance -Heat Resistant -Doesn’t yellow over time so is ideal for use on glassware Appearance: Crystal Clear Where can this product be used? -Fixing a broken glass vase -Repairing jewellery -Toy repairs -Fixing ornaments or crockery -Fixing your handbag strap -Not suitable for bonding plastics such as Polypropylene and Polyethylene or for use on polystyrene What materials is this product suitable for? -Glass -Metal -Wood -Fabric -Rigid Plastic -Crystal -Leather How to use this product: -Before applying the Araldite mixture, all surfaces MUST be thoroughly clean and dry. -All traces of grease, rust paint, etc. should be removed. -For best results, smooth surfaces should be roughened by mechanical abrasion after solvent cleaning. -Onto a clean, disposable surface (e.g. polyethylene or cardboard), dispense equal volumes of Part A and Part B. Thoroughly mix together with a spatula, nail or stick. When using the tubes it is essential to use the correct mixing ratio, i.e. 1 part each -Apply adhesive immediately to both surfaces and press together. Clamping is not necessary, but allow the bond to remain undisturbed for at least 20 minutes. Scrape off excess adhesive and wipe mixing utensils immediately. -When using tube kit, ensure correct caps are replaced on each tube or they will adhere. Handy tips: -A useful solvent to clean up epoxy and polyester resins BEFORE they are cured can be prepared by mixing 2 parts toluene with 1 part alcohol (eg methylated spirits or denatured alcohol). -Clamping is recommended for a stronger bond. -For a maximum working time, mix in small quantities. Large quantities accelerate the curing process and reduce working time. -To extend product life replace caps immediately after use. -When using the tube variant, ensure you replace the correct cap on the correct tube. Placing the wrong cap on the wrong tube will cause the tube to harden. (lids and tubes are colour coded to help) -Wipe off any uncured Araldite with acetone or nail polish remover. -To remove product after cure, mechanical action (scraping or sanding) is recommended. Since the product is chemically resistant solvent will NOT dissolve this product. -To reposition the bond once cured, check that the item is heat resistant. If safe, heat the item slowly, e.g. in an oven, to at least 150oC. The product will soften and liquify slightly. -Scrape off any excess then reposition the joint carefully using appropriate safety equipment. Allow the item to cool down in the correct position. The product will reharden once returned to room temperature. -Keep a box of Selleys Sugar Soap Wipes around for quick & effective cleanup -For cleaning surfaces prior to application of adhesive, if the surface is porous, we would recommend using Selleys Liquid Sugar Soap. If the surface is non-porous eg glass or metal, firstly clean the surface with Methylated Spirits. If there is old difficult to remove residue such as old paint, we recommend using paint stripper such as Selleys Kwik Strip Smart. Safety tips: -Avoid contact with the skin and eyes. -Avoid breathing vapour. -Do not use solvents near eyes or open wounds. -In case of contact with eyes, flush with water for at least 15 minutes and seek medical attention. -Non-toxic when set. Storage and re-use: Ensure caps or lids are replaced and product stored in a cool dry place.
$21.85
![Selleys No More Gaps Multipurpose Sealant Filler 475g [White]](http://gluesaustralia.com.au/cdn/shop/files/62810ec4c8d842009839ace74d1cac64.png?v=1757753067&width=645)
Selleys No More Gaps Multipurpose gap filler delivers a smooth finish and because of its superior flexibility and low shrinkage, those unsightly gaps and cracks won’t re-appear. Features Superior flexibility to cope with building movement, meaning the cracks and gaps will be hidden for longer. Has greater than 300% elongation/stretch and up to +/- 15% movement capability. Superior adhesion to a broad range of surfaces, resulting in a lasting finish. A smooth flawless finish and minimal shrinkage. Can be painted over with both water and oil based paints, after the surface has skinned (approximately 30 minutes* after application). Is formulated for long term resistance to cracking and crumbling. Easy water clean-up Will not stain building materials. Has good resistance to weathering. Low toxic, low odour, low VOC, less harmful to the environment Where can this product be used? Between window and door frames and the wall Along skirting boards Around cornices Between benchtops and tiles which are not exposed to water In corners or between walls and ceilings Between cabinets and cupboards Around air conditioning vents and the ceiling Where shrinkage or movement has caused rigid fillers to crack Gaps with the maximum width of 25mm and depth of 12mm What materials is this product suitable for? Timber Brick & Concrete Plasterboard, particleboard & fibre cement sheeting Masonry Ceramic Tiles Glass Aluminium Paint Many other building materials
$6.66

Polyfilla F20 Gap Filler: The Ultimate Gap Solution for High-Stress Applications Features Highly Durable High Flexibility Smooth Finish +/- 20% Joint Movement Capability Product Description Polyfilla F20 Gap Filler has been specially formulated to offer superior flexibility in high-stress interior and exterior applications. With up to +/- 20% joint movement capability, this gap filler is ideal for filling gaps around cornices, wall joints, skirting boards, as well as window and door frames. Application This product is extremely easy to use. Simply ensure the area is clean and dry, apply the filler, and allow it to dry. It adheres well to multiple surfaces and offers long-lasting results. Use Cases Cornices Wall Joints Skirting Boards Window & Door Frames
$8.69


Loctite Extreme Glue No Drip Gel contains a revolutionary Flextec formulation that fuses multiple materials together for a long-lasting bond. When a project or repair requires an adhesive with a higher viscosity and advanced resistance to extreme conditions, this liquid gel is your new go-to. This versatile, gap-filling glue seals and repairs nearly any surface, and it’s perfect for harsh conditions where constant flexing is a problem. Loctite Extreme Glue No Drip Gel dries clear and minimizes dripping for a clean, professional finish on any household project. It’s even dishwasher safe! Plus, our glue is durable enough to use outdoors because it cures quickly and is resistant to vibration, impact, moisture, UV exposure, and extreme temperatures. No Drip Gel is great for vertical applications Withstands vibration, impact, moisture, and UV light Strong and durable for long-lasting results Use as an indoor or outdoor glue Crystal-clear formula for a clean, professional look Water-resistant and temperature-resistant from -58° to 248° F Gap-filling gel for imperfect-fitting surfaces Flexible bond and precise grip
$11.86

A two-part epoxy adhesive that bonds with maximum strength. Mixed product gels in 2 hours. Initial bonding is achieved in 6–8 hours, with maximum bond strength after 3 days. Features Stronger than other glues due to the chemical reaction of the two parts Bonds a variety of surfaces Dries clear Very strong and durable bonding High water resistance (suitable for tiles around pools, but not below the water line for that use Selleys Knead It Aqua) Forms a rigid, durable bond Can be used for gap filling (surfaces need not mate closely) Good chemical resistance Heat resistant Clamping recommended for stronger bond Not suitable for bonding plastics such as Polypropylene and Polyethylene Bond strength weakens above 80°C but is regained when temperature drops Appearance Translucent Where Can This Product Be Used? Load-bearing repairs Gluing the head back on a hammer Fixing loose table or chair legs Bonding aluminium sheeting Bonding timber on boats Repairing splits and cracks in cricket bats Bonding fibreglass sheets Repairing skis Fixing Dynabolts and metal rods into concrete Suitable Materials Glass Metal Wood Fabric Rigid plastics (except Polyethylene and Polypropylene) Crystal Leather How to Use Ensure all surfaces are clean, dry, and free from grease, rust, or paint. For best results, roughen smooth surfaces after solvent cleaning. Dispense equal volumes of Part A and Part B onto a clean disposable surface (e.g. cardboard or polyethylene) and mix thoroughly. Apply adhesive immediately to both surfaces and press together. Clamp the bond for 6–8 hours while setting. Scrape off excess adhesive and clean utensils immediately. Handy Tips Mix in small quantities for longer working time — large mixes cure faster. Replace caps immediately after use and wipe nozzles with acetone or nail polish remover before sealing. Ensure caps are placed on the correct tubes (they are colour-coded). Remove uncured adhesive with acetone or nail polish remover. Once cured, remove by mechanical scraping or sanding — solvents will not dissolve the product. To reposition a cured bond, heat slowly to at least 150°C (if safe for the material), then scrape off excess and reposition carefully. For cleaning surfaces before use: Porous surfaces use Selleys Liquid Sugar Soap Non-porous surfaces (e.g. glass, metal) — clean with methylated spirits For stubborn residue use Selleys Kwik Strip Smart Ensure the surface is dry before applying. Safety Tips Avoid contact with skin and eyes. Avoid breathing vapour. Do not use solvents near eyes or open wounds. In case of eye contact, flush with water for 15 minutes and seek medical attention. Non-toxic when set. Refer to the Material Safety Data Sheet (MSDS) for more information. Storage & Reuse Replace caps tightly after use. Store in a cool, dry place.
$24.50

Glitz Furniture Polish Deep Wood Shine Formula 250ml revives tired timber and leaves a rich protective sheen that resists fingerprints and everyday dust. Ideal for routine care or quick touch ups, this easy to use polish helps nourish the surface so your furniture looks clean, smooth and beautifully refreshed. Why you will love it Deep wood shine that enhances natural grain and color Helps hide light swirl marks and minor dullness Protective layer that resists dust and fingerprints Quick wipe on, buff off application with no sticky residue Fresh, clean finish suitable for regular maintenance Best for Sealed timber furniture including tables, chairs, dressers and shelves Veneers and lacquered or polyurethane sealed wood surfaces Interior use around the home and office How to use Dust the surface thoroughly. Shake bottle well. Apply a small amount to a clean, soft cloth. Work in light, even sections, following the grain. Allow a brief haze to form, then buff with a dry cloth to a high shine. Repeat on dull patches as needed. A little goes a long way. Care tips Test on a small inconspicuous area before first use. Use gentle pressure to avoid swirl marks. Always buff with a clean cloth. For heavy grime, clean the surface first, allow to dry, then polish. Maintain regularly for the best long term appearance. Good to know Not suitable for raw, oiled or waxed timber, unsealed wood, floors or food preparation surfaces. Avoid use on high gloss piano finishes unless the manufacturer approves polishing. Keep off fabric, carpets and porous materials. Safety and storage Use in a well ventilated area. Keep out of reach of children and pets. Avoid contact with eyes. If splashed, rinse with water. Store upright in a cool, dry place. Replace cap after use. Frequently asked questions Will this leave a greasy filmWhen applied sparingly and buffed as directed, it leaves a clean sheen with no greasy residue. Can I use it on laminateYes on sealed laminate furniture. Do not use on flooring laminate. How often should I polishLightly every 2 to 4 weeks or whenever surfaces look dull. Specifications Product Furniture polish Finish Rich sheen Use Indoor, sealed wood and furniture surfaces Size 250 ml Application Cloth apply and buff What is in the pack 1 x Glitz Furniture Polish Deep Wood Shine Formula 250ml
$9.86 $8.69

Glitz Beeswax Polish for Timber and Furniture Shine 200g Bring tired timber back to life with a rich beeswax polish that nourishes, protects, and leaves a warm, natural glow. Perfect for refreshing furniture finishes and helping repel dust with a silky, low sheen. Why choose this polish Deep conditioning to help replenish dry timber surfaces. Natural wax glow for a classic hand-rubbed finish without a greasy residue. Dust resistant finish that helps surfaces stay cleaner for longer. Easy to use wipe on, let cure briefly, then buff to shine. Versatile suitable for most sealed and previously waxed wood furniture. Ideal for Dining tables, sideboards, desks, chairs, and timber trims Antique and vintage furniture restoration touch ups Timber accessories and decorative pieces Not suitable for Unsealed raw wood where an oil or sealer is required first High traffic floors or benchtops that need hard wearing coatings Exterior timber exposed to weather How to use Clean the surface to remove dust and light grime. Ensure the area is dry. Apply a small amount of polish with a soft lint free cloth using circular motions. Set allow 5 to 10 minutes for the wax to haze lightly. Buff with a clean cloth until the desired sheen appears. Repeat light coats on very dry timber for an even, richer finish. Pro tips Test in an inconspicuous spot to confirm compatibility and sheen level. Less is more. Thin coats deliver a smoother, streak free result. Maintain with a quick rebuff or a very light reapplication every few months. Compatibility Suitable on sealed, varnished, lacquered, shellac, and previously waxed timber Always avoid application on wet or recently oiled surfaces Ingredients overview Beeswax blend with conditioning waxes in a cleaning and polishing carrier. Product details Brand Glitz Product Beeswax Polish for Timber and Furniture Shine Pack size 200g Finish Low sheen, natural glow Coverage Varies by timber and porosity. A little goes a long way. Use Interior Clean up Wipe cloths with a small amount of mild detergent, then rinse and air dry Storage Keep tightly closed in a cool, dry place away from direct sunlight Safety Use in a well ventilated area. Avoid contact with eyes and prolonged skin contact. Keep out of reach of children and pets. Frequently asked questions Will it darken the timber? Wax can slightly enrich color and grain. Always spot test first. How often should I reapply? For most furniture every 2 to 4 months is sufficient. High use items may benefit from more frequent light applications. Can I use it over raw wood? For best durability seal or oil raw wood before waxing. Good to know Apply thin, even coats for best clarity and feel. Buff with a clean microfiber cloth to elevate the final sheen.
$17.08 $16.79

Selleys No More Gaps Multipurpose gap filler delivers a smooth finish and because of its superior flexibility and low shrinkage, those unsightly gaps and cracks won’t re-appear. Features Superior flexibility to cope with building movement, meaning the cracks and gaps will be hidden for longer. Has greater than 300% elongation/stretch and up to +/- 15% movement capability. Superior adhesion to a broad range of surfaces, resulting in a lasting finish. A smooth flawless finish and minimal shrinkage. Can be painted over with both water and oil based paints, after the surface has skinned (approximately 30 minutes* after application). Is formulated for long term resistance to cracking and crumbling. Easy water clean-up Will not stain building materials. Has good resistance to weathering. Low toxic, low odour, low VOC, less harmful to the environment Where can this product be used? Between window and door frames and the wall Along skirting boards Around cornices Between benchtops and tiles which are not exposed to water In corners or between walls and ceilings Between cabinets and cupboards Around air conditioning vents and the ceiling Where shrinkage or movement has caused rigid fillers to crack Gaps with the maximum width of 25mm and depth of 12mm What materials is this product suitable for? Timber Brick & Concrete Plasterboard, particleboard & fibre cement sheeting Masonry Ceramic Tiles Glass Aluminium Paint Many other building materials
$19.84

Prep Interior & Exterior is a dry, plaster based, cement reinforced filler for the repair of common non-flexible wall linings such as plaster, concrete, timber, and wallboard. This product is highly water-resistant and therefore suitable for interior or exterior use. Can be used to fill deep or shallow crevices in one application. Easy to mix and use White finish Non-shrinking Easily sanded Can be nailed or screwed when dry Water-resistant
$7.50


A fast setting strong and durable two part epoxy, general purpose adhesive. Mixed product gels in 5 minutes. Initial bonding is achieved in 20 minutes with maximum bond strength after 16 hours. Features Araldite is stronger than other glues due to the chemical reaction of the two parts Bonds a variety of surfaces Dries Clear Quick setting in 5 minutes No clamping necessary Moderate water resistance Forms a rigid, durable bond Can be used for gap filling (surfaces need not mate closely) Good chemical resistance Appearance Clear with a slight yellow tinge Where can this product be used? Bakelite – joining or repairing Bonding shells, stones or pebbles to decorate bottles, lamps, bricks or garden pots Repairing splits or cracks in a tennis racket Repairing metal toys Not suitable for bonding plastics such as Polypropylene and Polyethylene Bond strength weakens above 65°C but strength is regained when temperature drops What materials is this product suitable for? Glass Metal Wood Fabric Rigid Plastic Crystal Leather How to use this product General Use Before applying the Araldite mixture, all surfaces MUST be thoroughly clean and dry. All traces of grease, rust paint, etc. should be removed. For best results, smooth surfaces should be roughened by mechanical abrasion after solvent cleaning. Onto a clean, disposable surface (e.g. polyethylene or cardboard), dispense equal volumes of Part A and Part B. Thoroughly mix together with a spatula, nail or stick. When using the tubes it is essential to use the correct mixing ratio, i.e. 1 part each Apply adhesive immediately to both surfaces and press together. Clamping is not necessary, but allow bond to remain undisturbed for at least 20 minutes. Scrape off excess adhesive and wipe mixing utensils immediately. When using the Araldite 5ml Everyday tube, ensure correct caps are replaced on each tube or they will harden. To use Selleys Araldite Singles: Fold – the pack in half, so that foil is back to back. Tear – carefully along perforations. Squeeze – bubbles to extrude adhesive. Mix – two parts together until well combined. Apply – mixed adhesive to surfaces and bring together. Wipe off excess adhesive and do not apply undue strain to bond for 30 minutes. Handy tips For maximum working time, mix in small quantities. Large quantities accelerate the curing process and reduce working time. To extend product life replace caps immediately after use. Ensure you wipe excess from nozzle with a tissue dipped in acetone (or nail polish remover) before replacing the caps. When using the tube variant, ensure you replace the correct cap on the correct tube. Placing the wrong cap on the wrong tube will cause the tube to harden. (lids and tubes are colour coded to help) Wipe off any uncured araldite with acetone or nail polish remover. To remove product after cure, mechanical action (scraping or sanding) is recommended. Since the product is chemically resistant solvent will NOT dissolve this product. To reposition the bond once cured, check that the item is heat resistant. If safe, heat the item slowly, e.g. in an oven, to at least 150oC. The product will soften and liquify slightly. Scrape off any excess then reposition the joint carefully using appropriate safety equipment. Allow the item to cool down in the correct position. The product will reharden once returned to room temperature. Clamping is recommended for a stronger bond. Singles are great for those unexpected household breakages, so keep them at home, just in case. Keep a box of Selleys Sugar Soap Wipes around for quick & effective clean up. For cleaning surfaces prior to application of adhesive, if the surface is porous, we would reccomend using Selleys Liquid Sugar Soap. If the surface is non-porous eg glass or metal, firstly clean the surface with Methylated Spirits. If there is old difficult to remove residue such as oold paint, we recommend using paint stripper such as Selleys Kwik Strip Smart. Ensure the surface is dry before applying the product. Safety tips Avoid contact with the skin and eyes. Avoid breathing vapour. Do not use solvents near eyes or open wounds. In case of contact with eyes, flush with water for at least 15 minutes and seek medical attention. Non toxic when set. For further information refer to the Material Safety Data Sheet (MSDS). Storage and re-use Ensure caps are replaced and product stored in a cool dry place.
$18.00
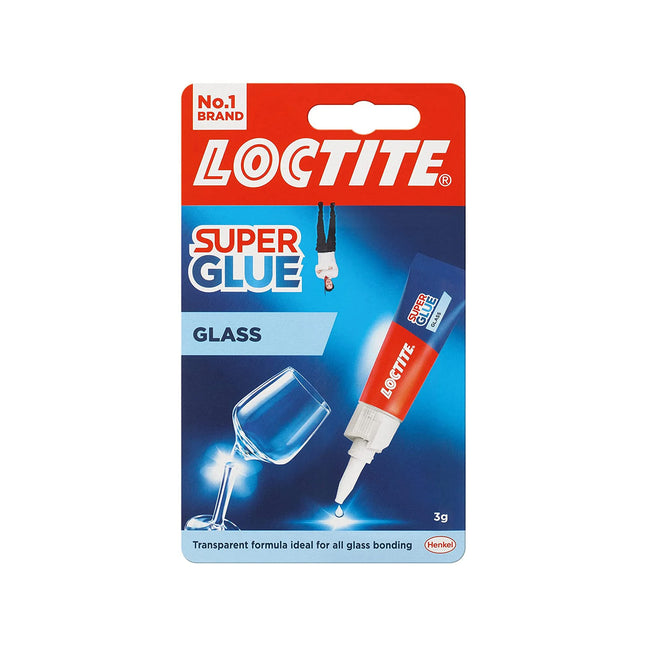
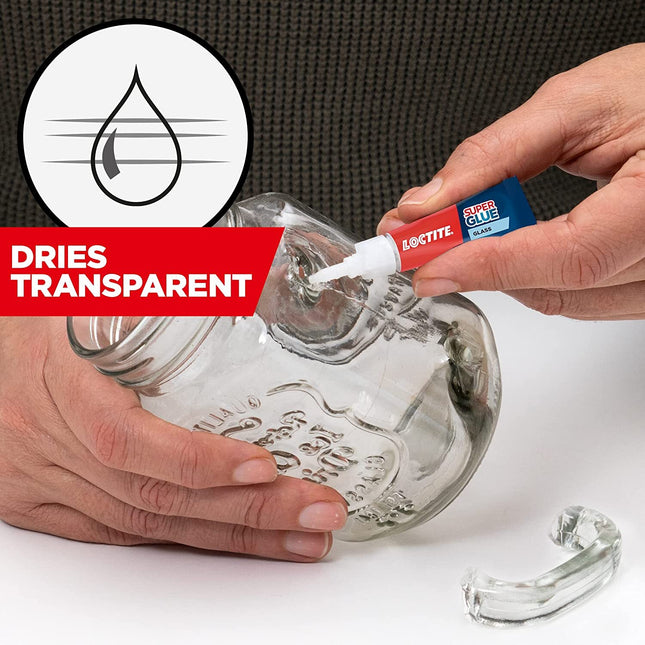
Instant, crystal clear bonds that are water and dishwasher-resistant. Formulated to work on all types of glass. Recommended on:Glass, Crystal, Tinted Glass, Glass Works, Opaque Glass, Blown Glass. Properties:Bonds glass to glassGlass to metalStained glassCrystal and tinted glassWater and dishwasher resistantBonds in secondsDries transparent for invisible bondsEasy to open, self-piercing and anti-clog capSolvent-free Step by Step: Ensure surfaces to be joined are clean, completely dry and close fitting Twist cap clockwise until it locks, then unscrew in an anti-clockwise direction to open Carefully squeeze a small drop onto one surface. Press the surfaces together and hold until set Replace the cap immediately and store upright in a cool dry place. How to Repair a Glass Water Jug?Loctite Super Glue Glass has been specially formulated to repair glassware, delivering a sparkling performance every time. Once dry it forms crystal clear bonds on all types of glass breakages and cracks, delivering water and dishwasher resistant seals that are not only neat and free from unsightly white glue marks but also strong enough to resist pressure from temperature changes and water. Loctite Super Glue Glass is designed to work on all kinds of glass: glass, crystal, tinted glass, glass works, opaque glass and blown glass, and has a high strength formula that ensures you get long-lasting durability. Follow the step by step application guide:1.Wash the broken area with water (avoid using detergent as this can affect the glue's performance) and dry thoroughly. Ensure that the surfaces to be joined are close fitting.2.Carefully squeeze a small drop onto one of the broken parts. Press both surfaces together firmly and wait until they is set.3.Do not move until the surfaces are set. Don’t worry if there is some excess glue, this can be easily removed once dry (see point 5)4.Allow at least 1-2 hours to fully cure before using. For best results leave overnight.5.Once dry, if there is any excess residue, gently wipe with a tissue dipped in Loctite Glue Remover or nail varnish remover containing acetone.6.Replace the cap immediately and store the glue upright in a cool dry place.
$8.95 $8.78

Get sharp, clean paint edges with Paint Partner Thick Masking Tape. This reliable painter’s tape is designed to stick firmly, remove cleanly within the recommended time, and resist paint bleed for professional looking results on walls, ceilings, trims, doors, and furniture. Crisp paint lines with reduced bleed on properly prepared surfaces Thicker construction for easy handling, straight tearing, and consistent edging Clean removal within the recommended timeframe to help reduce residue Suitable for most interior paint systems including acrylic and enamel Value 6 pack for multi room or multi day projects Ideal For Masking skirting boards, window frames, architraves, and cornices Two tone feature walls and colour blocking Furniture upcycling and detailed trim work Protecting hardware and fixtures during repainting Specifications Brand Paint Partner Product Thick Masking Tape for Crisp Paint Lines Width 24 mm Length per roll 27 m Pack size 6 rolls Adhesive type Pressure sensitive Surface types Painted drywall, timber trim, metal, glass, and sealed surfaces Use Interior masking and edge definition Removal window Remove within the recommended project timeframe for clean results Colour Neutral masking tape How to Use Prep the surface Ensure it is clean, dry, and free of dust or grease. Lightly sand and wipe where needed. Apply the tape Align to the paint edge and press down firmly, smoothing along the full length to seal the edge. Paint Apply paint in light coats, brushing or rolling away from the tape edge to reduce bleed. Remove While paint is still slightly tacky or once fully dry per paint instructions, peel the tape back on itself at a 45 degree angle. Pro Tips Burnish the tape edge with a clean cloth or plastic card for the sharpest lines. For textured walls, apply a very light coat of the base colour along the tape edge, let it set, then apply the top colour. Test in a small, hidden area on delicate or freshly painted surfaces. What’s in the Pack 6 rolls of Paint Partner Thick Masking Tape, each 24 mm x 27 m. Storage and Safety Store in a cool, dry place away from direct sunlight. Use on fully cured paint only. Always test before full application. Dispose of used tape in household waste according to local guidelines. Frequently Asked Questions Will it pull off existing paintWhen applied to properly cured paint and removed within the recommended timeframe, it is designed for clean removal. Always test on a small area first. Can I use it outdoorsBest suited for interior projects. For extended outdoor exposure consider a UV resistant painter’s tape. How do I get the sharpest edgePress the tape down firmly along the edge and remove at a 45 degree angle while paint is slightly tacky or fully cured as directed by the paint manufacturer. Why Buy From Glues Australia Australian based support and fast dispatch Carefully curated paint preparation range Competitive pricing on multi pack project essentials
$9.65 $7.87


Earl’s Powder Putty – Mix-to-Use Interior & Exterior Filler Earl’s Powder Putty is a multi-purpose powder filler for professional and DIY repairs. Just add water, mix only what you need, and achieve a tough, easy-sand finish with no waste and no shrinking. Brand: Earl’s Interior and exterior use* Mix-on-demand convenience Non-shrinking, smooth finish Easy sanding and shaping Indefinite shelf life in dry powder form Proudly made in Australia *Exterior applications must be sealed/painted and used on stable substrates. About Earl’s Powder Putty Earl’s Powder Putty delivers reliable, high-quality filling for timber, walls, masonry and metal. Because it’s supplied as a dry powder, you can tailor the mix to your task—stiffer for knife-grade filling and sculpting, or looser for fine skim work. The result is a hardwearing repair that sands easily and accepts coatings beautifully. Where Earl’s Powder Putty Works Timber & woodwork: doors, frames, skirting, architraves, furniture, cabinetry Walls & panels: plasterboard and cement sheeting patching and feathering Masonry & concrete: chips, small holes and surface imperfections Metals: minor dents and irregularities prior to priming and painting Floor preparation: quick patching of distressed boards prior to covering Craft & hobby: architectural details, mouldings and small sculpting tasks Why Choose Earl’s No shrink: Formulated to dry without shrinking for flush, invisible repairs. Mix what you need: Reduce waste and always work with a fresh batch. Shapes perfectly: Once dry, Earl’s Powder Putty can be cut, carved, sanded or sawn. Paint-ready: Accepts primers and topcoats after proper dry and prep. Economical & dependable: Indefinite shelf life in powder form when stored dry. Directions for Earl’s Powder Putty Surface prep: Ensure the area is clean, dry and sound. Remove loose material, dust, grease and contaminants. Key glossy surfaces for better adhesion. Mix: In a clean container, add Earl’s Powder Putty and slowly incorporate clean water. Stir to a smooth, lump-free paste. Adjust water to suit the task. Apply: Press the mix firmly into the repair with a putty knife or trowel. Slightly overfill to allow for sanding back flush. Build: For deep repairs, apply in layers, allowing each to firm before adding the next. Finish: Once dry, sand smooth. The cured filler can be carved or sawn to refine edges and profiles. Coat: Prime/seal and paint after full dry. For exterior use, always seal with suitable coatings. Clean-up: Clean tools with water while the product is still wet. Dry and recoat times vary with temperature, humidity and film thickness. Allow extra time in cool or damp conditions and for deep fills. Good to Know About Earl’s Not waterproof by itself: Water and weather resistance requires sealing/painting. Not flexible: Avoid use where movement, vibration or structural flexing is expected. Stable substrates only: Ensure exterior bases are sound and well prepared. Storage: Keep Earl’s Powder Putty dry and tightly closed. Moisture exposure can reduce performance after opening. Safety: Avoid dust during mixing and sanding. Use PPE and adequate ventilation. Typical Earl’s Applications Filling nail and screw holes, chips and minor cracks Skim patching and feathering edges prior to painting Rebuilding small decorative profiles and mouldings Levelling minor surface imperfections before finishing Specifications Brand Earl’s Product Name Earl’s Powder Putty Product Type Multi-purpose powder filler Format Dry powder; mix with clean water Colour (dry) Off-white to white; paintable Use Areas Interior and exterior* (exterior must be sealed/painted; stable substrates only) Substrate Compatibility Wood, plasterboard, cement sheeting, concrete, masonry, properly prepared metal Shrinkage Non-shrinking when used as directed Sandability Easy sanding once fully dry Paintability Prime/seal and paint after full dry Water Resistance Requires sealing; product itself is not waterproof Shelf Life (powder) Indefinite when stored cool, dry and sealed Clean-up Water while wet Tools Putty knife, trowel, mixing stick or paddle, sanding block Country of Origin Australia Limitations of Earl’s Powder Putty Do not use as a flexible gap filler or where structural movement is expected. Always prime/seal before exposure to moisture or exterior weather. Deep repairs may require multiple layers with adequate drying between coats. Not for permanently wet, submerged or high-movement joints. FAQs – Earl’s Powder Putty Can I mix a large batch and store it?Mix only what you can use within the working time. Discard any mix that begins to stiffen or set. Can I screw or nail into it?For non-structural tasks, light fixings may be possible in sufficiently thick, fully cured areas. Pre-drill as needed and test first. Is it paintable?Yes. Once dry and sanded, prime or seal the repair and finish with your chosen coating system. Always follow label directions. Test on a small, inconspicuous area to confirm compatibility and finish.
$10.92 - $175.00
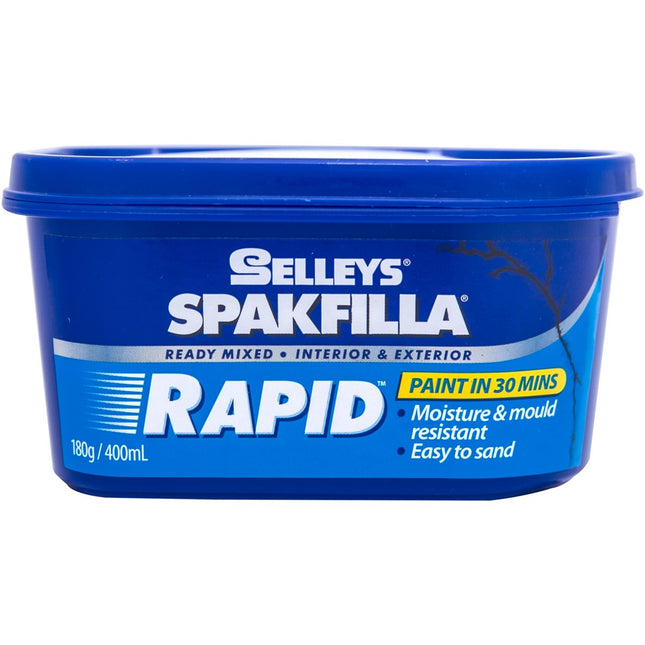
Selleys Spakfilla Rapid is a ready-mixed, lightweight filler designed for fast and easy repairs. It dries quickly, resists cracking and shrinking, and usually requires only one application—making it ideal for quick patching jobs around the home or office. Features Fills cracks and holes in a single application Pre-mixed and ready to use straight from the tub Minimal shrinkage – no need to overfill Fast drying – sand and paint within a short time Includes a convenient filling spatula Water-based formula – easy clean-up with water Paintable with both oil-based and water-based paints Where to Use Cracks and holes on stable, non-moving surfaces Walls, ceilings, doors, and window frames Small repairs in plaster, timber, and masonry surfaces Suitable Materials Wallboard and plasterboard Wood and timber surfaces Masonry and plaster Primed nail heads Product Details Colour: White Technology: Water-based Use: Interior, or exterior when painted How to Use Ensure surfaces are clean, dry, and free of dust or loose material. Using the provided spatula, press filler firmly into the crack or hole and smooth the surface. No need to overfill. Allow to dry (approximately 30 minutes for thin applications), then lightly sand for a smooth finish. Remove dust and paint as desired. For oil-based paints, allow 24 hours before painting. Limitations Not suitable for use on plastic, metal, or exterior timber exposed to moisture. Not flexible – avoid using between surfaces subject to structural movement (use Selleys No More Gaps Coloured Caulk 450g instead). Not designed for load-bearing areas or surfaces under compression (e.g. behind doors). Do not nail through filler. Avoid use below 5°C or in wet conditions. Handy Tips Wait 24 hours before painting with oil-based paints. Water-based paints can be applied once the filler has set. If filler thickens, stir before use. If too dry, add a small amount of water and mix. Clean tools with water after use. Before painting, clean with Selleys Sugar Soap Cleaner Concentrate 1L or Selleys Sugar Soap Wipes x25. For outdoor applications, protect from rain until dry and painted with two coats. Deeper repairs (over 2mm) may require longer drying times. Recommended Accessories For masking before painting: Bear Masking Tape Painter Edge Pro 48mm x 50m For reinforcing plaster joints: Eazy Tape Plasterboard Joint Tape 90m Clean Up Remove uncured product with water. Once cured, remove by scraping or sanding.
$15.56

A two part epoxy adhesive that bonds with maximum strength. Mixed product gels in 2 hours. Initial bonding is achieved in 6-8 hours with maximum bond strength strength after 3 days. Features Araldite is stronger than other glues due to the chemical reaction of the two parts Bonds a variety of surfaces Dries Clear Very Strong, durable bonding Very high water resistance (e.g. OK for fixing tiles around pool, but not below the water line. For this use Selleys Knead it Aqua) Forms a rigid, durable bond Can be used for gap filling (surfaces need not mate closely) Good chemical resistance Heat Resistant Clamping is recommended to achieve a stronger bond Not suitable for bonding plastics such as Polypropylene and Polyethylene Bond strength weakens above 80°C but strength is regained when temperature drops Where can this product be used? Load bearing repairs Gluing the head back on your hammer Fixing loose table or chair legs. Bonding solid pieces of Aluminium sheeting Bonding timber on your boat Repairing splits and cracks in Cricket bats Bonding fibreglass sheets Repairing Ski’s Fixing Dynabolts and metal rods into concrete What materials is this product suitable for? Glass Metal Wood Fabric Rigid Plastic – will not bond to Polyethylene or Polypropylene plastics Crystal Leather How to use this product Before applying the Araldite mixture, all surfaces MUST be thoroughly clean and dry. All traces of grease, rust paint, etc. should be removed. For best results smooth surfaces should be roughened by mechanical abrasion after solvent cleaning. Onto a clean, disposable surface (e.g. polyethylene or cardboard), dispense equal volumes of Part A and Part B. Thoroughly mix together with a spatula, nail or stick. When using the tubes it is essential to use the correct mixing ratio, i.e. 1 part each Apply adhesive immediately to both surfaces and press together. Clamping is necessary while bond sets over 6-8 hours. Scrape off excess adhesive and wipe mixing utensils immediately. When using tubes, Ensure correct caps are replaced on each tube or they will harden Handy tips For maximum working time, mix in small quantities. Large quantities accelerate the curing process and reduce working time. To extend product life replace caps immediately after use. Ensure you wipe excess from nozzle with a tissue dipped in acetone (or nail polish remover) before replacing cap. When using the tube variant, ensure you replace the correct cap on the correct tube. Placing the wrong cap on the wrong tube will cause the tube to harden. (lids and tubes are colour coded to help) Wipe off any uncured araldite with acetone or nail polish remover. To remove product after cure, mechanical action (scraping or sanding) is recommended. Since the product is chemically resistant solvent will NOT dissolve this product. To reposition the bond once cured, check that the item is heat resistant. If safe, heat the item slowly, e.g. in an oven, to at least 150oC. The product will soften and liquify slightly. Scrape off any excess then reposition the joint carefully using appropriate safety equipment. Allow the item to cool down in the correct position. The product will reharden once returned to room temperature. Clamping recommended for a stronger bond. For cleaning surfaces prior to application of adhesive, if the surface is porous, we would reccomend using Selleys Liquid Sugar Soap. If the surfact is non-porous eg glass or metal, firstly clean the surface with Methylated Spirits. If there is old difficult to remove residue such as oold paint, we recommend using paint stripper such as Selleys Kwik Strip Smart. Ensure the surface is dry before applying the product.
$29.36

Weldbond Universal Adhesive can be used in various applications as a glue, bonding agent, sealer or primer. It’s high solid content means that it can be easily diluted and therefore becomes a very economical alternative to traditional products used for specific applications. Same formula & product you trust, just better looking! Weldbond is a universal adhesive that bonds almost anything! It is non-toxic, non-flammable. Weldbond will dry clear and flexible and is therefore ideal for use with woods and fabrics as no glue lines will show and the glue will bend with movement. It is non-staining and will not become brittle with age. It is non-toxic, non-flammable & Solvent free 3-4 times stronger than standard P.V. High Solid content (51-53%) means more glue and it goes a lot further Does everything a P.V.A does, plus more Dries to a clear, flexible bond and can be used as a sealer, bonding agent or primer.
$8.13

Sikaflex®-111 Stick & Seal is a high-performance 1-part multipurpose adhesive and sealant that bonds and seals a wide range of construction materials for both internal and external applications. Its advanced silane-terminated polymer technology delivers exceptional adhesion without surface pre-treatment, even on damp substrates. Key Features Bonds well to a wide variety of substrates without surface pre-treatment Adheres to damp concrete and other porous materials Compatible with most construction materials, including EPS/XPS and building wraps Excellent mechanical strength and weathering resistance Low VOC, LEED v4 EQc 2 compliant, and EC 1PLUS certified Ideal for bonding and sealing in indoor and outdoor environments Where to Use Designed for professional and DIY use across construction and renovation projects. Perfect for bonding or sealing: Concrete and masonry Wood and timber components Ceramic, stone, and tiles Metal surfaces Glass and plastic materials such as PVC, PA, PET, and EPS/XPS Applications Adhesive for bonding construction components Sealant for vertical and horizontal joints Repairs, renovations, and installations in building and civil works Technical Information Composition Silane-terminated polymer Density ~1.40 kg/L (ISO 1183-1) Shore A Hardness ~36 (after 28 days) Tensile Strength ~1.5 N/mm² (ISO 37) Elastic Recovery ~75 % (ISO 7389) Service Temperature −50 °C to +80 °C Curing Rate ~3 mm per 24 h (at 23 °C / 50 % r.h.) Skinning Time ~35 minutes (at 23 °C / 50 % r.h.) Colour Options Available in White, Concrete Grey, and Black. Packaging 290 ml cartridge | 12 cartridges per box Storage & Shelf Life Store unopened in a cool, dry place between +5 °C and +25 °C. Shelf life 12 months from production date. Certifications CE Marking – EN 15651-1 (Facade elements Class F EXT-INT CC 20HM) GEV-EMICODE EC 1PLUS (Very Low Emissions) LEED v4 EQc 2 Low-Emitting Materials compliant French VOC Regulation Class A+ Why Choose Sikaflex®-111 Stick & Seal This versatile adhesive-sealant provides superior adhesion on most construction materials, making it the go-to solution for professionals and renovators who need reliable bonding and sealing performance. Whether you are working on concrete, metal, or plastic, Sikaflex®-111 Stick & Seal ensures a flexible, durable, and weather-resistant joint every time.
$23.98

SIKA® FILLER-101 | FINE SURFACE FILLER Premium, fine surface filler Very fine consistency for fine surface filling Application thickness up to 3mm per layer Fast drying and easy to sand USE Suitable for indoor filling work on plaster boards, fabrics, old wallpapers, etc. Smooth finish CHARACTERISTICS AND ADVANTAGES Ready to use, no mixing required Easy application High initial tack or grab on plaster and concrete Quick drying COLOUR: White Appearance / Colour White paste Packaging 500 ml plastic tube Storage Storage Conditions / Shelf-Life 12 months from date of production if stored properly in undamaged and unopened original sealed packaging, in cool and dry conditions. Protect from frost. Technical Data Chemical Base Filled styrene-acrylate dispersion. Density ~ 1.100 kg/l Solid Content ~ 55% Grading Dmax : 0.12 mm Layer Thickness 3 mm max. Application Details Consumption This depends on the substrate roughness and thickness of the layer applied. As a guide, ~ 1 l of Sika® Filler-101 can fill ~ 1 m2 per mm thick. Substrate Quality Clean, free from dust, dry and oil. Application Conditions / Limitations Substrate Temperature +5°C min. / +35°C max. Ambient Temperature +5°C min. / +35°C max. Application Instructions Mixing Sika® Filler-101 is supplied ready to use - no mixing is required. Application Method / Tools Sika® Filler-101 can be applied with spatula in layer thicknesses from 0 - 3 mm. When filling deeper holes or cracks the filler must be applied in several layers and must be allowed to almost dry. Holes and cracks from 4 - 15 mm can more easily be filled with Sika® Filler-105. When dried finish the surface with Sika® Filler-101. Cleaning of Tools Clean all tools and application equipment with water immediately after use. Hardened / cured material can only be mechanically removed. Waiting Time / Overcoating Drying Time: ~ 2 hours Paintability: ~ 4 hours Value Base All technical data stated in this Product Data Sheet are based on laboratory tests. Actual measured data may vary due to circumstances beyond our control.
$21.47

Selleys White For Life Ready To Use Grout is a premium-quality, pre-mixed grout designed to deliver a brilliant, long-lasting white finish for wall and floor tiles. Suitable for interior applications with joints up to 5mm, this product is ideal for both new tile installations and regrouting jobs. Surface Preparation: Ensure all surfaces are clean, dry, and free from dust, oil, old grout, and other contaminants. For new tiling jobs, let tile adhesive set for at least 24 hours. For regrouting, completely remove old grout and thoroughly clean the joints. Application Instructions: Cut the cartridge tip and attach the nozzle. Trim to desired bead width. Using a caulking gun, apply grout into joints, pressing it in to eliminate air gaps. Smooth grout using a rubber float or grout applicator, working diagonally. After 15–20 minutes (depending on temperature), gently wipe tile surfaces with a damp sponge to remove excess grout and haze. Avoid over-wetting and excessive wiping, which can weaken the grout lines. After 24 hours, polish tile surfaces with a soft dry cloth to remove any remaining haze. Coverage: Approx. 2m² per 410g cartridge (based on 300x300mm tiles with 3mm x 5mm joints) Drying Time: Touch dry in 30 minutes Allow 72 hours before exposing to water in wet areas such as showers Clean-Up: Clean tools and tile surfaces with water before the grout cures Once dry, remove excess grout by mechanical means Technical Data: Colour: White Appearance: Smooth, creamy paste Joint Width: Up to 5mm Water Clean-Up: Yes (before curing) Shelf Life: 12 months if stored unopened in a cool, dry place
$19.72

A high grade linseed oil putty with excellent adhesion for repairing and glazing wood and metal frames. For use on: Wood & metal (EXTERIOR & INTERIOR) Dries in: Skins over in 2-3 days depending on weather conditions. Ready to use: YES Colour: Light brown Ensure all surfaces are clean, sound and dry. Remove all old putty, dust off loose and crumbling material. • Bare timber should be primed with an oil-based primer before applying putty. • Knead putty thoroughly for smooth, even consistency in application. • Apply putty to working area with either a thumb or putty knife. When evenly applied, smooth off. • Always allow several days for putty to skin before applying an oil-based undercoat. Can be painted with either water or oil-based topcoat. Q. I used Polyfilla Putty on a window frame and have noticed some wrinkling on the surface. Is something wrong with the product? A. No. When this product is used on metal window frames exposed to heat, some surface wrinkling can occur. This will not affect the performance of the putty in any way.
$13.53

Dunlop Flexible Coloured Grout is a smooth-finish, flexible cement-based grout available in a wide palette of popular colours to complement almost any tile. Its stronger colour formula gives rich, consistent joints, while built-in Grout Shield anti-mould and anti-bacteria technology resists mould and bacteria growth to keep wet areas looking fresher for longer. Easy to work and forgiving to clean off, it ensures flush joints with no pin holes.Where to use itUse it on walls and floors, indoors and outdoors, with ceramic, porcelain, marble, granite and mosaic tiles. It handles joints from 1mm right up to 8mm, so one product covers both fine wall joints and wider floor joints. For swimming pools, use the White 200 colour mixed with Dunlop Primer & Additive.How to useMake sure joints are clean, dry and raked clear of adhesive. Mix the powder with clean water (or with Dunlop Primer & Additive for extra flexibility, adhesion and stain resistance) to a smooth paste. Spread diagonally across the tiles with a rubber float, packing joints full, then sponge the surface clean once firm and buff off the haze. Initial set occurs after about 24 hours; showers can be exposed to water after 3 days, the grout can be sealed after 3 days and full cure is reached in 7 days.Important notesCoverage depends on tile size, joint width and depth - allow around 15% wastage. Colour can vary slightly with water content and curing conditions, so mix consistently between batches.Specifications Joint width 1 - 8mm Coverage guide Approx. 0.55kg/m² for 200 x 200 x 8mm tiles at 3mm joints Tile types Ceramic, porcelain, marble, granite, mosaics Location Walls and floors, indoor and outdoor SafetyCement-based - the wet mix is alkaline and may irritate skin and eyes. Wear gloves and eye protection, avoid breathing mixing dust, and wash after use. Keep out of reach of children; refer to the Safety Data Sheet.
$15.23 - $15.24

Glitz Furniture and Surface Polish Protective Shine 250g Bring dull furniture back to life with Glitz Furniture and Surface Polish. This quick spray-on polish lifts dust, reduces fingerprints, and leaves a smooth, protective shine that helps repel everyday grime. Ideal for busy homes and workspaces that want clean surfaces with a polished finish in minutes. Why you will love it Fast clean and shine: wipe away dust and light marks while restoring a bright finish. Protective layer: helps resist smears and fingerprints for surfaces that stay cleaner for longer. Versatile use: suitable for sealed timber furniture, laminates, vinyl, stainless steel, chrome, and sealed stone benchtops. Streak smart: designed to buff off clean so the surface looks fresh, not oily. Fresh finish: leaves a pleasant just cleaned feel. Best for Coffee tables, dining tables, sideboards, entertainment units Cabinet doors, shelves, desks, office furniture Appliance exteriors like stainless steel fridges and dishwashers Sealed stone and laminate benchtops How to use Shake well before use. Spray lightly onto the surface from about 20 to 25 cm, or spray onto a clean soft cloth. Wipe evenly to lift dust and light soil. Buff with a dry microfiber cloth to reveal a smooth, protective shine. Pro tips Test on a small hidden area first, especially on delicate or unusual finishes. For heavily soiled areas, clean first with a suitable surface cleaner, then polish. Use a dedicated microfiber cloth for polishing to avoid streaks. What to avoid Do not use on unsealed or raw timber. Do not use on floors, glass, fabrics, or screens. Avoid overspray near slippery walkways. Product details Brand Glitz Product Furniture and Surface Polish Protective Shine Format Aerosol spray Size 250 g Finish Smooth polished sheen Suitable Surfaces Sealed timber, laminate, vinyl, stainless steel, chrome, sealed stone benchtops Country of Use Australia Safety and storage Use in a well ventilated area and keep away from heat and open flames. Keep out of reach of children and pets. Store upright in a cool dry place. Frequently asked questions Will it make surfaces slippery It is not for floors. When used on furniture and benchtops as directed, buff to a dry finish to avoid slick residue. Can I use it on raw timber No. Seal or finish the timber first, then polish. Does it remove heavy stains It is a maintenance polish. For heavy grime, clean with an appropriate cleaner first, then apply this polish for protection and shine. Good to pair with Microfiber cleaning cloths for lint free buffing Everyday surface cleaner for pre clean on sticky or greasy areas Glues Australia keeps Australia together with trusted cleaning and care essentials. Order today for fast dispatch.
$8.21 $6.22

Ready to use, hard drying acrylic putty filler Ideal for repairing cracked, broken or uneven surfaces 30 minute fast drying time Includes bonus applicator Suitable for fibrous cement, brick, plaster and wood surface repairs available in 500gm/1.5kg Not suitable for wet areas or where structural movement occurs
$7.64

SIKA® FILLER-101 | FINE SURFACE FILLER Premium, fine surface filler Very fine consistency for fine surface filling Application thickness up to 3mm per layer Fast drying and easy to sand USE Suitable for indoor filling work on plaster boards, fabrics, old wallpapers, etc. Smooth finish CHARACTERISTICS AND ADVANTAGES Ready to use, no mixing required Easy application High initial tack or grab on plaster and concrete Quick drying COLOUR: White Appearance / Colour White paste Packaging 500 ml plastic tube Storage Storage Conditions / Shelf-Life 12 months from date of production if stored properly in undamaged and unopened original sealed packaging, in cool and dry conditions. Protect from frost. Technical Data Chemical Base Filled styrene-acrylate dispersion. Density ~ 1.100 kg/l Solid Content ~ 55% Grading Dmax : 0.12 mm Layer Thickness 3 mm max. Application Details Consumption This depends on the substrate roughness and thickness of the layer applied. As a guide, ~ 1 l of Sika® Filler-101 can fill ~ 1 m2 per mm thick. Substrate Quality Clean, free from dust, dry and oil. Application Conditions / Limitations Substrate Temperature +5°C min. / +35°C max. Ambient Temperature +5°C min. / +35°C max. Application Instructions Mixing Sika® Filler-101 is supplied ready to use - no mixing is required. Application Method / Tools Sika® Filler-101 can be applied with spatula in layer thicknesses from 0 - 3 mm. When filling deeper holes or cracks the filler must be applied in several layers and must be allowed to almost dry. Holes and cracks from 4 - 15 mm can more easily be filled with Sika® Filler-105. When dried finish the surface with Sika® Filler-101. Cleaning of Tools Clean all tools and application equipment with water immediately after use. Hardened / cured material can only be mechanically removed. Waiting Time / Overcoating Drying Time: ~ 2 hours Paintability: ~ 4 hours Value Base All technical data stated in this Product Data Sheet are based on laboratory tests. Actual measured data may vary due to circumstances beyond our control.
$16.13

Premium, coarse-grained, wide crack filler, Coarse-grained consistency for maximum filling capacity. Application thickness up to 5mm per layer, to a maximum of 30mm. Fast drying and easy to sand Use: Suitable for indoor filling and repair where thicker filling capability is needed A finer grade filler such as Sika® Filler 101 should be used for finishing surfaces before painting Features Ready to use, no mixing required Easy application Thick layer filling and levelling ability High initial tack or grab on plaster and concrete Quick drying Colour: Grey
$88.91

Premium, coarse-grained, wide crack filler, Coarse-grained consistency for maximum filling capacity. Application thickness up to 5mm per layer, to a maximum of 30mm. Fast drying and easy to sand Use: Suitable for indoor filling and repair where thicker filling capability is needed A finer grade filler such as Sika® Filler 101 should be used for finishing surfaces before painting Features Ready to use, no mixing required Easy application Thick layer filling and levelling ability High initial tack or grab on plaster and concrete Quick drying Colour: Grey
$15.46

Overview: Selleys White For Life Wet Area Waterproof Silicone Sealant is a premium, 100% silicone sealant designed to provide a long-lasting, waterproof, and mould-resistant seal in high-moisture areas such as bathrooms, kitchens, and laundries. Its advanced formulation ensures the sealant remains brilliant white over time, resisting yellowing, staining, and blackening. Surface Preparation: Ensure all surfaces are clean, dry, and free from dirt, dust, oil, and loose materials. Clean the area with mineral turpentine and wipe dry with a clean cloth before application. Application Instructions: Cut the nozzle at a 45° angle to the desired bead size. Cut the cartridge tip and fit the nozzle. Place the cartridge into a caulking gun and apply steady pressure to ensure the sealant is pushed into the joint. Tool the sealant with a spatula dipped in detergent water within 5-10 minutes of application for a smooth finish. Clean up any excess sealant with mineral turpentine before it skins. Allow the sealant to cure fully, which typically takes 72 hours. Coverage: The coverage depends on the joint size; for example, a 5mm x 5mm joint will yield approximately 12 linear meters per 300g cartridge. Drying Time: The sealant skins in about 10 minutes and cures fully in 72 hours. Clean-Up: Uncured sealant can be removed with mineral turpentine. Once cured, the sealant is extremely difficult to remove and must be abraded or trimmed with a knife. Technical Data: Technology: Acetic cure silicone Colour: White Density: 1.05 g/cm³ Shore A Hardness: Approximately 20 Tensile Strength: 1.5 MPa Elongation at Break: 400% Service Temperature Range: -60°C to +150°C
$17.00

Selleys Wet Area Silicone is a high-quality, neutral cure silicone sealant designed specifically for areas exposed to moisture, such as kitchens, bathrooms, and laundries. This 100% silicone formula provides a long-lasting waterproof seal that won’t shrink, crack, or peel for up to 25 years, making it ideal for sealing around showers, sinks, bathtubs, and other wet areas. Its anti-mould properties ensure that your bathroom stays hygienic and clean for longer. The 90ml tube is perfect for smaller jobs or touch-ups, offering easy handling for precise application in tight spaces. Selleys Wet Area Silicone adheres to a wide range of materials, including ceramics, glass, stainless steel, metal fittings, and plastic laminates, ensuring a secure, flexible seal in high-humidity environments. Whether you’re sealing around a kitchen sink or maintaining the edges of a shower enclosure, this product guarantees professional results every time. Where can this product be used? Showers screens Baths Spas Sinks Plumbing Fixtures What materials is this product suitable for? Ceramic, glazed and porcelain fixtures Metal, copper and brass fittings Plastic laminates Rubber Glass Stainless steel Concrete and grouts Many plastics including polystyrene How to Use Use in a well ventilated area. Avoid contact with skin and eyes. Clean surface with mineral turpentine and dry. Cut cartridge, fit and cut nozzle at 45° angle and fit into a caulking gun. Apply with steady pressure, ensuring sealant is pushed into joint. Tool with a spatula dipped in detergent water within 5-10 mins of application. Clean up with mineral turpentine before product skins. Sealant will cure in 72hrs. Limitations: Not paintable. Complete painting 7 days prior to applying sealant. Not suitable for building materials that bleed oils or solvents, such as impregnated wood. Not for use on polyethylene, polypropylene or Teflon. Pre-test plastics before use. Not suitable for aquariums. Not suitable for food or drinking water contact. Not suitable for permanent water immersion. Handy tips For neater joints, mask sides before applying sealant and remove tape before sealant skins. When first applying product, extrude a small amount onto a piece of scrap material to ensure a smooth continuous flow of silicone sealant. Work in sections that can be completed before sealant skins. Tooling off and tape removal must be completed before skinning occurs or a rough surface, may result so working in sections allows for a better finish. *Warranty Information Refer to product label for full conditions. This guarantee does not limit and may not necessarily exceed your rights under the Competition and Consumer Act 2010. Clean Up Uncured product may be removed with mineral turps. Cured product can be removed with Selleys Silicone Remover or by cutting and scraping.
$13.62

Selleys Special Putty is a Linseed oil based, knife grade putty available in a natural colour. Features Easy to use. Can be applied by hand or with a putty knife Product has exceptional keeping qualities Available in a natural colour Superior grade putty Where can this putty be used? A wood sash putty that is excellent for glazing wooden windows and doors Bedding glass beads Not recommended for use with heat absorbing glass If being used in external applications it is not recommended for use with timber stains, timber oils and clear finishes Not recommended for use where structural movement may occur Not recommended for use in metal framed windows. What materials is this putty suitable for? Wood Timber How to use this product Rebates and grooves should be rigid, free from distortion, true and square, and should be clean, dry and unobstructed before glazing. Rebates and grooves should be of a size which allows adequate edge cover and putty volume. Minimum bed putty – 2mm, minimum front putty – 4mm where timber beads are used, and 2mm bed putty and 12mm front putty where no glazing beads are used. Depth of rebate: 10mm for 3-4mm glass, 15mm for 5-8mm glass. Two coats of good quality house paint should be applied not less than 2 weeks and not more than 4 weeks after completion of glazing. Paint should be carried out 2mm above the top line of the putty. Handy tips Do not use kerosene, turps or other material to aid in working the putty Allow putty to skin before applying paint Product can be applied by hand or with a putty knife. Add a few drops of linseed oil on the hands or knife to make for easier working Putty can thicken in cold weather. Warming the putty by working it in the hands before the application will soften it. Putty must be painted in exterior applications. High humidity, cold weather and use in interior applications can extend skinning times. Putty can separate on prolonged standing. If excessive oil is observed on the surface try to work the entire mixture together to redistribute the oil. Before painting, clean and dust & filler particles using Selleys Sugar Soap or Selleys Super Kleen. Safety tips Low hazard material For further detail on the safe use of this product, please refer to the Material Safety Data Sheet, which can be downloaded from this site.
$41.00

Selleys Spakfilla Rapid is a ready-mixed lightweight filler that is fast drying, virtually non-shrinking, non-cracking & needs only one application. Features Fill cracks and holes in a single application Pre-mixed and ready to use Minimal shrinkage so no need to overfill Very fast drying allowing sanding and painting in a short time period Comes complete with a filling spatula for ease of use Water-based, so can be cleaned up with water Paintable with oil and water-based paints Where can this product be used? Filling cracks and holes on surfaces where no structural movement occurs Filling cracks in walls, ceilings, doors, windows Repairing holes in walls, ceilings, doors and windows What materials is this product suitable for? Wallboard Wood Masonry Plaster Primed nail heads Plasterboard Colours White Technology Water Based Use Interior Exterior (when painted) How To Use Ensure surfaces are clean, dry and free of loose material. Using the flexible spatula provided on the lid, press the filler firmly into the crack or hole and smooth off surface; there is no need to overfill. Lightly sand back any excess filler from the surface after product dries (30 minutes in thin applications). Dust off any loose dust before painting with water-based paints. For oil-based paints allow 24 hours before painting. Limitations: Not recommended for use on plastic, metal or exterior timber likely to swell/shrink on absorption of water. Product is not flexible so not suitable for use between surfaces that are subject the structural movement - use Selleys No More Gaps Not recommended for use where load or compression occurs as product may be crushed e.g. behind a door if the knob touches against the wall. Nailing this product is not recommended. Avoid using below 5°C or in wet conditions. Handy Tips Painting with oil-based paints is not recommended until 24 hours after filler has been applied. Water based paints may be used immediately after filler has set. If filler is found to have stiffened prior to use, stir product. Product that has actually hardened should be discarded. If still too dry add one teaspoon of water and stir again to desired consistency. Application tools may be cleaned with water. Before painting, clean dust and filler particles using Selleys Sugar Soap or Selleys Super Kleen. In exterior applications, protect from rain until dry and painted over with 2 coats of paint. Some paints may temporarily discolour when applied over the filler, but will revert to the correct colour once dry. For applications more than 2mm deep, or in cold or humid conditions, expect longer drying times. Keep container closed when not in use. Clean Up Uncured product may be removed with water. Cured product can be removed by scraping or sanding.
$25.02
![Selleys No Mould Silicone Selant 100ml [White]](http://gluesaustralia.com.au/cdn/shop/files/15eb0d3681e54148ad88ef00e07df55b.png?v=1757753027&width=645)
Selleys No Mould Silicone sealant is specially designed to create a long lasting waterproof seal in areas where mould resistance is necessary Features Superior formulation+ that stops mould growth* Fast skinning formulation which means you can use your shower in 1 hour Provides a durable waterproof seal Resists lifting Where can this product be used? Suitable for use in humid and damp environments such as Kitchens Bathrooms Laundries Showers Basins tiles Worktops Baths & spas Plumbing fixtures What materials is this product suitable for? Ceramic Glazed & porcelain fixtures Aluminium Plastic laminates Some rubbers Glass Stainless Steel How to Use Before applying your new sealant we recommend spraying Selleys Rapid Mould Killer into the gap to kill any residual mould Thoroughly clean surface where sealant will be applied with turps and dry completely Cut nozzle at 45°angle, cut cartridge tip and fit nozzle Place in a caulking gun, apply with steady pressure, ensuring sealant is pushed into the joint Tool with a spatula dipped in detergent water within 5-10 minutes of application Clean up with turps before product skins Limitations: +Compared to Selleys Wet Area #Sealant will be waterproof and shower ready in 1 hour after application in showers. The semi-cured sealant must not be touched until fully cured (at least 48 hours) *To maintain your sealant properties, ensure you regularly clean off any soap scum and dirt as these encourage mould growth Not suitable for aquariums, food or drinking water contact, permanent immersion in water, or metals other than aluminium and stainless steel. Not suitable for PE, PP, PTFE and some rubbers. Pre-test on other surfaces for compatibility Tips For neater joints, mask sides before applying the sealant and remove the tape before sealant skins Not paintable. Complete painting 7 days before applying the sealant
$14.32
![Selleys No Mould Silicone Sealant Waterproof [White]](http://gluesaustralia.com.au/cdn/shop/files/121994701b5c42c1bd5e5c839bcfcd4e.jpg?v=1757753039&width=645)
Selleys No Mould Silicone sealant is specially designed to create a long lasting waterproof seal in areas where mould resistance is necessary FeaturesSuperior formulation+ that stops mould growth*Fast skinning formulation which means you can use your shower in 1 hourProvides a durable waterproof sealResists lifting Where can this product be used?Suitable for use in humid and damp environments such asKitchensBathroomsLaundriesShowersBasinstilesWorktopsBaths & spasPlumbing fixtures What materials is this product suitable for?CeramicGlazed & porcelain fixturesAluminiumPlastic laminatesSome rubbersGlassStainless Steel How to UseBefore applying your new sealant we recommend spraying Selleys Rapid Mould Killer into the gap to kill any residual mouldThoroughly clean surface where sealant will be applied with turps and dry completelyCut nozzle at 45°angle, cut cartridge tip and fit nozzlePlace in a caulking gun, apply with steady pressure, ensuring sealant is pushed into the jointTool with a spatula dipped in detergent water within 5-10 minutes of applicationClean up with turps before product skins Limitations: +Compared to Selleys Wet Area#Sealant will be waterproof and shower ready in 1 hour after application in showers. The semi-cured sealant must not be touched until fully cured (at least 48 hours)*To maintain your sealant properties, ensure you regularly clean off any soap scum and dirt as these encourage mould growthNot suitable for aquariums, food or drinking water contact, permanent immersion in water, or metals other than aluminium and stainless steel. Not suitable for PE, PP, PTFE and some rubbers. Pre-test on other surfaces for compatibility TipsFor neater joints, mask sides before applying the sealant and remove the tape before sealant skinsNot paintable. Complete painting 7 days before applying the sealant
$21.93
![Selleys No More Gaps Filler Sealant Fast Dry [White]](http://gluesaustralia.com.au/cdn/shop/files/da7575e6045648c8aee7c9769b69a8cc.jpg?v=1757753086&width=645)
Selleys No More Gaps Fast Dry has been designed to be painted over in just 20 minutes so that you can finish the job sooner! No More Gaps Fast Dry also provides superior crack resistance with high flexibility and low shrinkage. Features Paint over in 20 minutes* Superior crack resistance Superior adhesion to a broad range of surfaces, resulting in a lasting finish A smooth flawless finish and minimal shrinkage Can be cleaned up easily and quickly with water Will not stain building materials Can be used indoors and outdoors *Allow longer drying times before painting with flat or ceiling paints or in cooler weather. Where can this product be used? Architraves Skirting boards Cornices Window and door frames Wall joints What materials is this product suitable for? Timber Brick & Concrete Plasterboard, particleboard & fibre cement sheeting Masonry Ceramic Tiles Glass Aluminium Painted surfaces Many other building materials How to Use Ensure the surface is clean, dry and free from dust, grease, flaking/powdery paint and old or crumbling caulk. Cut seal and nozzle and fit to cartridge. Insert into caulking gun such as Selleys Light Speed Caulking gun. Apply with caulking gun, forcing product into gap. For a smooth finish, smooth with a finger dipped in water. For a professional finish use a paint scraper such as a 50mm Soft Grip Scraper. Clean up excess with a damp cloth immediately and clean hands and tools with water. Allow to skin (about 20 minutes) before painting with water-based paints. If oil-based paints are to be used, or if gaps are large, allow sealant to set for about 24 hours and ensure the product is completely cured. Limitations: For gaps between tongue and groove boards and weatherboards use No More Gaps® Exterior & Weatherboard. Where movement is excessive or for areas where contact with water is frequent, use the appropriate Selleys® Silicone Sealant. Handy Tips To avoid paint cracking, apply at temperatures above 10°C and do not apply paint too thick. Ensure you tape both sides of the gap before applying the product. This ensures a neat finish and makes it easier to clean up. When first applying product, extrude a small amount onto a piece of scrap material to ensure a smooth continuous flow of gap filler, and a perfect finish. If you are going to wipe off the excess gap filler with a wet finger, ensure you wet your finger with water and not saliva, as saliva contains bacteria and this will increase the chances of mould growing in your gap filler. Allow the surfaces to skin prior to painting, which is approximately 20 minutes. Protect from rain until firmly skinned. Allow for longer skin and cure times in damp conditions. Some water based under coats and flat paints may crack on drying. To reduce this effect allows the product to cure for 24 hours in small gaps or 48 hours in larger gaps before painting with such paints. For exterior applications protect from rain until firmly skinned. Keep a pack of Selleys Sugar Soap Wipes handy to wipe up any spills and for cleaning. They are an easy and effective way to keep clean on the job.
$7.56

Selleys No More Gaps Bathroom & Kitchen is a flexible gap filler with superior water and mould resistance for bathroom and kitchen surfaces. Also available in easy tube format. Features Superior water resistance. Superior flexibility to cope with building movement, meaning the cracks and gaps will be hidden for longer. Up to +/- 25% movement capability. Optimum adhesion is achieved on ceramics, glass, aluminium, most plastic and cement. Mould resistant-contains a fungicide to help protect against unsightly mould growth. Can be painted over with both water and oil based paints Easy water clean-up Low odour Where can this product be used? Bathroom vanities Bathroom cabinets In and around glass and tiles Cabinets Architraves Skirting boards Bench tops Windows Door frames What materials is this product suitable for? Ceramics Glass Aluminium Most Plastics Cement Sheeting Wood Plasterboard Many other building surfaces How to Use Ensure the surface is clean and free from dust, grease, flaking/powdery paint and old or crumbling caulk. Cut seal and nozzle and fit to cartridge. Insert into a quality caulking gun, such as Selleys Light Speed caulking gun. Apply with caulking gun, forcing product into gap Smooth with a wet spatula. Clean up with a damp cloth immediately, before filler skins in approx. 10-15 minutes. Allow surfaces to skin prior to painting (approximately 1 hour). Skin time will be extended in cold or humid conditions, or if painting with flat or ceiling paints (approximately 3 hours) To allow product to strengthen, protect from water for 24 hours. Limitations: Should not be used in permanently damp locations. Use Selleys® Wet Area Silicone Sealant around sinks, baths and shower recesses. Not recommended for prolonged contact with water. Handy Tips Ensure you tape both sides of the gap before applying the product. This ensures a neat finish and makes it easier to clean up. When first applying product, extrude a small amount onto a piece of scrap material to ensure a smooth continuous flow of gap filler. Remove the tape before the gap filler skins. If you are going to wipe off the excess gap filler with a wet finger, ensure you wet your finger with water and not saliva, as saliva contains bacteria and this will increase the chances of mould growing in your gap filler. It is best to use a spatula dipped in soapy water. Clean off all excess No More Gaps Bathroom & Kitchen from equipment immediately before it cures with a damp cloth. Once cured, No More Gaps Bathroom & Kitchen is extremely difficult to remove and must be trimmed with a knife. Keep a pack of Selleys Sugar Soap Wipes handy to wipe up any spills and for cleaning. They are an easy and effective way to keep clean on the job. To avoid paint cracking, apply at temperatures above 5°C and do not apply paint too thick. Allow longer drying times before painting with flat or ceiling paints and in cooler weather. Can be applied to damp surfaces however product must be allowed to dry following application.
$12.50

A premium grade high strength construction adhesive that delivers a consistently strong bond on mirror, metal and glass material. Uses Ideal for adhering mirrors to walls, metal letterboxes to exterior walls, house numbers to exterior walls, bathroom fixtures to tiles, tool holders on metal shed walls etc. Liquid Nails Mirror, Metal, Glass is also suitable for use on BHP decorative sheet metals such as Lysaght, Zincalume, Colorbond®, Marviplate®, galvanised metals, Alcan and Comalco aluminium systems. Technical Features Will not discolour mirrors Heat and steam resistance Adheres metal, glass and mirror well to most surfaces including painted surfaces but not wall coverings Adheres and forms a durable seal between sheet metals Gap filling on uneven surfaces Forms flexible/shock resistant bonds UV resistant Low odour during application Non corrosive Weather resistant Application Tips All surfaces must be clean, dry and free from dirt dust, oil and loose rust. Clean surfaces with mineral turpentine and wipe dry with a clean rag before applying. Painted surfaces should not be flaky or peeling. Cut tip off cartridge and cut nozzle to suitable size opening (approximately 5mm). Fit nozzle to cartridge. Place cartridge into caulking gun. Support bond until adhesive cures sufficiently (at least 48 hours adhesive cures at 2mm depth per day). APPLICATION FOR MIRRORS For mirrors up to 6mm thick, apply strips of adhesive 5cm from edges and approx 8cm apart When mirror is pressed onto the wall, strips of adhesive must not spread into, or touch one another. A gap must remain between them. Immediately after applying adhesive, place mirror against wall before adhesive skins (within 5 minutes) The weight must be supported and mirror must be held in place with temporary supports (e.g. with clips or tape) to hold and maintain adhesive contact over the total bond area until sufficient adhesive strength has developed. Normally after 72 hours. Do not seal around the edges of the mirror for at least a week to allow air circulation and aid the adhesive fully cure Mirrors should not be fixed directly to unpainted plaster, timber, concrete or brick walls. These surfaces should be painted to prevent potential damage to mirror. Painted surfaces should not be flaking or peeling. Not recommended for fixing vinyl back mirrors If in doubt, conduct an adhesion test by curing a little adhesive onto mirror backing for 24 hours. If adhesive can be peeled off, do not proceed. GENERAL APPLICATION Apply as for mirrors and press surfaces together immediately Leave ‘squeeze out ‘ to cure and trim (avoid cutting into the bond) Support bond until adhesive cures sufficiently (normally after 72hrs). Adhesive cures at 2mm depth per day. Technical Details and Performance Indicative information only, not to be used for setting specifications. Consistency (As applied) Non-slump, solvent free paste Curing Mechanism Very rapidly develops an adhesive bond by reaction with moisture from the air Curing Rate 2mm depth per day Skin Forming Time 5-10 minutes (depending on weather conditions) Service Temperature –60°C to +150°C Lap Shear Bond Strength (Aluminium to Aluminium at 1.6mm thick adhesive, 500sq mm bond area) After 24 hrs: 280KPa After 48 hrs: 550KPa After 7 days: 830KPa Coverage 15 metres of a 5mm diameter bead Cleaning Clean all excess adhesive from equipment before it cures with a cloth dampened with mineral turpentine or acetone. Once cured adhesive is extremely difficult to remove and must be abraded or trimmed with a knife
$22.00

The Selleys 3-in-1 Adhesive, Sealant & Gap Filler is your ultimate all-in-one solution for a wide range of DIY and professional applications. This versatile product combines the power of a strong adhesive, the reliability of a waterproof sealant, and the precision of a gap filler, all in one easy-to-use formula. Whether you're tackling home repairs, sealing joints, or filling cracks, Selleys 3-in-1 ensures a durable, flexible, and weather-resistant finish. Perfect for both indoor and outdoor use, it adheres to a variety of surfaces including wood, metal, glass, and ceramics. With Selleys 3-in-1, you can trust in a product that delivers exceptional results every time, simplifying your projects and saving you time and effort Where can this product be used? Use 3 in 1 for sealing, bonding and filling almost any material damp or dry,inside or outside Provides a durable waterproof seal Provides strong bonds and a perfect paintable finish What materials is this product suitable for? Glass Metals Timber Brick Concrete Tiles Most plastics (not for polyethylene, polypropylene or teflon) How to Use Adhesive Apply to one surface, in beads for broad surfaces (every 30cm) or dots for small surfaces. Press surfaces together and allow to cure. Sealant Apply product, ensuring it is forced into the joint, with good contact to surfaces. Tool with a soap solution before skinning occurs. Gap Filler Apply product into gap. Smooth off with spatula dipped in soapy water. Allow to skin before painting with water based paints. Limitations: Not recommended for solvent based paints. If required, paint with a water based paint first. Handy tips For neater joints, mask sides before applying sealant and remove tape before sealant skins. Larger, heavier items need to be supported until the adhesive cures. Paint with water-based paint. A minimum of two coats are necessary to ensure proper wetting out the sealant surface Clean Up Uncured product may be removed with mineral turps. Cured product can be removed by scraping or sanding or with the help of Selleys Silicone Remover. Size: 480g Cartridge Colour: White Technology Sil-X® Use: Interior & Exterior
$23.38

Prep Interior & Exterior is a dry, plaster based, cement reinforced filler for the repair of common non-flexible wall linings such as plaster, concrete, timber, and wallboard. This product is highly water-resistant and therefore suitable for interior or exterior use. Can be used to fill deep or shallow crevices in one application. Easy to mix and use White finish Non-shrinking Easily sanded Can be nailed or screwed when dry Water-resistant
$46.50

Prep Interior & Exterior is a dry, plaster based, cement reinforced filler for the repair of common non-flexible wall linings such as plaster, concrete, timber, and wallboard. This product is highly water-resistant and therefore suitable for interior or exterior use. Can be used to fill deep or shallow crevices in one application. Easy to mix and use White finish Non-shrinking Easily sanded Can be nailed or screwed when dry Water-resistant
$28.90

Prep Interior & Exterior is a dry, plaster based, cement reinforced filler for the repair of common non-flexible wall linings such as plaster, concrete, timber, and wallboard. This product is highly water-resistant and therefore suitable for interior or exterior use. Can be used to fill deep or shallow crevices in one application. Easy to mix and use White finish Non-shrinking Easily sanded Can be nailed or screwed when dry Water-resistant
$4.43
You have seen 48 out of 147 products
Products that level to a clean, smooth surface with minimal tooling, ideal for visible seams and cosmetic repairs. Use filters to refine by chemistry, viscosity and cure profile. Always review the product page and TDS/SDS.