
Thixotropic or expanding systems that bridge uneven joints and larger voids. Balance gap-fill with cure-through depth and final strength. Use filters to refine by chemistry and working time. Always check the product page and TDS/SDS.


Bostik Repair All is a clear, multi-purpose adhesive for quick, durable repairs around the home, garage, and workshop. It bonds strongly, remains slightly flexible, and is water resistant once cured, making it suitable for everyday fixes and craft projects. Why you will love it Strong, long lasting bond Dries clear for a neat finish Water resistant once fully cured Flexible bond helps absorb vibration Suitable for indoor and outdoor use Works on Metal, wood, ceramics, glass, most rigid plastics, rubber, leather, fabric, and more. Always test on delicate or unknown materials first. Ideal for Household repairs and DIY Craft, hobbies, and school projects Fixing ornaments, toys, trims, and fittings Directions Ensure surfaces are clean, dry, and free of dust or grease. Lightly roughen smooth surfaces. Apply a thin even layer to one surface. Join parts together and press firmly. Support or clamp if needed. Wipe away any squeeze out immediately with a cloth dampened with solvent suitable for the substrate. Allow to set undisturbed. Handling strength is typically reached within hours. Full cure is usually achieved after 24 hours depending on bead size, temperature, and humidity. Clean up Uncured adhesive can be removed with a suitable solvent. Cured adhesive is best removed mechanically by trimming or carefully scraping. Good to know Not recommended for polyethylene, polypropylene, PTFE, or surfaces that will be in constant water immersion. Avoid contact with food or drinking water surfaces. Store upright in a cool dry place with cap tightly closed. Key details Brand Bostik Product Repair All Appearance Clear when dry Finish Flexible Water Resistance Yes, once cured Pack Size 20ml Always read the label and follow safety instructions. Keep out of reach of children.
$14.50
![Intergram WoodBlend Timber Grain Wood Filler 180g [Colour: Ash Meranti]](http://gluesaustralia.com.au/cdn/shop/files/9300611329301.jpg?v=1754724101&width=645)
![Intergram WoodBlend Timber Grain Wood Filler 180g [Colour: Cypress Cedar]](http://gluesaustralia.com.au/cdn/shop/files/9300611329400.jpg?v=1754724101&width=645)
A water-based timber and grain filler, suitable for both interior and exterior use. Woodblend sands to an extremely fine, smooth finish. Woodblend can be coated with water or oil-based timber finishes and paints. Available in six inter-mixable colours. KEY PRODUCT INFORMATIONCoverage: 5m2/LRecoat: 2hrsFull cure: N/AClean up: WaterSheen: N/A USAGE INSTRUCTIONS WHERE TO USEAreas: All interior timber, Exterior timberSubstrates: All interior timberLocations: Interior, Exterior APPLICATIONMethods: Filling blade or knife 1. Apply WoodBlend with a flexible filling blade or knife. Fill deep holes in approx. 10mm stages, allowing two hours drying time between each stage.2. To ease application, dampen blade with water.3. Wipe off excess with a slightly damp sponge. When dry, sand to a smooth finish.4. When using clear finishes, apply WoodBlend after the first coat of clear to minimise smudging.5. For use as a grain filler, thin WoodBlend with 5-10% water to achieve the required consistency. Apply with a flexible filling blade or knife and allow to dry. When dry, sand back to bare timber, leaving filler only in the grain. IMPORTANT: Keep container tightly closed when not in use.
$20.34 - $45.73


Our Quick Setting Gel Epoxy Adhesive is the perfect product to use when you need to get your project pieces in place fast. This product fills gaps and covers large porous surfaces. The final cure colour is cream but can be mixed with paint to colour match. This product sets in only 5 minutes. Works best on: • Porous materials • Ceramic • Metal • Pottery • Wood • Tile • Crafts Properties: Initial colour: Green resin/white hazy hardener Maximum Gap: .25” Final colour: White hazy Hardness, Shore D: 75-85 (After full cure) Set Time: 4-6 minutes @ 65-80F Shear Strength, Steel: 1500 psi (± 20%) Handling Time: After 1 hour Aluminum: 900 psi (± 20%) Full Strength: 24 hours Operating Temperature Range:-320 to 3000F (-360 to 1490C) Instructions: 1. Surfaces should be clean and dry, free from oil and grease. 2. Roughen surfaces with emery cloth or sandpaper for best results. 3. Dispense from container following package directions & mix thoroughly approximately 1 minute. Use package blister or clean cardboard for mixing container, do not use metal. 4. Apply to both surfaces and mate parts together. 5. Remove excess epoxy immediately with denatured alcohol. 6. Sets in 4-6 minutes at room temperature (77F / 25C) with full cure in 24 hours. Helpful Hints: To colour Epoxy Gel, do test sample using mixed epoxy with added small amounts of colourant, such as paint (latex or oil), stain or tint. Mix well & apply to scrap piece of wood. Let dry to compare the final colour to the color of repair item. Keep testing until a colour match is achieved, then mix the appropriate amount of colourant with Epoxy Gel and bond repair item.
$9.95


This new, innovative dispensing system allows for accurate control while utilizing an advanced formula of the Super Glue Corporation's signature product cyanoacrylate (Super Glue GEL). The easy to hold applicator design allows for either continuous stream or single drop control. No more sticky fingers! This glue works great when adhering to porous or vertical surfaces. It will not drip or run! Works best on: Aluminum Ceramic China Hard & Soft Wood Jewelry Metal Most Plastics Pottery Rubber Vinyl Pacer Technology AccuTool Gel (19026) is a quick-setting, non-sagging gel adhesive that fills gaps & works best on: Leather Metal Vinyl Rubber Most plastics Aluminium Ceramics Hard & Soft Wood China Pottery Jewellery Fingernails NOTE: Not for use with Teflon, polyethylene, polypropylene, certain silicone rubber types, glass, rearview mirrors or parts that are subjected to great shock or continuous immersion in water. Properties: Initial colour: Clear, transparent Final colour: Clear Set time: 10-30 seconds Full Strength: 24 hours Operating Temperature Range: -650 to 1800 F (-540 to 820C) Use: For best results, items should fit closely together. 1. Protect clothing and work surfaces (metal foil works well). Use in a well-ventilated area. Refer to package for special opening instructions – has Self Piercing “Ratchet” Opener. After opening, remove the outer cap for use. 2. Apply sparingly to one surface using 1 drop per square inch. Assemble parts and hold together with pressure for 15 seconds or until set. 3. After use, wipe tip before replacing cap to prevent sticking and close bottle securely. Storage and Shelf Life: Store upright in a cool area away from sunlight or heat sources. Stored under these conditions, a one-year shelf life can be expected. Safety: Contains cyanoacrylate. CAUTION: Eye Irritant. Bonds skin & eyes in seconds. Use with adequate ventilation. Avoid contact with clothing as can cause a burn. In case of eye contact, flush with water for 15 minutes; get medical attention for eye or internal contact. To remove from skin, soak in acetone nail polish remover & gently peel adhesive off with a fingernail; water exposure will wear off residual adhesive in a few days (do not use polish remover around the eye area). KEEP OUT OF REACH OF CHILDREN.
$9.95

Quick Setting Single Use Epoxy Adhesive is the perfect product to use when you need to get your project pieces in place fast. This product sets in only 5 minutes. Works best on: All-Purpose Ceramic Metal Pottery Wood Tile Crafts Fabric Properties: Initial colour: Clear hazy to light yellow Final colour: Light yellow Set Time: 4-6 minutes @ 65-80F Handling Time: After 30 minutes Full Strength: 24 hours Maximum Gap:25" Hardness, Shore D: 75-83 (After full cure) Shear Strength, Steel: 1200 psi ( 20%) Operating Temperature Range: -40o F to +176oF (-40oC to +80oC) Instructions: 1. Surfaces should be clean and dry, free of oil and grease. 2. Roughen surfaces with emery cloth or sandpaper for best results. 3. Dispense from containers following package directions and mix thoroughly approximately 1 minute. 4. Apply mixed epoxy to both surfaces and mate parts together. 5. Remove excess epoxy immediately with denatured alcohol. 6. Sets in 4-6 minutes at room temperature (77F or 25C) with full cure in 24 hours. Storage: After use, wipe tips to remove residual product and reseal the container. Store upright, with tips up, in a cool, dry location. Stored under these conditions, a one-year shelf life can be expected. Safety: Contains Epoxy resin & Mercaptan hardener. May cause eye/skin irritation with direct contact. In case of direct eye contact, flush with water for 15 minutes and consult a physician. Wash hands and skin thoroughly with soap and water after use. If swallowed, seek medical advice immediately and show container label. Keep out of reach of children.
$29.95


$15.00

Tarzan's Grip Mega Bond Glue is suitable for bonding a large variety of surfaces in interior and exterior applications. It is formulated to react with moisture on the surfaces to be bonded, resulting in amazing bond strength and water resistance. Incredible bond strength Waterproof Superior strength Adheres to even visibly damp surfaces Fast curing - less than 30 minutes Materials: wood, ceramic, stone, concrete, metal, glass, fibreglass, leather, laminate, masonry, plasterboard and some plastics.
$25.98

Tarzans Grip Mega Bond Glue is suitable for bonding large variety of surfacees in interior and exterior applications. It is formulated to react with moisture on the surfaces to be bonded, resulting in amazing bond strength and water resitance. Incredible bond strength Waterproof Adheres to even visibly damp surfaces Fast curing - less than 30 minutes
$10.50

SikaBond is a high strength contact adhesive that will not slump on vertical surfaces. It can be used as a one way liquid adhesive, or a two way contact adhesive, on a variety of surfaces. Uses SikaBond can be used on most substrates due to its excellent adhesion. These include: Floor and wall panels. Wood, plasterboard and chipboard. Aluminium, iron and steel. Concrete, cement sheeting and masonry. Advantages One component ready to use. Fast drying time. Easy to use. High adhesion strength. Non-slump. Storage and Shelf Life Stored in the original sealed packaging at temperatures of between 5ºC and 35ºC, this material will keep for at least twelve (12) months. Instructions for Use Surface Preparation All surfaces must be clean, sound, dry and free of oil, grease and surface contamination. Thoroughly remove all loose particles and dust. Any loose flaking must be removed and light sanding is recommended. Application One Way Method: This method is recommended for heavier panels or where load or stress is expected. Apply a 4 to 6mm bead of SikaBond using a cartridge gun, making sure the beads are no more than 45cm apart. Bring both substrates immediately together and clamp, nail or screw for a minimum of 24 hours. For butt joints use adhesive on both panel edges. Two Way Method: Apply adhesive as in one way method, bring together substrates, and press firmly over entire surface to transfer adhesive. Then pull apart. Allow adhesive to tack off for 3 to 5 minutes depending on weather conditions, reposition the objects and press together firmly. The surfaces should be tapped together with a hammer and a padded block to ensure maximum contact. Maximum bond strength will be achieved in 12 to 72 hours, depending on substrates and weather. Heavy panels may require temporary mechanical fastening until maximum strength is achieved.
$5.24
![Sika Sikaflex 252 High Strength structural Adhesive Sealant [White]](http://gluesaustralia.com.au/cdn/shop/files/7612895456164_5c293f0a-df90-415e-875b-0ed963018cfa.jpg?v=1754711706&width=645)
High strength, structural grade polyurethane adhesive sealant High strength elastic adhesive, suitable for structural joints subjected to high dynamic stress Suitable for use on trucks, trailers and caravans with excellent adhesion to timber, metals, primers and paint coatings Vibration dampening USE Sikaflex® 252 is suitable for structural joints that will be subjected to dynamic stresses. Suitable substrate materials are timber, metals, particularly aluminium (incl. anodized components), sheet steel (incl. phosphated, chromated and zinc-plated components), metal primers and paint coatings (2-c systems), ceramic materials and plastics. CHARACTERISTICS AND ADVANTAGES 1-C formulation Elastic Can be overpainted Good gap-filling properties Capable of withstanding high dynamic stresses Vibration Damping Non-corrosive Electrically non-conductive Bonds well to a wide variety of substrates
$53.62

Sika MaxTack® 100g: Secure Your Projects with Unmatched Initial Grab Product Overview Sika MaxTack® 100g is a high-strength, solvent-free adhesive with incredible initial tack. Advantages High initial tack and powerful grab Secure bonding without the need for tapes, nails, or screws Excellent workability and over-paintable with water-based paints Perfect for both interior and sheltered outdoor use Applications Designed for the bonding of: Skirting boards, wood frames, and panels Anodised aluminum and hard PVC profiles Polystyrene mouldings, ceiling tiles, and more Packaging Available in 100g foil packs, 24 packs per box. Color Options Off-white in color. Application Instructions Ensure the substrate is clean and dry. For best results, follow our standard construction guidelines. Cleaning & Maintenance Clean tools immediately after use with water. Hardened material can only be removed mechanically.
$11.47

Sika® Filler One Strike Maxi is revolutionary ready-mixed lightweight filler for the preparation of numerous surfaces prior to painting or wallpapering. For filling on plaster, brick, stone, wood and render. Fills in one go- No need to build up layers of filler – fills up to 75mm deep in one application No sanding or sagging Fast drying and easy to sand CHARACTERISTICS AND ADVANTAGES Fills in one go- No need to build up layers of filler – fills up to 75mm deep in one application No sanding or sagging Fast drying and easy to sand Internal/external use Overpaintable Overstainable Easy to use Dries brilliant white COLOUR: White Sika® Filler One Strike is revolutionary ready-mixed lightweight filler for the preparation of numerous surfaces prior to painting or wallpapering. Based on high strength lightweight polymeric fillers, the product outperforms conventional fillers in most applications Designed for professional and D.I.Y use. Uses Sika® Filler One Strike 1 is suitable for filling of gap in: Plaster Brick Stone Wood Render Characteristics Advantages Fills in one go- No need to build up layers of filler - fills up to 75mm deep in one application. Easy to use - lightweight paste is incredibly easy to apply. No sanding required - finishes to a smooth surface. No sagging - the lightweight properties of Sika® Filler One Strike prevent sagging even on ceilings. Non-shrink - will not shrink back whilst drying. Quick drying - ready to paint/paper in just 30 minutes. Overpaintable with most solvent based and emulsion paints. Overstainable Internal/external use. Dries brilliant white Product Data Appearance / Colour Lightweight brilliant white paste Packaging 300 ml cartridge Storage Storage Conditions / Shelf-Life 24 months from date of production if stored properly in undamaged and unopened original sealed packaging, in cool and dry conditions. Protect from frost. Technical Data Chemical Base Filled water based polymer dispersion. Density ~ 0.49-053 kg/l Solid Content ~ 61% (w/w) pH 8.0 – 9.0 Grading Dmax : 0.12 mm Layer Thickness Maximum Width: 50 mm Maximum Fill: 75 mm System Information Application Details Consumption This depends on the substrate roughness and thickness of the layer applied. As a guide, ~ 1 cartridge of Sika® Filler One Strike yields 0.3 m 2 per mm thick. Substrate Quality Clean, free from dust, dry and oil. Application Conditions / Limitations Substrate Temperature +5°C min. / +30°C max. Ambient Temperature +5°C min. / +30°C max. Application Instructions Mixing Sika® Filler One Strike is supplied ready to use - no mixing is required. Application Method / Tools Apply direct from pail with spatula/spreader. Smooth over surface and allow drying. Sanding is not normally required although the product may be sanded if required. Sika® Filler One Strike can be painted over after approx. 30 minutes using water based paints. Leave to dry for 12 hours when using solvent based paints. Cleaning of Tools Clean all tools and application equipment with water immediately after use. Hardened / cured material can only be mechanically removed. Waiting Time / Overcoating Drying Time: Note: ~ 30 minutes at 20°C The drying time correspond to thin layer thickness. If deep holes or cracks are filled, longer time is required in order for the product to harden in its full thickness. Notes on Application / Limitations • Do not use to fill plastic or metals. • Do not apply when rain is imminent (external use). • Do not apply in temperatures (ambient and surface) below 5°C. • If using externally overpainting is essential
$13.00

Premium, coarse-grained, wide crack filler, Coarse-grained consistency for maximum filling capacity. Application thickness up to 5mm per layer, to a maximum of 30mm. Fast drying and easy to sand Use: Suitable for indoor filling and repair where thicker filling capability is needed A finer grade filler such as Sika® Filler 101 should be used for finishing surfaces before painting Features Ready to use, no mixing required Easy application Thick layer filling and levelling ability High initial tack or grab on plaster and concrete Quick drying Colour: Grey
$20.57

Sil-X advanced polymer technology is formulated to deliver superior performance in demanding situations where conventional products fail, on any surface* wet or dry. Sil-X has been specially developed to withstand the tough Australian and New Zealand conditions. Selleys THE ONE Adhesive delivers superior bond strength on any building surface. Can be applied to wet or dry, interior or exterior, porous or non porous surfaces*. Extreme versatility that takes the guess work out of DIY. Features Strong bond on any building material Can be applied to wet or dry surfaces Suitable for interior and exterior applications Can be used on porous and non-porous materials Will adhere to oily surfaces Low VOC Excellent weather resistance Flexible and long lasting Paintable with water-based paints What materials is this product suitable for? Suitable for all building materials* How to use this product Ensure surfaces are clean and free from grease or loose particles. Cut tip of cartridge, fit nozzle and cut at 45ºangle to desired size before placing in a cartridge gun such as Selleys Light Speed Caulking Gun. Apply with a caulking gun, pushing adhesive onto the surface. Position pieces and press firmly together. Larger, heavier materials may need to be supported until the adhesive cures. If painting, paint with water-based paint. Handy tips Keep a pack of SELLEYS Sugar Soap Wipes handy to wipe up any spills and for cleaning. They are an easy and effective way to keep clean on the job. Limitations *Not for PE, PP, PTFE, or permanent water immersion Clean up Clean up with turps before the adhesive cures. Safety tips Keep out of reach of children. Avoid skin and eye contact and breathing vapours. Use in a well ventilated area. Wear protective clothing, gloves and eye protection. If on skin, wash with soap and water. Cure product before disposal. Product releases methanol during cure.
$17.00


Power Grip™ sticks and withstands virtually anything*. Powered by SIL-X® technology for high versatility and durability, this glue will work even in the most extreme conditions*. Where normal glues fail, Power Grip™ rises to the challenge. Features Sticks and withstands virtually anything* Outperforms Super glue on uneven, porous or non-rigid surfaces. Shockproof – bends on impact High flexibility High bond strength Gap filling: Sticks uneven surfaces together, which means you can fix things that didn’t break cleanly. Water & Weatherproof Temperature Resistant 15C – 120C Dishwasher Safe Works on uneven surfaces Set time 3 minutes Colour Dries clear What materials is this product suitable for? Metal Wood Stone Bricks Concrete Masonry Ceramic Glass Foam Leather Laminate Vinyl Fabric Cardboard Most plastics (will not bond polyethylene or polypropylene plastics; for these use Selleys Plastics Glue) How to use this product Use in a well-ventilated area Ensure surfaces are clean and dry. Remove cap and apply to a surface. Simply apply and hold the bond in place for at least 1 minute or until set (around 3 mins, allow longer for non-porous surfaces such as metal and plastics). If necessary clamp or tape to support until adhesive sets – for porous surfaces such as wood and ceramics, practical strength is usually achieved within 12 hours. Product cures rapidly, wipe nozzle clean and tightly replace cap immediately. Store upright in a cool dry place. Clean up before adhesive sets with turps or acetone. Handy tips Initial bond in 3 minutes, full cure in 12-24 hours. To reduce set times on non-porous surfaces, keep surfaces apart for 30 seconds before bringing together. Safety Tips Causes skin irritation. May cause an allergic skin reaction. Causes serious eye damage. KEEP OUT OF REACH OF CHILDREN. Avoid skin and eye contact and breathing vapours. Use in a well-ventilated area. Wash thoroughly after handling. Product releases methanol during cure. Storage and re-use Wipe nozzle clean, replace cap & store in a cool dry place. *Not suitable for polyethylene, polypropylene or PTFE. Not for permanent water immersion. Avoid UV exposure
$19.12

Power Grip™ sticks and withstands virtually anything*. Powered by SIL-X® technology for high versatility and durability, this glue will work even in the most extreme conditions*. Where normal glues fail, Power Grip™ rises to the challenge. Features Sticks and withstands virtually anything* Outperforms Super glue on uneven, porous or non-rigid surfaces. Shockproof – bends on impact High flexibility High bond strength Gap filling: Sticks uneven surfaces together, which means you can fix things that didn’t break cleanly. Water & Weatherproof Temperature Resistant 15C – 120C Dishwasher Safe Works on uneven surfaces Set time 3 minutes Colour Dries clear What materials is this product suitable for? Metal Wood Stone Bricks Concrete Masonry Ceramic Glass Foam Leather Laminate Vinyl Fabric Cardboard Most plastics (will not bond polyethylene or polypropylene plastics; for these use Selleys Plastics Glue) How to use this product Use in a well-ventilated area Ensure surfaces are clean and dry. Remove cap and apply to a surface. Simply apply and hold the bond in place for at least 1 minute or until set (around 3 mins, allow longer for non-porous surfaces such as metal and plastics). If necessary clamp or tape to support until adhesive sets – for porous surfaces such as wood and ceramics, practical strength is usually achieved within 12 hours. Product cures rapidly, wipe nozzle clean and tightly replace cap immediately. Store upright in a cool dry place. Clean up before adhesive sets with turps or acetone. Handy tips Initial bond in 3 minutes, full cure in 12-24 hours. To reduce set times on non-porous surfaces, keep surfaces apart for 30 seconds before bringing together. Safety Tips Causes skin irritation. May cause an allergic skin reaction. Causes serious eye damage. KEEP OUT OF REACH OF CHILDREN. Avoid skin and eye contact and breathing vapours. Use in a well-ventilated area. Wash thoroughly after handling. Product releases methanol during cure. Storage and re-use Wipe nozzle clean, replace cap & store in a cool dry place. *Not suitable for polyethylene, polypropylene or PTFE. Not for permanent water immersion. Avoid UV exposure
$9.00

Features Simply sticks almost anything without screws or clamps* Instantly holds even on vertical surfaces* Adjustable for up to 15 minutes UV & water-resistant Holds up to 360kg/ m² Where can this product be used? Indoors and outdoors for any bonding applications What materials is this product suitable for? Glass Metals Timber Brick Concrete / masonry Tiles Not for polyethylene, polypropylene or teflon Colours White Technology Sil-X® Use Interior Exterior How to use Make sure surfaces are clean, free from grease, girt and grime. Sand back any loose or peeling surfaces. Pull off cap, unscrew nozzle and pierce membrane with the tip of the nozzle. Replace nozzle and cut along the second ridge. Cover one surface in the adhesive in long vertical strips. After applying the adhesive, press surfaces together firmly, ensuring the adhesive spreads. Clean up any excess product with methylated spirits.
$13.00
![Selleys Armour Flex High Performance Adhesive [Black]](http://gluesaustralia.com.au/cdn/shop/files/9300697125286_24a1028f-4655-4200-8859-8e45b8c9ab19.jpg?v=1754711936&width=645)
Selleys ArmourFlex provides superior strength with instant grab and more flexibility than conventional adhesive/sealants. Features Superior strength & instant grab No primer required Watertight seal with a 10-year guarantee* Can be applied to wet or damp surfaces with excellent adhesion Non-bubbling Better curing and extrudability (>5°C) Easily paintable with 2 coats of water-based paints after product skins in 60 to 90 minutes Sandable Low VOC** Long-lasting flexibility Fast curing No slump Trafficable Potable water approved AS/NZS4020 (Area to volume ratios **Meets GBCA limits for general purpose and architectural sealants. Where can this product be used? Skylights Walls Patios Floors Fencing Windows Expanding joints in concrete What materials is this product suitable for? Concrete Timber Metals Cement sheeting Brick Plasterboard Ceramic tiles Fibreglass Most plastics (Pre-test before use. Not for polyethylene, polypropylene or Teflon.) Ensure substrates are clean and free of oil, grease or loose particles. Cut seal and nozzle and fit to cartridge, then place in caulking gun. Hold caulking gun at 45° angle and gun sealant ahead of nozzle ensuring product is pushed into joint. For neat joints, use masking tape on both sides of the joint and remove before skinning. Tool with a soapy solution before skinning occurs. For optimal joint design, use non-absorbent backing material (e.g. polyethylene backer rod) and appropriate joint width/depth. See technical data sheet for more information. Limitations: Not suitable on polyethylene, polypropylene or Teflon. Not for permanent water immersion or below water-line use. In dry conditions, surfaces can be misted with water to speed up cure. Paint with water-based paint. A minimum of two coats are necessary to ensure proper wetting out the sealant surface
$24.23


An all purpose, high strength household glue that unlike standard superglues is extremely ‘infinitely’ more flexible. It can repair and bond a variety of surfaces and withstand the most extreme/rough conditions whilst providing the ultimate bond. Features Strong Bond Ultra Flexible – infinitely more flexible* Extreme Resistance to: Shocks & Vibration, Torsion & Movement, Water and Extreme Temperatures Dishwasher Safe Gap Filling (works on uneven surfaces) Paintable Adjustable for 1min Non-Drip (great for vertical surfaces) Interior/Exterior Easy to use Heat resistant -15°C to +120°C Solvent free, no shrinkage Colour Dries translucent What materials is this product suitable for? Metal Wood Glass Rubber China Leather Ceramics Masonry Fibreglass Vinyl Cardboard Fabric Most plastics (will not bond polyethylene or polypropylene plastics; for these use Selleys Plastics Glue) Storage and re-use Wipe nozzle clean, replace cap & store in a cool dry place Safety Tips On contact, uncured adhesive can irritate eyes. If in eyes, flush with water for at least 15 minutes and seek medical advice. Avoid contact with skim. If contact occurs, wipe off and wash with detergent. Avoid breathing vapours. Use in a well ventilated area
$12.00

A durable, multi-purpose filler that has been designed for filling deep and wide cracks and holes on all surfaces inside and outside the home. Easy to sand, sets to a super hard finish and is highly crack resistant. For use on: Brick, masonary, concrete, plasterboard, wood & metal (INTERIOR & EXTERIOR) Fill depth: Up to 10mm Dries in: 3 hours Ready to use: YES Colour: White • Surface to be filled should be clean and dry with no loose or powdery material. • Exterior surfaces and metals (eg. nail heads) should be primed before application. • Using the filling blade press filler in firmly and remove excess. • Allow to dry (2-3 hours in thin 2-3mm applications depending on humidity). Allow longer drying times if painting with oil based paints (24 hours minimum) or for deeper applications. • For deeper jobs apply in 10mm layers, allowing each layer to set, before applying the next layer. • Protect from rain until painted over. .• For best results, apply paint undercoat before applying water or oil based paint top coat. • Use Polyfilla Gap filler or silicone sealant where joint movement occurs. • Clean up with water before filler dries Q. Is there a filler I can use for both inside and outside? A. Polyfilla Large Cracks is a multipurpose filler designed for filling cracks and holes on all surfaces inside and outside the home.
$11.74

A durable, multi-purpose filler that has been designed for filling deep and wide cracks and holes on all surfaces inside and outside the home. Easy to sand, sets to a super hard finish and is highly crack resistant. For use on: Brick, masonary, concrete, plasterboard, wood & metal (INTERIOR & EXTERIOR) Fill depth: Up to 10mm Dries in: 3 hours Ready to use: YES Colour: White • Surface to be filled should be clean and dry with no loose or powdery material. • Exterior surfaces and metals (eg. nail heads) should be primed before application. • Using the filling blade press filler in firmly and remove excess. • Allow to dry (2-3 hours in thin 2-3mm applications depending on humidity). Allow longer drying times if painting with oil based paints (24 hours minimum) or for deeper applications. • For deeper jobs apply in 10mm layers, allowing each layer to set, before applying the next layer. • Protect from rain until painted over. .• For best results, apply paint undercoat before applying water or oil based paint top coat. • Use Polyfilla Gap filler or silicone sealant where joint movement occurs. • Clean up with water before filler dries Q. Is there a filler I can use for both inside and outside? A. Polyfilla Large Cracks is a multipurpose filler designed for filling cracks and holes on all surfaces inside and outside the home.
$84.97

A durable, multi-purpose filler that has been designed for filling deep and wide cracks and holes on all surfaces inside and outside the home. Easy to sand, sets to a super hard finish and is highly crack resistant. Filling blade included For use on: Brick, masonary, concrete, plasterboard, wood & metal (INTERIOR & EXTERIOR) Fill depth: Up to 10mm Dries in: 3 hours Ready to use: YES Colour: White Application • Surface to be filled should be clean and dry with no loose or powdery material. • Exterior surfaces and metals (eg. nail heads) should be primed before application. • Using the attached filling blade press filler in firmly and remove excess. • Allow to dry (2-3 hours in thin 2-3mm applications depending on humidity). Allow longer drying times if painting with oil based paints (24 hours minimum) or for deeper applications. • For deeper jobs apply in 10mm layers, allowing each layer to set, before applying the next layer. • Protect from rain until painted over. .• For best results, apply paint undercoat before applying water or oil based paint top coat. • Use Polyfilla Gap filler or silicone sealant where joint movement occurs. • Clean up with water before filler dries FAQ's Q. Is there a filler I can use for both inside and outside? A. Polyfilla Large Cracks is a multipurpose filler designed for filling cracks and holes on all surfaces inside and outside the home.
$29.00

Parfix Maxi Nails Fast is a water based construction adhesive that grabs quickly and provides high bond strength between a wide range of materials including concrete, plywood, ceramics, brick and plasterboard. Fast acting, adheres within minutes Quick & easy clean up with water Low odour
$5.00


Loctite® Repair Putty Multi-Purpose is a two-part adhesive consisting of an epoxy resin putty and a hardener putty which are mixed by kneading. They react to produce a hard, tough, permanent and waterproof bond on a wide range of materials. Loctite® Repair Putty Multi-Purpose does not shrink and is resistant to most common solvents. It can bond to damp surfaces and cure under water. Loctite Epoxy Putty can be sanded, drilled and painted. Recommended For Bonding metal, masonry, brick, wood, glass, ceramic, rubber, fibreglass composite, china, stone, marble and many rigid plastics Use to seal pipes, fix leaks in tanks and drains, repair appliances, tools, furniture, toys, automotive parts, pools and cracks in concrete Not Recommended For Potable water systems. Applications above 121°C (250°F). Polyethylene and polypropylene. Structural applications. Safety Precautions Wear gloves. Preparation Surfaces should be clean and free from grease and oil. For better adhesion, slightly roughen the surface with a wire brush or sandpaper prior to cleaning. Cut off desired length of Epoxy Putty and knead until uniform color is obtained. Putty turns from blue to white when completely mixed. Application Apply the putty to surface to be repaired within 3 minutes of mixing. Work putty firmly into the crack or hole. For bonding, place the putty between the surfaces and apply firm pressure to ensure intimate contact with both surfaces. If applying to a wet surface, apply forcefully and hold in place until adhesion takes effect. For a smooth finish, rub the putty with a damp cloth prior to hardening. Working time is approximately 5 minutes. After 45 minutes, the putty can be sanded, drilled or painted. Cleanup Cured putty may be cut away with caution using a sharp blade.
$35.00

Loctite® Epoxy Weld Bonding Compound is a two-part system consisting of an epoxy resin and a hardener. When mixed in equal volumes, the resin and hardener react to quickly produce a tough, rigid, high strength bond. Loctite® Epoxy Weld can be used as a convenient alternative to welding. It can be used as an adhesive for repairing, filling and rebuilding all metal and common surfaces. It cures to a metallic gray finish and can be easily sanded, drilled, machined or painted when fully cured. Loctite® Epoxy Weld does not shrink and is resistant to most shop fluids such as water, diesel fuel, gasoline, antifreeze, hydraulic fluid, motor oil and transmission fluids. Won t crack when drilled or machined Can be used outdoors One-time application Quick completion of project Can withstand temperatures up to 350°F (177°C) intermittently Good for applications requiring shear strength up to 3000 psi High impact resistance Water resistant Does not shrink Sets in 4 to 6 minutes High heat resistance Exceptional bond strength Recommended on Repairing machinery, appliances, tools, lawnmowers, automotive components, pipes, and embedding bolts and screws into metal Bonding various types of metal such as iron, steel, aluminum, brass, bronze, copper and pewter Properties High impact resistance Won’t crack when drilled or machined Water resistant Can be used outdoors Does not shrink One-time application Sets in 4 to 6 minutes Quick completion of project High heat resistance Can withstand temperatures up to 350°F (177°C) intermittently Exceptional bond strength Good for applications requiring shear strength up to 3000 psi HOW TO USE: Step 1: Safety Precautions Avoid skin contact. Keep away from eyes. Avoid prolonged breathing of vapors. Apply in a well ventilated area. Open windows and doors to achieve good cross-ventilation. Wear safety glasses to protect eyes, and rubber or plastic gloves to protect skin. Step 2: Preparation Protect work area. Surfaces must be clean, dry and free from oil, wax and paint. For better adhesion, roughen smooth surfaces prior to cleaning. Pre-fit parts to be joined. Pierce tube nozzles using the reverse side of the caps. Squeeze out equal amounts of resin and hardener on a clean, disposable surface. Prepare only as much as can be used within 3 minutes of mixing. Recap tubes immediately after use. Match the black cap with the resin and the white cap with the hardener. Mix resin and hardener together for approximately 1 minute or until it is uniform in color. Step 3: Application Apply to surfaces to be filled or bonded. Join and press parts together. When bonding butt joints, adhesive should be applied as a reinforcing fillet or splint over the joint for additional support. Remove any excess glue immediately with acetone, mineral spirits or rubbing alcohol. Support until bond sets in 10 to 15 minutes at room temperature. Parts can be handled within 15 minutes and machined within 16 to 24 hours. Cure time is lengthened in cooler temperatures and shortened in warmer weather. Step 4: Cleanup Clean excess glue immediately with acetone before adhesive sets. Cured adhesive may be cut away with caution using a sharp blade. Prolonged immersion in paint stripper will soften the cured adhesive to aid removal.
$15.17


Loctite Pre Mixed Epoxy 60 seconds is a two-part adhesive consisting of an epoxy resin and a hardener. When mixed in equal volumes, the resin and hardener react to produce a tough, rigid, high strength bond, which starts to set in 60 seconds and reaches handling strength in 5 to 10 minutes. The static mix nozzle delivers a uniform mixture of resin and hardener every time. It can be used as an adhesive for a wide range of materials or as a versatile filler for gap bonding, surface repairs and laminating. octite Pre Mixed Epoxy 60 seconds does not shrink and is resistant to water and most common solvents. It can be tinted with earth pigments, cement or sand for color matching and can be sanded and drilled. Recommended on Great for crafting projects Bonding metal, glass, ceramic, wood, many rigid plastics, china, tile, fiberglass, concrete and stone Can be combined with fiberglass cloth for a durable patch Properties High impact resistance: won’t crack when drilled Can be tinted to match surrounding materials Water resistant and can be used outdoors Does not shrink Convenient instant mix syringe Consistently dispenses equal, uniformly mixed amounts of each component Sets in 40 to 60 seconds Quick completion of project HOW TO USE: Step 1: Safety Precautions Well-ventilated area, gloves. Step 2: Preparation Protect work area. Surfaces must be clean, dry and free from oil, wax and paint. For better adhesion, roughen smooth surfaces prior to cleaning. Pre-fit parts to be joined. Remove plastic cap from center of plunger. Turn nozzle end up and pull plunger back slightly allowing air bubbles to rise to top. Snap off and discard end of syringe. Insert nozzle opening and push past prongs. Rotate nozzle 90° to lock into place. Step 3: Application Depress plunger to dispense equal amounts of hardener and resin directly onto surface to be filled or bonded. Remove and discard nozzle. Wipe syringe tip immediately. Retract plunger slightly and close with the cap provided. Place objects together within 40 seconds of adhesive application. Bond sets in 40 to 60 seconds at 20°C to 25°C. Remove any excess adhesive immediately with mineral spirits. Usable strength is obtained within 5 to 10 minutes. Warmer temperatures will shorten the set time and cooler temperatures will lengthen it. Step 4: Cleanup Clean excess glue immediately with mineral spirits. Cured adhesive may be cut away with caution using a sharp blade. Prolonged immersion in paint stripper will soften the cured adhesive to aid removal.
$7.91


LOCTITE 660 is a high strength retaining compound with good gap filling properties, ideal for repairing worn-out seats, keys, splines, bearings or tapers without remachining. LOCTITE® 660 is designed for the bonding of cylindrical fitting parts, particularly where bond gaps occurs without the need for remachining. The product cures when confined in the absence of air between close-fitting metal surfaces and prevents loosening and leakage due to shock and vibration. LOCTITE 660 exhibits excellent gap cure characteristics and is also suitable for retaining shims. Ideal for repairing worn parts without remachining Enables re-use of worn bearing seats, keys, splines or tapers Suitable for retaining shims P1 NSF Reg. No.: 123704 Technical Information Agency Approvals / Specifications NSF P1 Color Silver Diametrical Clearance (Maximum) Unit mm Fixture Time 15 min. Fixture Time Temperature 15 °C Gap Fill 0.5 mm Key Characteristics Thixotropic Substrates Metal: Steel
$10.59

Bonds metals, ceramics, concrete, fibreglass, marble and wood. Syringe dispenser accurately measures equal amounts of resin and hardener to prevent wastage. Fast curing, cure commences in five minutes and reaches full cure in one hour. When cured, the bond is transparent and virtually colourless. Loctite 5 Minute Epoxy Adhesive's premium formulation is solvent-free and 100% solids providing a non-shrink, environmentally friendly bond. High viscosity provides a good gap-filling ability. DIRECTIONS FOR USE: 1. Surfaces must be clean and dry. If possible, roughen surface with sandpaper to improve keying and bonding. 2. Cut tips of twin nozzle with a sharp knife and remove nozzle cap from syringe plunger. 3. Push the twin plunger to squeeze out equal amounts of resin and hardener in the amounts required. 4. Mix the resin and hardener for one or two minutes until the colour is completely uniform. 5. Apply immediately to both surfaces and press together. Pressure clamping is not necessary, but allow the adhesive to set for at least 5 minutes before moving. Remove any excess adhesive immediately. 6. Important. After dispensing product be certain to insert plug supplied in the nozzle of the syringe to prevent waste. Preferably store in an upright position as packaged. Structural Bonding - Fast Cure. Sets in 5 minutes. Sets in 5 minutes. Good chemical resistance. Fixture time: 4-6 min Temperature Resistance: Up to 180°F (82°C)
$15.11

J-B Weld is The Original Cold Weld two-part epoxy system that provides strong, lasting repairs to metal and multiple surfaces. Mixed at a ratio of 1:1, it forms a permanent bond and can be shaped, tapped, filed, sanded and drilled after curing. At room temperature, J-B Weld sets in 4-6 hours to a dark grey colour. A full cure is reached in 15-24 hours. J-B Weld has a tensile strength of 3960 PSI and sets to a hard bond overnight. It can withstand temperatures up to 550ºF when fully cured. Great For: Household Repairs Automotive Plumbing Marine Crafts & More Strenght: 3960 PSI Set Time: 4-6 Hours Cure Time: 15-24 Hours Cure Colour: Dark Grey Use on: Automotive Brick Concrete Epoxy & Adhesives J-B Weld Metal Pro Sizes And More
$32.00

PlasticWeld is a specially formulated two-part adhesive and epoxy filler system that provides for strong, lasting repairs. PlasticWeld will bond a variety of surfaces, such as metal, composites, fiberglass and others. PlasticWeld sets in 5 minutes at room temperature and is fully cured in 1 hour. Using a 1:1 mixing ratio, PlasticWeld combines to a tensile strength of 3200 PSI and cures to an off-white color. GREAT FOR Most Hard Plastics ABS Fibreglass PVC Glass Vinyl STRENGTH 3200 PSI SET TIME 5 Minutes CURE TIME 1 Hour CURE COLOR Off White USE ON Automotive Ceramic Epoxy & Adhesives Fibreglass Plastic/Composite/PVC And More
$14.95
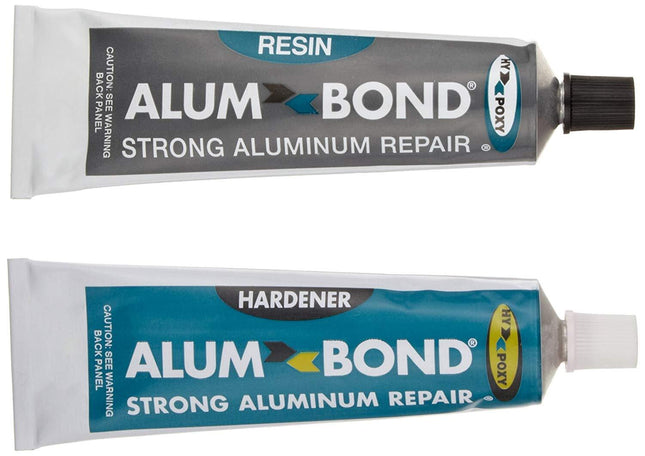
A two-component epoxy formula highly concentrated with carefully selected pure aluminium particles, modified curing agents, and special high quality additives to provide maximum strength, durability, and ease of application. APPLICATIONS: ALUMBOND is specially formulated for repairing HVAC copper pipes, HVAC condenser coils, tanks, valves, pumps, castings, water jackets, radiators, etc., where non-rusting, non-magnetic aluminum finish is desired. PHYSICAL PROPERTIES: Color Grey Pot Life 1 lb. @ 24ºC (75°F) 45 minutes Viscosity Non-sagging Paste Mixed Viscosity 330,000 cps Cure Shrinkage 0.0005 in/in Temperature Resistance 250°F (121ºC) Hardness (Shore, ASTM D 1706) 83D Cured Density 17.5 cu. in. per lb. Coefficient of Thermal Expansion 40 X 10- 6 cm/cm/ºC Compression Strength (ASTM D 695) 8,600 psi (59 M Pa) Tensile Strength (ASTM D 638) 3,500 psi (24 M Pa) Maximum Line Pressure (after 5 hours application time) 650 psi DIRECTIONS: Surfaces must be clean, dry, and preferably roughened for maximum adhesion. Dispense equal volumes of resin and hardener. Volume Ratio is 1:1. Mix thoroughly for 6 minutes making certain that all of the hardener comes in contact with all of the resin. Apply the mixed compound with a putty knife, spatula, or similar tool. The tool may be moistened with water to provide a smooth finish to the HY-POXY ALUMBOND. CURING TIME: At 75°F (24°C) a ½” (12.5mm) layer of HY-POXY ALUMBOND putty will be hard in approximately 45 minutes HY-POXY ALUMBOND will not cure properly below 40°F (4°C).
$85.00

Hold It Australia T77 STUDLOCK High Strength for Bolts 25mm and Above - 50ml Description: HOLDIT AUSTRALIA T77 Studlock large diameter high strength threadlocker is a red, general purpose adhesive for permanent threaded assemblies. It effectively locks fasteners 1 and larger in diameter, providing a seal against leakage and corrosion while resisting attacks from lubricants and industrial liquids and gases. Applications Ideal for eliminating double nutting/welding in critical assemblies. T77 allows for reduced casting thickness and prevents cracked castings from interference fit stresses. Suitable for larger diameter studs with coarse threads and can be used to reclaim worn stud holes. Primers are recommended for large gaps and poorly fitting parts. Instructions for Use Clean all surfaces with a cleaning solvent and allow to dry. If the metal is inactive or the cure speed is slow, apply HOLDIT AUSTRALIA AA471 Activator or AA649 Accelerator. Shake the product thoroughly before application. Apply the adhesive to the fixing position of the fastener or onto the internal threads of a blind hole. Assemble components and tighten to the required torque level. Allow the adhesive to fully cure before applying load. Active & Inactive Metal Table Active Metals (Fast Cure): Iron, Steel, Nickel, Aluminium Inactive Metals (Slow Cure): Stainless Steel, Titanium, Zinc, Anodized Aluminium, Galvanised Steel Passive Surfaces (Primer Necessary): Ceramics, Glass, Plastics, Painted Surfaces
$34.86


The product that started it all. Original Gorilla Glue built a name for itself with its incredible, industrial holding power and versatility. Water activated, it expands into materials to form an incredibly strong bond to virtually anything. Gorilla Glue is your solution for almost any project or repair. It’s 100% waterproof, safe for indoor and outdoor use and strong enough to stand up to the elements. Plus, its expansion allows it to penetrate the glued surface for a superior bond. Sand it, paint it, stain it. Simply stated, it’s the Toughest Glue on Planet Earth. Directions: Prepare and Dampen the Surfaces If you’re using Original Gorilla Glue for the first time, or bonding a new type of material, we always recommend trying a test piece first. Prepare your surfaces: All surfaces must be clean, dust free and tight fitting. For shiny surfaces, such as metals, glass and some plastics, roughen up the material to give the glue something to bite into. Damp It: Lightly dampen one surface with water. We recommend using a damp cloth or spraying with water. Do not saturate the surface. For dense hardwoods, lightly dampen both surfaces prior to gluing. Evenly Apply Gorilla Glue Onto the Dry Surface Glue It: Carefully apply onto the dry surface. Do not over apply. We recommend wearing gloves or spreading the glue with a disposable brush. In some instances, Gorilla Glue can be a skin sensitizer. If you are predisposed to skin reactions, please take the extra precaution. If you do get the glue on your skin, try removing it with a dry cloth or paper towel first (particularly if the glue is still tacky). If that doesn’t work, try washing with soap and cold water, or using an exfoliator with a gritty texture. Dry your skin and apply lotion. We do not recommend using any kind of alcohol or acetone. This actually strips the skin of its natural oils, which means the glue is more likely to stick. Clamp the Two Surfaces Together Tightly Clamp It: Make sure the clamping pressure is distributed evenly across the surface. Or, if you don’t have a clamp, use heavy objects or Gorilla Tape® to achieve the appropriate clamping pressure. For lighter objects, try using rubber bands to hold the pieces together tightly. Clamp objects for 1–2 hours. For best results, allow 24 hours to cure. Clean up If you need to remove any uncured “squeeze out” or wet glue, we recommend wiping with a dry cloth or using a standard paint thinner. Make sure to read and follow directions if using a paint thinner. Always wear gloves. Once the glue is dry, it is best removed mechanically: Try sanding, chiselling, scraping or picking. The dried glue will not damage tools.
$10.86


The product that started it all. Original Gorilla Glue built a name for itself with its incredible, industrial holding power and versatility. Water activated, it expands into materials to form an incredibly strong bond to virtually anything. Gorilla Glue is your solution for almost any project or repair. It’s 100% waterproof, safe for indoor and outdoor use and strong enough to stand up to the elements. Plus, its expansion allows it to penetrate the glued surface for a superior bond. Sand it, paint it, stain it. Simply stated, it’s the Toughest Glue on Planet Earth. Directions: Prepare and Dampen the Surfaces If you’re using Original Gorilla Glue for the first time, or bonding a new type of material, we always recommend trying a test piece first. Prepare your surfaces: All surfaces must be clean, dust free and tight fitting. For shiny surfaces, such as metals, glass and some plastics, roughen up the material to give the glue something to bite into. Damp It: Lightly dampen one surface with water. We recommend using a damp cloth or spraying with water. Do not saturate the surface. For dense hardwoods, lightly dampen both surfaces prior to gluing. Evenly Apply Gorilla Glue Onto the Dry Surface Glue It: Carefully apply onto the dry surface. Do not over apply. We recommend wearing gloves or spreading the glue with a disposable brush. In some instances, Gorilla Glue can be a skin sensitizer. If you are predisposed to skin reactions, please take the extra precaution. If you do get the glue on your skin, try removing it with a dry cloth or paper towel first (particularly if the glue is still tacky). If that doesn’t work, try washing with soap and cold water, or using an exfoliator with a gritty texture. Dry your skin and apply lotion. We do not recommend using any kind of alcohol or acetone. This actually strips the skin of its natural oils, which means the glue is more likely to stick. Clamp the Two Surfaces Together Tightly Clamp It: Make sure the clamping pressure is distributed evenly across the surface. Or, if you don’t have a clamp, use heavy objects or Gorilla Tape® to achieve the appropriate clamping pressure. For lighter objects, try using rubber bands to hold the pieces together tightly. Clamp objects for 1–2 hours. For best results, allow 24 hours to cure. Clean up If you need to remove any uncured “squeeze out” or wet glue, we recommend wiping with a dry cloth or using a standard paint thinner. Make sure to read and follow directions if using a paint thinner. Always wear gloves. Once the glue is dry, it is best removed mechanically: Try sanding, chiselling, scraping or picking. The dried glue will not damage tools. Storage Tips After each use, wipe the bottle’s lid and nozzle clean with a dry cloth. For 2 oz. bottles, tightly replace the lid after wiping clean and store in a cool, dry place. For bottle sizes 4 oz. and larger, we suggest squeezing excess air out of the bottle. While still squeezing, tightly replace the cap and then store in a cool, dry place. This helps eliminate moisture in the bottle. You should expect a year shelf life.
$12.50

Bostik Nail It Instant Grab White: Grab It Fast, Hold It Forever Product Overview Bostik Nail It Instant Grab White is a high-quality professional adhesive crafted with MSP (Modified-Silyl Polymer) technology. It offers extremely high initial tack, eliminating the need for fixation or support during curing. Smart Advantages Extremely high initial tack No fixation or support needed during curing Free of isocyanates, phthalates, solvents, and silicones Suitable for both interior and exterior use Non-corrosive towards metals Almost odorless Resistant to moisture, weather, and UV Applications Universal bonding adhesive suitable for: Stone, Concrete, Glass Metals, Alloys, Stainless steel Plastics, Polyurethane, PVC Wood, Paint Systems Directions for Use Application should be done in vertical stripes using a caulking gun. No need for fixation or support due to high initial strength. Limitations Not suitable for certain plastics, continuous water exposure, or movement joints. Cleaning & Safety Remove excess uncured adhesive with Bostik Handy Wipe or a damp cloth. Cured adhesive can only be mechanically removed. Product Codes & Specifications Available in 290ml cartridges. Temperature resistance ranges from -40°C to +90°C.
$18.00

Bostik Nail It Fast Cure White: The Acrylic Adhesive for Rapid, Strong & Odorless Bonds Product Overview Bostik Nail It Fast Cure is a fast-curing, versatile acrylic adhesive that offers strong and durable bonds. It's easy to apply and almost odorless. Key Benefits Solvent-free formula Suitable for EPS and XPS Non-corrosive towards metal Easy to apply and clean Applications Specifically developed for bonding: Wood, chipboard, hardboard uPVC to brickwork, stone or concrete Ceramic tiles to porous substrates Limitations Not suitable for PE, PP, PC, PMMA, PTFE, soft plastics, neoprene, and bituminous substrates. Not designed for continuous exposure to water or for movement joints. Application Instructions Apply the adhesive in a ventilating manner, using vertical stripes or dots. Material should be placed by shoving and pushing firmly. Surface Preparation All substrates must be solid, clean, dry, and free from grease and dust. For porous substrates, priming may be required. Cleaning & Maintenance Tools and uncured material can be cleaned with water or Methylated Spirit. Cured material must be removed mechanically. Bostik HANDY WIPES are recommended for cleaning hands. Colour Options Available in white.
$6.96
You have seen 84 out of 84 products
Thixotropic or expanding systems that bridge uneven joints and larger voids. Balance gap-fill with cure-through depth and final strength. Use filters to refine by chemistry and working time. Always check the product page and TDS/SDS.