In Stock
Express Post: 1-3 Days | Standard Post: 2-5 Days
Get your adhesive jobs done quickly and cleanly with the GlueMix Disposable Kit. This all-in-one set includes a disposable mixing tray, a sturdy wooden stick, and a pair of lightly powdered, natural rubber gloves for added convenience and protection.
Complete Kit: Everything you need to mix and apply adhesives with ease.
Convenient & Disposable: Use it once and toss it—no cleanup required.
Mess-Free Mixing: The tray keeps your workspace clean and organized.
Durable Wooden Stick: Perfect for precise mixing and spreading.
Protective Gloves: Made from natural rubber, these gloves are lightly powdered for easy on-and-off wear and fit either hand comfortably.
Ideal for epoxy, glue, and resin projects, the GlueMix Disposable Kit is your go-to solution for hassle-free adhesive application. Perfect for repairs, crafts, or one-time projects.
In Stock
Express Post: 1-3 Days | Standard Post: 2-5 Days
The DTA Boss Grout Clean Up System Kit is a professional-grade cleaning solution designed to make post-grouting clean-up fast and effortless. Ideal for both tradespeople and DIYers, this all-in-one system helps you remove grout haze and residue from tiles after grouting.
What’s Included:
Heavy-duty cleaning sponge with handle
High-capacity rinse bucket with roller
Surface Preparation:
Before use, ensure that the tiled surface has set appropriately based on grout manufacturer instructions. The grout should be partially cured but not fully hardened — typically 10–30 minutes after application. Remove excess grout with a rubber float before using this cleanup system.
Application Instructions:
Fill the rinse bucket with clean water up to the indicated level.
Use the included sponge to gently clean the surface in a diagonal motion.
Rinse sponge regularly by rolling it over the inbuilt rollers to remove grout particles.
Repeat the process until the grout haze is removed and the tile surface is clean.
Coverage:
Cleans up to approximately 25–50m² per fill depending on tile texture and grout thickness.
Drying Time:
Tiles are generally clean and dry within 30–60 minutes of cleanup depending on ambient temperature and humidity. Ensure proper ventilation for best results.
Clean-Up:
Empty the bucket, rinse the sponge and components with clean water. Dry thoroughly before storing to extend product life.
Technical Data:
Rollers: Dual high-strength plastic rollers
Sponge: Extra absorbent and replaceable
This system is compatible with most grout types including cementitious and epoxy grouts. For stubborn epoxy residue, use in conjunction with a suitable epoxy grout cleaner.
In Stock
Express Post: 1-3 Days | Standard Post: 2-5 Days
• Fluoride based formula controls slipping on ceramic, mosaic and quarry tiles, terrazzo and unpainted concrete floors
• Alters surface texture yet maintains the appearance of the floor
• Coverage: 10sqpm per meter
In Stock
Express Post: 1-3 Days | Standard Post: 2-5 Days
Dulux Precision Maximum Strength Adhesion Primer
Get a tough, reliable bond on hard to paint surfaces with Dulux Precision Maximum Strength Adhesion Primer. This water based, low odour primer works as a primer, sealer and undercoat, creating a strong foundation for acrylic or oil based topcoats on both interior and exterior projects.
Why choose this primer
Water based with low odour
Excellent adhesion on glossy and hard to coat surfaces
Suitable as primer, sealer and undercoat
Interior and exterior use
Fast drying: touch dry in 30 minutes, recoat in 1 to 2 hours
Topcoat within 30 days for best results
Ideal surfaces
Tiles, high gloss enamels, varnished timber, uPVC, fiberglass, aluminium, galvanised steel, Colorbond, glass, glazed brick, laminates and previously painted glossy finishes.
Key specs
Finish
Flat
Colour
White
Coverage
Up to 10 m² per litre per coat, depending on surface
Dry time
Touch dry 30 minutes
Recoat time
1 to 2 hours
Full strength
7 days after application
VOC
30.4 g/L
Application temperature
Between 10°C and 32°C
Clean up
Water
Pack sizes
1 L and 4 L
How to use
Prepare the surface so it is clean, dry and free of grease, wax, dust, loose paint and rust. Wash if needed and allow to dry.
Stir thoroughly before and during use.
Apply 1 even coat with a high quality brush, roller or spray. For very smooth surfaces 1 coat is usually sufficient.
Allow 1 to 2 hours before recoating or applying the topcoat. Topcoat within 30 days.
Application tips
Do not tint for difficult surfaces. Thin only if necessary with a small amount of water.
When using solvent based enamel topcoats, lightly sand the primer before applying the enamel.
If using under products with strong solvents, let the primer dry 24 hours and test compatibility on a small area first.
Where not to use
Floors, benchtops or surfaces subject to standing water
Below 10°C surface temperature or if conditions may drop below 10°C during drying
Clean up and safety
Clean tools with water and a mild detergent, then rinse. Ensure good ventilation during use. Wear eye protection and avoid skin and eye contact. Always follow label directions.
Sold Out
Express Post: 1-3 Days | Standard Post: 2-5 Days
Dulux Precision Maximum Strength Adhesion Primer
Get a tough, reliable bond on hard to paint surfaces with Dulux Precision Maximum Strength Adhesion Primer. This water based, low odour primer works as a primer, sealer and undercoat, creating a strong foundation for acrylic or oil based topcoats on both interior and exterior projects.
Why choose this primer
Water based with low odour
Excellent adhesion on glossy and hard to coat surfaces
Suitable as primer, sealer and undercoat
Interior and exterior use
Fast drying: touch dry in 30 minutes, recoat in 1 to 2 hours
Topcoat within 30 days for best results
Ideal surfaces
Tiles, high gloss enamels, varnished timber, uPVC, fiberglass, aluminium, galvanised steel, Colorbond, glass, glazed brick, laminates and previously painted glossy finishes.
Key specs
Finish
Flat
Colour
White
Coverage
Up to 10 m² per litre per coat, depending on surface
Dry time
Touch dry 30 minutes
Recoat time
1 to 2 hours
Full strength
7 days after application
VOC
30.4 g/L
Application temperature
Between 10°C and 32°C
Clean up
Water
Pack sizes
1 L and 4 L
How to use
Prepare the surface so it is clean, dry and free of grease, wax, dust, loose paint and rust. Wash if needed and allow to dry.
Stir thoroughly before and during use.
Apply 1 even coat with a high quality brush, roller or spray. For very smooth surfaces 1 coat is usually sufficient.
Allow 1 to 2 hours before recoating or applying the topcoat. Topcoat within 30 days.
Application tips
Do not tint for difficult surfaces. Thin only if necessary with a small amount of water.
When using solvent based enamel topcoats, lightly sand the primer before applying the enamel.
If using under products with strong solvents, let the primer dry 24 hours and test compatibility on a small area first.
Where not to use
Floors, benchtops or surfaces subject to standing water
Below 10°C surface temperature or if conditions may drop below 10°C during drying
Clean up and safety
Clean tools with water and a mild detergent, then rinse. Ensure good ventilation during use. Wear eye protection and avoid skin and eye contact. Always follow label directions.
In Stock
Express Post: 1-3 Days | Standard Post: 2-5 Days
Dunlop AAC Block Construction Adhesive 15 kg is a reliable thin bed adhesive for autoclaved aerated concrete blockwork chosen for home repairs, trade work, and craft builds when you want a bond you can trust. Designed for Australian conditions, it balances strength, ease of use, and clean application so you can get professional results without special tools. The 15 kg pack is ideal for general work and keeps neatly in a toolbox or caddy.
Why choose Dunlop AAC for your next project
Everyday jobs often involve mixed materials and imperfect surfaces. Dunlop AAC Block Construction Adhesive 15 kg has been formulated to wet out well, grab quickly, and cure to a tough finish that resists movement and contact stress. It maintains bond integrity across common temperature swings and has dependable resistance to moisture and most household chemicals. Whether you are fixing, building, sealing, or assembling, this product gives you confidence from first squeeze through final set.
Best for
Laying AAC blocks in internal and external walls
Creating straight and plumb courses with minimal waste
Suitable surfaces
The adhesive works well on the following surface types when properly prepared:
AAC blocks and panels
Suitable primed substrates as per system design
Surface preparation
Good preparation is the key to a long lasting repair. Remove loose material, dust, and grease. Wipe glossy areas with methylated spirits or an approved cleaner and allow to dry. On very smooth plastics and metals, lightly roughen with fine abrasive paper to give the adhesive a mechanical key. Dry fit parts first and mark alignment points so you can assemble accurately within the open time. If bonding porous materials, ensure both faces are dry and free of surface chalking.
How to use
Check fit and plan clamping. Do a trial run without adhesive so you know the order of steps.
Apply a thin, continuous bead to one surface. For wide pieces, use a zig zag pattern to maximise wetting.
Bring surfaces together within the stated open time of follow bag guidance for open time and pot life. Reseat once if needed, then hold steady.
Apply even pressure using clamps, tape, weights, or temporary fasteners. Avoid squeezing all adhesive out of the joint.
Allow to cure undisturbed. Initial handling strength will develop as the adhesive sets, with a full cure reached based on the chemistry described below.
Cure profile
Mix to a creamy consistency and apply with a notched trowel. Align blocks within the open time and tap to level. Allow to set before further work.
Temperature and environmental performance
Protect fresh work from rain, frost, and high heat. Avoid application to very cold, sweating, or waterlogged surfaces. For outdoor use protect fresh bonds from rain until the skin has formed and the core has progressed in cure. Once fully cured, the bond resists normal weathering, splash water, and intermittent UV exposure based on the substrate and paint systems used.
Clean up and finishing
Wash tools with water while material is fresh. Remove spills promptly. When cured, excess can be carefully trimmed or sanded. For painted finishes, allow the adhesive to fully cure before priming. Test paint on a small area to confirm compatibility and drying behaviour.
Coverage guide
Coverage varies with bead size, surface porosity, and technique. As a general guide, a 3 mm bead yields approximately 10 to 12 linear meters per 310 mL cartridge. Smaller packs scale proportionally. Gaps, rough edges, and highly absorbent materials will reduce coverage. Plan an extra margin for offcuts and practice passes.
Tips for best results
Work within the recommended open time so the adhesive can properly wet the surfaces.
Use light clamping pressure to keep parts aligned while maintaining a film thickness for strength.
For very porous substrates, apply a thin precoat as a primer layer and allow it to tack before final assembly.
Keep joint lines clean by masking edges with painter tape and removing it before the adhesive skins.
Where movement or vibration is expected, design the joint to share load across a large area.
Troubleshooting
Poor adhesion: Check for oil, release agents, or surface dust. Reclean and lightly abrade if necessary.
Slow cure: Low temperature and low humidity extend cure time. Maintain moderate conditions for best results.
Visible squeeze out: Wipe fresh material with a suitable solvent and a soft cloth. Once cured, trim carefully.
Bond line prints through paint: Allow a full cure, then prime and apply thin coats of paint, allowing proper drying between coats.
Storage and shelf life
Keep dry and use within shelf life. Always check the pack for a lot code and use by guidance. Reseal immediately after use and store upright. Dispose of empty containers responsibly.
Safety
Read the label before use. Wear gloves when handling uncured material. Provide ventilation in enclosed areas. Avoid contact with skin and eyes. Keep out of reach of children and pets. If sensitivity occurs, stop use and seek advice. Do not ingest. First aid directions and detailed handling information are available on the package and the safety data sheet.
Frequently asked questions
Can I bond dissimilar materials? Yes, provided each surface is clean and sound. Differences in expansion are managed by the adhesive film thickness and the inherent flexibility after cure.
Is clamping required? Light clamping improves alignment and final strength. Excessive pressure can starve the joint of adhesive which reduces performance.
Is the bond water resistant? Once cured the bond resists splash water and routine humidity. For permanent immersion choose an adhesive designed for underwater service and follow the manufacturer guidance.
Planning your job
Measure twice and cut once. Dry assemble parts so you can confirm squareness and alignment before adhesive is involved. Keep rags, clamps, and spacers ready. If you are new to the product, test on offcuts to get a feel for bead size and squeeze out. A consistent 1 to 2 mm bond line is a good starting point for most rigid materials. Thicker lines help when surfaces are uneven. Avoid starving the joint by pressing too hard without giving the adhesive a place to reside.
Responsible use
Choose an adhesive that suits the materials and the environment the finished piece will face. If a joint will be submerged, carry structural loads, or be exposed to strong chemicals, check the technical data sheet for specific guidance. Many general purpose products are perfect for day to day work, while specialised tasks call for a system designed and tested for that environment. Using the right product first saves time, money, and rework.
Aftercare and maintenance
Adhesive joints are remarkably strong when used correctly. Design repairs so that routine loads are shared across a generous area. Where heavy vibration is present, pair the adhesive bond with appropriate mechanical fasteners. Keep cleaning chemicals mild, and avoid abrasive pads on visible joints. If a bond will be repainted, choose flexible paint where movement is expected, and keep edges sealed to prevent dirt tracking along the bond line.
Recycling and disposal
Allow empty containers to cure before disposal. Check local council guidance for recycling of plastics and metal cartridges. Never pour uncured product into drains or soil. Wipe tools on scrap material and let residue harden before placing in general waste. Smart handling keeps the workspace clean and reduces environmental impact.
In Stock
Express Post: 1-3 Days | Standard Post: 2-5 Days
Dunlop Damp-Proof Waterproofing is an acrylic brush-on membrane designed to prevent rising damp, efflorescence, and resist negative hydrostatic pressure. It adheres excellently to substrates including brick, masonry, concrete block, concrete, stone, and timber, and can be easily applied using a brush or roller. Once cured, it can be overcoated with most decorative paints.
Surface Preparation: Ensure all surfaces are structurally sound and free from existing coatings, adhesives, and efflorescence to achieve maximum bond strength and resistance to hydrostatic pressure. Surfaces may be damp but not wet and must be cleaned free of dirt, grease, oil, or other contaminants. Fill holes and non-structural cracks with a suitable floor repairer before application.
Application Instructions:
For Floors: Spread the material using a brush or long nap roller to achieve coverage, then finish with a long nap roller.
For Walls: Apply using a brush, roller, or spray, ensuring even coverage.
Work the material into voids to avoid pinholing.
For areas affected by hydrostatic pressure, apply a minimum of two coats. The second coat can be applied after 4 hours. Ensure uniform coverage and the required dry film thickness per coat.
Coverage:
Single Coat: Approximately 3m² per litre, per coat, when used as a barrier to efflorescence or as a moisture-resistant coating over green concrete.
Multiple Coats: For areas with hydrostatic pressure, two coats are required at a coverage rate of 1.5m² per litre per coat. Additional coats may be necessary to achieve uniform coverage.
Drying Time: Allow the membrane to cure for 24 hours before applying adhesives, mortars, decorative coatings, or other surface treatments. Ensure the membrane is not damaged during subsequent treatments. For floor surfaces, allow the final coating to cure for at least 24 hours before further treatment to minimize the risk of mechanical damage.
Clean Up: Wash all equipment with water or a water/detergent mixture immediately after use.
Technical Data:
Base: Acrylic
Application Temperature: 10°C to 35°C
Dry Film Thickness: Achieve required thickness as per application guidelines
Curing Time: 24 hours before overcoating
Shelf Life: Refer to packaging for details
In Stock
Express Post: 1-3 Days | Standard Post: 2-5 Days
Dunlop Express Wet Area Waterproofing Membrane is a high-performance, fast-drying liquid membrane designed for use in internal wet areas including bathrooms, showers, laundries, and kitchens. This flexible, water-based acrylic polyurethane formulation creates a seamless and highly durable waterproof barrier that is tile-ready within hours.
It’s suitable for use under tile adhesives, screeds, and other flooring products. The product forms a tough, elastomeric layer that resists movement, cracking, and water penetration. It meets the requirements of Class III membranes and is suitable for both floor and wall applications.
Surface Preparation:
Ensure all surfaces are clean, dry, and structurally sound. Remove dust, grease, oil, curing compounds, and loose or flaking materials. Prime all surfaces using a compatible primer. On porous or highly absorbent surfaces, apply a second primer coat if needed. Any existing cracks, gaps, or joints should be sealed or reinforced using bond breakers or reinforcing fabric.
Application Instructions:
Apply the membrane using a brush or roller.
Two coats are required for effective waterproofing.
First coat should be applied in one direction.
Once dry to the touch (approx. 2 hours), apply the second coat in the opposite direction.
Membrane should extend at least 150mm up walls in general wet areas and 1.8m in shower recesses.
Waterproofing must be applied continuously and without breaks or pinholes.
Use reinforcing fabric over joints and corners if required.
Avoid application in conditions below 10°C or above 35°C.
Coverage:
Approximately 1m² per litre per coat. A 5kg pail covers roughly 2.5m² with two coats, depending on surface porosity.
Drying Time:
Touch dry: 1–2 hours
Recoat time: 2 hours
Ready for tiling: 4–6 hours
Fully cured: 24 hours
Drying times will vary with ambient temperature and humidity.
Clean Up:
Clean tools and equipment immediately after use with water. Do not allow membrane to dry on tools.
Technical Data:
Type: Water-based acrylic polyurethane
Classification: Class III membrane
Application Method: Brush or roller
Flexibility: High
Water Resistance: Excellent
Colour: Grey
Shelf Life: 12 months (unopened in cool, dry conditions)
In Stock
Express Post: 1-3 Days | Standard Post: 2-5 Days
Dunlop FC Joint Sealant
Dunlop FC Joint Sealant is a premium, ultra flexible, moisture curing polyurethane sealant designed for jointing fibre cement, blueboard and compressed fibre cement sheets. The non slump formula handles joints up to 40 mm wide with a movement capability of plus or minus 25 percent. It is easy to apply, solvent free and isocyanate free. Colour: Grey.
Why choose this sealant
High flexibility for dynamic joints
Non slump for clean, accurate beads on vertical and horizontal surfaces
Solvent free and isocyanate free
Paintable after curing
Reliable performance supported by a 10 year guarantee
Ideal uses
Joints in fibre cement, blueboard and compressed fibre cement sheets
Facade and cladding joints where movement is expected
General building joints up to 40 mm width
Compatible surfaces
Adheres to most common construction substrates, including:
Fibre cement sheets and blueboard
Precast concrete panels, blockwork and bricks
Sandstone and granite
Fibreglass
Plasterboard
Technical details
Movement capability
± 25%
Joint width
Up to 40 mm
Skin time
Approximately 35 minutes at 23°C and 50% RH
Tack free time
Approximately 1 hour at 23°C and 50% RH
Cure rate
About 2.5 mm per 24 hours at 23°C and 50% RH
Application temperature
10°C to 35°C
Clean up
Warm water immediately after use
Shelf life
12 months unopened, stored cool and dry
Finish
Paintable when dry. Can be overcoated with paint or texture coats.
Colour
Grey
Surface preparation
Ensure surfaces are clean and dry, free of dust, oil, grease, salt, mould, release agents and any contaminants that may affect adhesion. Mask adjacent areas to keep lines neat. Follow sheet fixing instructions from the board manufacturer.
How to apply
Cut the nozzle at a sharp angle slightly wider than the desired bead or joint width.
Use a suitable backing rod where required to control depth. Aim for a joint depth equal to half the joint width.
Gun the sealant into the joint and tool within 10 minutes using a round spatula to ensure full contact with the joint sides.
Curing times increase in cold or humid conditions.
Safety and handling
Avoid contact with skin and eyes. Wear protective gloves, clothing and eye protection. Ensure adequate ventilation during application. Keep out of reach of children. Refer to the product SDS for full safety guidance.
Guarantee
Backed by a 10 year guarantee when used as directed.
In Stock
Express Post: 1-3 Days | Standard Post: 2-5 Days
Dunlop Floor Repairer Rapid Patch Mortar is a high-performance, fast-setting compound ideal for repairing holes, cracks, and uneven surfaces on internal floors. Suitable for use prior to the installation of tiles, vinyl, carpet, or other floor coverings, it delivers a smooth, level finish ready for light foot traffic within 45 minutes and covering applications in as little as 2 hours.
Surface Preparation:
Ensure the substrate is clean, sound, and free of grease, dust, oil, paint, or other contaminants. Surfaces should be dry and firm. Smooth or sealed surfaces must be roughened or etched. For porous substrates like timber, fibre-cement, or plasterboard, priming may be required. For floors in direct contact with soil, a moisture barrier should be used before applying the patch mortar.
Mixing Instructions:
Add 5kg of product into approximately 1.5L of clean water in a clean container. Mix thoroughly with a mixing paddle to a lump-free, smooth consistency. Mix only what can be used within 15 minutes.
Application Instructions:
Apply with a steel trowel to the required thickness (up to 20mm in a single application). Shape and smooth the surface before the material begins to set. For deeper repairs, additional layers can be applied once the initial layer has set. Avoid adding extra water once mixed.
Coverage:
Approximately 3m² at 1mm thickness per 5kg bag. Coverage varies with surface texture and thickness applied.
Drying Time:
Initial set: ~45 minutes
Ready for coverings (tiles, vinyl, carpet): ~2 hours
Final cure: 24 hours (depending on thickness and ambient conditions)
Clean Up:
Clean tools and equipment immediately with water before the mortar sets.
Technical Data:
Type: Rapid-setting cementitious repair mortar
Application Thickness: Up to 20mm
Pot Life: 15 minutes
Foot Traffic: 45 minutes
Ready for Coverings: 2 hours
Colour: Grey
Shelf Life: 12 months in original unopened packaging stored in a dry area
In Stock
Express Post: 1-3 Days | Standard Post: 2-5 Days
Dunlop Floor Tile Adhesive 4kg is a premium cement-based adhesive formulated for fixing a wide range of floor tiles, including ceramic, porcelain, mosaics, and natural stone. It provides strong bonding performance, easy application, and long-lasting durability for both indoor and outdoor projects.
Key Features
Ideal for floor installations in residential and commercial settings
Suitable for concrete, cement screeds, compressed fibre-cement sheets, and existing tiles
Strong adhesion with excellent workability and pot life of up to 2.5 hours
Can be used indoors and outdoors for versatile tiling applications
Grey colour finish for consistent, professional results
Coverage
Recommended trowel: 10 x 10 x 10 mm
Approximate coverage: 0.4 m² per kg
Typical total coverage: around 1.6 m² per 4 kg bag
Mixing Instructions
Use approximately 400 ml of clean water per 1 kg of powder.
Add powder to water and mix to a thick, creamy consistency.
Allow to stand for 5 minutes, then re-mix thoroughly before use.
Do not add additional water once mixed.
Application
Apply with a suitable notched trowel ensuring full coverage under tiles.
Spread only enough adhesive that can be tiled within the open time.
Press and slide tiles at right angles to the notches for full contact.
Do not exceed a bed thickness of 10 mm or less than 3 mm.
Allow adhesive to set for approximately 24 hours before grouting.
Limitations
Not suitable for continuous water immersion such as pools or tanks
Do not use over timber floors or non-absorbent substrates like metal
Not recommended for substrates subject to movement or shrinkage
Additional Information
Clean tools with water immediately after use
Shelf life: up to 12 months when stored sealed in a dry location
Full traffic after 24 hours at 23°C and 50% relative humidity
10 Year Guarantee: Backed by Ardex Australia Pty Ltd against manufacturing defects when used according to the manufacturer’s directions.
Based on Dunlop official technical data sheet. Always follow the latest installation guidelines and safety instructions.
In Stock
Express Post: 1-3 Days | Standard Post: 2-5 Days
Dunlop Floorfix Professional Tile Adhesive 15 kg is a reliable cement based floor tile adhesive for porcelain and ceramic tiles chosen for home repairs, trade work, and craft builds when you want a bond you can trust. Designed for Australian conditions, it balances strength, ease of use, and clean application so you can get professional results without special tools. The 15 kg pack is ideal for general work and keeps neatly in a toolbox or caddy.
Why choose Dunlop Floorfix for your next project
Everyday jobs often involve mixed materials and imperfect surfaces. Dunlop Floorfix Professional Tile Adhesive 15 kg has been formulated to wet out well, grab quickly, and cure to a tough finish that resists movement and contact stress. It maintains bond integrity across common temperature swings and has dependable resistance to moisture and most household chemicals. Whether you are fixing, building, sealing, or assembling, this product gives you confidence from first squeeze through final set.
Best for
General floor tiling
High traffic residential areas
Back buttering dense porcelain tiles
Suitable surfaces
The adhesive works well on the following surface types when properly prepared:
Concrete slabs and screeds
Cement sheet underlay
Existing tiles that are clean and sound
Surface preparation
Good preparation is the key to a long lasting repair. Remove loose material, dust, and grease. Wipe glossy areas with methylated spirits or an approved cleaner and allow to dry. On very smooth plastics and metals, lightly roughen with fine abrasive paper to give the adhesive a mechanical key. Dry fit parts first and mark alignment points so you can assemble accurately within the open time. If bonding porous materials, ensure both faces are dry and free of surface chalking.
How to use
Check fit and plan clamping. Do a trial run without adhesive so you know the order of steps.
Apply a thin, continuous bead to one surface. For wide pieces, use a zig zag pattern to maximise wetting.
Bring surfaces together within the stated open time of as indicated on the bag for best wetting and transfer. Reseat once if needed, then hold steady.
Apply even pressure using clamps, tape, weights, or temporary fasteners. Avoid squeezing all adhesive out of the joint.
Allow to cure undisturbed. Initial handling strength will develop as the adhesive sets, with a full cure reached based on the chemistry described below.
Cure profile
Respect open time and bed thickness. Allow adequate set before grouting and opening to traffic.
Temperature and environmental performance
Apply in suitable ambient conditions for predictable cure. Avoid application to very cold, sweating, or waterlogged surfaces. For outdoor use protect fresh bonds from rain until the skin has formed and the core has progressed in cure. Once fully cured, the bond resists normal weathering, splash water, and intermittent UV exposure based on the substrate and paint systems used.
Clean up and finishing
Damp sponge on fresh residue, water clean-up for tools. When cured, excess can be carefully trimmed or sanded. For painted finishes, allow the adhesive to fully cure before priming. Test paint on a small area to confirm compatibility and drying behaviour.
Coverage guide
Coverage varies with bead size, surface porosity, and technique. As a general guide, a 3 mm bead yields approximately 10 to 12 linear meters per 310 mL cartridge. Smaller packs scale proportionally. Gaps, rough edges, and highly absorbent materials will reduce coverage. Plan an extra margin for offcuts and practice passes.
Tips for best results
Work within the recommended open time so the adhesive can properly wet the surfaces.
Use light clamping pressure to keep parts aligned while maintaining a film thickness for strength.
For very porous substrates, apply a thin precoat as a primer layer and allow it to tack before final assembly.
Keep joint lines clean by masking edges with painter tape and removing it before the adhesive skins.
Where movement or vibration is expected, design the joint to share load across a large area.
Troubleshooting
Poor adhesion: Check for oil, release agents, or surface dust. Reclean and lightly abrade if necessary.
Slow cure: Low temperature and low humidity extend cure time. Maintain moderate conditions for best results.
Visible squeeze out: Wipe fresh material with a suitable solvent and a soft cloth. Once cured, trim carefully.
Bond line prints through paint: Allow a full cure, then prime and apply thin coats of paint, allowing proper drying between coats.
Storage and shelf life
Store sealed and dry to prevent lumping. Always check the pack for a lot code and use by guidance. Reseal immediately after use and store upright. Dispose of empty containers responsibly.
Safety
Read the label before use. Wear gloves when handling uncured material. Provide ventilation in enclosed areas. Avoid contact with skin and eyes. Keep out of reach of children and pets. If sensitivity occurs, stop use and seek advice. Do not ingest. First aid directions and detailed handling information are available on the package and the safety data sheet.
Frequently asked questions
Can I bond dissimilar materials? Yes, provided each surface is clean and sound. Differences in expansion are managed by the adhesive film thickness and the inherent flexibility after cure.
Is clamping required? Light clamping improves alignment and final strength. Excessive pressure can starve the joint of adhesive which reduces performance.
Is the bond water resistant? Once cured the bond resists splash water and routine humidity. For permanent immersion choose an adhesive designed for underwater service and follow the manufacturer guidance.
Planning your job
Measure twice and cut once. Dry assemble parts so you can confirm squareness and alignment before adhesive is involved. Keep rags, clamps, and spacers ready. If you are new to the product, test on offcuts to get a feel for bead size and squeeze out. A consistent 1 to 2 mm bond line is a good starting point for most rigid materials. Thicker lines help when surfaces are uneven. Avoid starving the joint by pressing too hard without giving the adhesive a place to reside.
Responsible use
Choose an adhesive that suits the materials and the environment the finished piece will face. If a joint will be submerged, carry structural loads, or be exposed to strong chemicals, check the technical data sheet for specific guidance. Many general purpose products are perfect for day to day work, while specialised tasks call for a system designed and tested for that environment. Using the right product first saves time, money, and rework.
Aftercare and maintenance
Adhesive joints are remarkably strong when used correctly. Design repairs so that routine loads are shared across a generous area. Where heavy vibration is present, pair the adhesive bond with appropriate mechanical fasteners. Keep cleaning chemicals mild, and avoid abrasive pads on visible joints. If a bond will be repainted, choose flexible paint where movement is expected, and keep edges sealed to prevent dirt tracking along the bond line.
Recycling and disposal
Allow empty containers to cure before disposal. Check local council guidance for recycling of plastics and metal cartridges. Never pour uncured product into drains or soil. Wipe tools on scrap material and let residue harden before placing in general waste. Smart handling keeps the workspace clean and reduces environmental impact.
In Stock
Express Post: 1-3 Days | Standard Post: 2-5 Days
Dunlop Gripper Fast Tile Adhesive 500 ml
Overview
Dunlop Gripper Fast Tile Adhesive 500 ml is a high quality multipurpose adhesive designed to deliver consistent, reliable bonding performance for trade professionals and serious DIYers. It is formulated for dependable adhesion, easy application, and clean finishing so you can complete jobs with confidence and minimal rework.
Why choose this product
Reliable bond performance supported by proven chemistry and rigorous quality control.
Smooth, predictable application that helps reduce mess and cleanup time.
Versatile adhesion profile suited to a wide range of substrates and project types.
Clear guidance on surface preparation, application method, and curing to help achieve the best possible result.
Suitable for residential fit-outs, maintenance, repairs, and light commercial projects.
Suitable materials
common building materials
ceramics
wood
metals
some plastics
stone
Typical applications
General installation, repair, and maintenance where a durable bond is required.
Interior work that benefits from a neat finish and tidy joints.
Projects where dependable initial grab and high final strength are important.
Surface preparation
Ensure all surfaces are clean, sound, and dry. Remove dust, oil, release agents, laitance, and any loose or flaky material. For dense or non-porous surfaces, light abrasion improves key. Test adhesion on a small area if you are unsure about compatibility. Observe local safety requirements when sanding or cutting.
Application
Check ambient and substrate temperature. Apply between 10°C and 30°C.
Cut the nozzle to the required bead size or prepare the container according to the product type.
Apply an even bead or spread with a suitable trowel where required. Avoid trapping air.
Press the materials together, ensuring full contact. For sheet goods, roll firmly to promote transfer and wetting.
Support, clamp, or brace as needed until the adhesive develops sufficient handling strength.
Cure and working time
Cure time varies with product and conditions. Allow adequate time before loading or finishing. Cooler temperatures and high humidity will slow curing, while warmer, drier conditions accelerate it. Do not load or finish until the bond has developed adequate strength. Always follow best practice for ventilation and safe handling during cure.
Coverage
Coverage varies based on substrate profile, bead size, and installation method. As a guide, a 300 ml cartridge with a 6 mm round bead can lay several linear meters. For trowel applied adhesives, a notched trowel pattern will influence yield. Plan to have extra on hand for porous or uneven surfaces.
Limitations
Do not apply to surfaces that are visibly wet unless the product specifically allows damp application.
Avoid continuous water immersion unless the product is rated for that exposure.
Not all plastics are compatible; test on polypropylene, polyethylene, and PTFE if required.
Observe maximum service temperature and any movement or vibration limits appropriate to the application.
Clean up
Clean uncured product with a suitable solvent or water as applicable. Always read the product label and follow local regulations for disposal of leftover material and containers.
Safety
Read the label before use and keep out of reach of children. Use in a well ventilated area. Wear protective gloves and eye protection. If on skin, wash with soap and water. If in eyes, rinse cautiously and seek medical advice if irritation persists. Do not ingest. Refer to the product Safety Data Sheet for detailed information.
Storage
Store upright in a cool, dry place away from direct sunlight and heat sources. Keep the cap or nozzle tightly closed when not in use. Do not allow to freeze unless the product literature states it is freeze-thaw stable. Rotate stock to use older product first.
Troubleshooting
Poor adhesion: Check surface prep, remove contaminants, and reapply with firm pressure.
Slow cure: Verify temperature and humidity. Increase airflow or allow more time.
Excess squeeze-out: Reduce bead size or spread more evenly. Clean residue before it skins.
Frequently asked questions
Can I paint over it? Many adhesives can be overcoated once cured. Test a small area with your paint system first.
Is it suitable outdoors? Check the product label for outdoor rating. Protect fresh adhesive from rain until cured.
What is the service temperature range? Typical service ranges suit most building environments. Avoid direct flame or extreme heat.
How do I remove cured material? Mechanical methods are usually required. Work carefully to avoid damaging surrounding finishes.
Why buy from Glues Australia
We curate a focused range so you can choose faster and build better. Every product listing includes practical how to detail, compatibility guidance, and straightforward support from a team that understands trade requirements. Order with confidence and get your project moving.
In Stock
Express Post: 1-3 Days | Standard Post: 2-5 Days
A water-based protective sealer which penetrates and cures within the pores of the grout. The sealer is fast drying and the bottle contains a brush for easy application.
A water-based protective sealer
Deep penetrating into the grout
Easy to use brush for perfect sealing over grout
Fast drying formula
Coverage
Seals up to 25m2 per 250ml
In Stock
Express Post: 1-3 Days | Standard Post: 2-5 Days
High-Performance Ready-Mixed Ceramic Tile Adhesive
This high-grab adhesive is designed to support even the heaviest wall tiles, providing superior flexibility for interior applications, particularly in kitchens and bathrooms.
Key Features:
Ready-mixed adhesive
High grab for heavy wall tiles
Superior flexibility
Tile Types:
Ceramic wall tiles
Granite
Marble (excluding moisture-sensitive stone)
Suitable Surfaces:
Cement render
Fibre-cement sheets
Painted surfaces (properly prepared)
Plasterboard
Application Areas:
Indoor walls
Coverage:
0.5m² per kg
In Stock
Express Post: 1-3 Days | Standard Post: 2-5 Days
Dunlop Mastic Multipurpose Tile Adhesive
High performance, cementitious, non-slump tile adhesive designed for walls and floors. Combines the ease of a mastic with the strength of a cement-based adhesive for reliable results on small to large format tiles.
Why choose it
Non-slump hold for heavy and large format tiles
Indoor and outdoor use on approved substrates
Extended open time of up to 30 minutes to position tiles
Bed thickness up to 10 mm
White colour for use under light or translucent tiles
Classification: C2TES1
Suitable tiles
Ceramic, porcelain, mosaics, natural stone that is not moisture sensitive, fully vitrified and translucent tiles.
Suitable substrates
Render, screeds, concrete
Plasterboard, fibre cement sheet walls, compressed fibre cement sheet floors
Ceramic tile underlay
Existing ceramic tiles indoors (properly prepared)
Dunlop undertile waterproofing membranes
Where it excels
Walls needing strong initial grab
Floors requiring reliable coverage and non-slump
Large format and deeply keyed tiles where full contact is critical
Coverage guide
6 mm notch (walls): about 0.5 m² per kg
10 mm notch (floors): about 0.3 m² per kg
5 kg bag: up to ~2 m² on walls or ~1.2 m² on floors
20 kg bag: up to ~10 m² on walls or ~6 m² on floors
Set and grout times
Allow approximately 24 hours at 23°C and 50% RH before grouting and light foot traffic. Dense tiles, cool weather or humid conditions may extend set time.
Mixing
20 kg bag: 6 to 6.5 L of clean water
5 kg bag: 1.5 to 1.75 L of clean water
Mix to a creamy consistency, stand for 5 minutes, then re-mix before use
Application tips
Follow AS 3958 best practice
Spread only as much adhesive as can be tiled within the open time
Press and slide tiles at right angles to the notches to achieve full contact
Back-butter large or deeply keyed tiles for 100% coverage
Remove squeeze-out from joints before setting
Not suitable for
Moisture sensitive natural stone
Areas under permanent water immersion such as pools
Timber, metal or any substrates subject to movement
Application below 5°C
Sizes
5 kg and 20 kg bags.
Clean up
Clean tools with water immediately after use.
Safety
Wear gloves and eye protection. Avoid inhaling dust. Refer to the product SDS and follow all safety directions.
In Stock
Express Post: 1-3 Days | Standard Post: 2-5 Days
Dunlop Primer & Additive is a water-based multipurpose solution that improves the bond between porous substrates and adhesives, waterproofing membranes, or screeds. It can be used as a primer before tiling or as an additive to strengthen screeds and grouts.
Surface Preparation:
Ensure the surface is clean, dry, and free of dust, oil, wax, paint, or other contaminants. For new concrete or screeds, allow to cure completely. Fill cracks and voids using a patching compound.
Application Instructions:
As a primer, dilute 1 part Dunlop Primer & Additive with 3 parts water. Apply evenly using a brush or roller. Allow it to dry for at least 30 minutes before applying adhesives or membranes.
As an additive, replace part or all of the mixing water in tile adhesives or grouts to improve flexibility and adhesion. Follow the manufacturer's recommended ratios.
Coverage:
Approximately 6–10m² per litre, depending on surface porosity.
Drying Time:
Allow to dry for at least 30 minutes before overcoating. Drying may vary depending on temperature and humidity.
Clean Up:
Clean tools and equipment with water immediately after use.
Technical Data:
Base: Water-based acrylic polymer
pH: Neutral
Appearance: Milky white liquid
Shelf Life: 12 months (unopened in cool, dry conditions)
Sold Out
Express Post: 1-3 Days | Standard Post: 2-5 Days
High strength, water based adhesive for carpet and cork
Dunlop Multipurpose Carpet & Cork Adhesive is a water based, high strength adhesive designed for installing smooth or textured backed carpets and cork tiles. It delivers excellent wet grab and reliable bond on prepared subfloors.
Suitable Surfaces
Concrete
Marine plywood
Fibre cement sheet
Key Features
Water based and low odour
High initial grab for reduced slippage
Repositioning window up to 60 minutes
Install immediately into wet adhesive for most carpets
For cork or stiff backings, allow 10 to 15 minutes tack time before laying
Coverage
Approx. 2.5 m² per litre with a 3.2 mm V notch trowel
Approx. 3.5 m² per litre with a 2.4 mm V notch trowel
Application
Ensure subfloor is dry, smooth, clean and protected from moisture. Prime highly porous concrete or timber before applying.
Spread an even coat with the recommended V notch trowel.
Lay carpet into the wet film. For cork or stiff backings, wait until the adhesive becomes tacky.
Roll in both directions with a suitable drum roller to ensure full transfer.
Set and Traffic Times
No foot traffic for 24 hours
Heavy traffic after 48 hours
Avoid water and cleaning for 48 hours
Clean Up
Clean tools immediately with warm soapy water
Remove dried residue with mineral turps
Storage
Shelf life up to 12 months in an unopened container stored at around 23°C.
Good To Know
Apply between 10°C and 30°C. Coverage varies with subfloor condition and trowel technique.
In Stock
Express Post: 1-3 Days | Standard Post: 2-5 Days
Dunlop Multipurpose Floor Leveller is a high-flow, cement-based compound ideal for smoothing and levelling uneven internal concrete surfaces before applying tiles, vinyl, carpet, or other floor coverings. Designed for ease of use, it pours and spreads to form a smooth surface ready for foot traffic and covering in minimal time. It’s perfect for domestic and light commercial applications.
Surface Preparation:
Ensure the surface is sound, dry, and clean. Remove all traces of dust, grease, oil, curing compounds, wax, or any loose particles. New concrete must be fully cured. Mechanically remove surface laitance or contamination. Porous surfaces may require priming to reduce absorption and improve adhesion.
Priming (if required):
Apply a compatible primer using a broom or roller and allow it to dry before applying the leveller. On extremely porous substrates, a second coat may be necessary.
Mixing Instructions:
Slowly add the contents of the 5kg bag to approximately 1L of clean water while stirring with a mixing paddle. Mix for 2–3 minutes until a lump-free, smooth consistency is achieved. Do not retemper once the mixture begins to set.
Application Instructions:
Pour the mixed product onto the floor and spread using a steel trowel or smoothing blade. The product will self-level and settle to a smooth finish. Apply at a thickness of 1–10mm in one application. Protect from foot traffic until it is fully cured.
Coverage:
Covers approximately 3.5m² at 1mm thickness per 5kg bag. Coverage varies with substrate texture and thickness.
Drying Time:
Walkable: 4 hours
Ready for tiling: 4–6 hours
Ready for other coverings: 24 hours
Dry times will vary depending on temperature, humidity, and layer thickness.
Clean Up:
Clean tools and mixing equipment with water immediately after use. Do not allow the product to dry on tools or surfaces.
Technical Data:
Type: Cement-based self-levelling compound
Application Thickness: 1mm to 10mm
Working Time: 15–20 minutes
Walkable: After 4 hours
Final Cure: Up to 24 hours
Colour: Grey
Shelf Life: 12 months if stored in original, sealed packaging
In Stock
Express Post: 1-3 Days | Standard Post: 2-5 Days
A water-based, penetrating sealer that maintains the natural surface appearance while offering superior stain resistance against both oil and water-based stains. It is ideal for indoor and outdoor use with excellent UV resistance, suitable for a variety of surfaces.
Key Benefits:
Superior stain resistance (oil and water)
Easy to clean and maintain
Excellent UV resistance, ideal for outdoor areas
Surface Preparation:
Ensure surfaces are free from dust, dirt, grease, oil, previous coatings, adhesives, and other contaminants. Any stains or surface irregularities present at the time of application will be locked into the final finish. Test sealer on a small, inconspicuous area to ensure suitability.
Application:
Apply sealer by brush, roller, or low-volume spray applicator.
Avoid excess application. Remove any material that hasn’t penetrated after 10 minutes with a cloth. Most surfaces require two coats, but porous surfaces may need additional coats. Allow 30 minutes drying time between coats.
Drying Time:
30 minutes to 1 hour between coats.
24 hours before light foot traffic.
3 days for rubber wheeled traffic.
7 days for full curing.
Coverage:
1L covers approximately 20m² per coat, depending on surface porosity.
Clean-Up:
Clean all equipment immediately after use with warm water or a water/detergent solution.
Shelf Life:
12 months when stored in an unopened container at 23°C.
Precautions:
While it repels immediate spills, the sealer’s stain resistance diminishes if spills are left unaddressed.
This product is not a waterproofing solution and is not recommended for use around swimming pools.
Safety:
Avoid inhalation, and eye or skin contact. In case of contact, rinse thoroughly with water. If swallowed, seek immediate medical advice. Always refer to the MSDS available on the Dunlop website.
In Stock
Express Post: 1-3 Days | Standard Post: 2-5 Days
Dunlop Premixed Resaflex Tile Adhesive 1 kg
Overview
Dunlop Premixed Resaflex Tile Adhesive 1 kg is a high quality tile adhesive designed to deliver consistent, reliable bonding performance for trade professionals and serious DIYers. It is formulated for dependable adhesion, easy application, and clean finishing so you can complete jobs with confidence and minimal rework.
Why choose this product
Reliable bond performance supported by proven chemistry and rigorous quality control.
Smooth, predictable application that helps reduce mess and cleanup time.
Versatile adhesion profile suited to a wide range of substrates and project types.
Clear guidance on surface preparation, application method, and curing to help achieve the best possible result.
Suitable for residential fit-outs, maintenance, repairs, and light commercial projects.
Suitable materials
ceramic tiles
porcelain tiles
mosaics
stone suitable for porous adhesives
most interior substrates
Typical applications
General installation, repair, and maintenance where a durable bond is required.
Interior work that benefits from a neat finish and tidy joints.
Projects where dependable initial grab and high final strength are important.
Surface preparation
Ensure all surfaces are clean, sound, and dry. Remove dust, oil, release agents, laitance, and any loose or flaky material. For dense or non-porous surfaces, light abrasion improves key. Test adhesion on a small area if you are unsure about compatibility. Observe local safety requirements when sanding or cutting.
Application
Check ambient and substrate temperature. Ideal application between 10°C and 30°C. Protect from freezing and rapid drying.
Cut the nozzle to the required bead size or prepare the container according to the product type.
Apply an even bead or spread with a suitable trowel where required. Avoid trapping air.
Press the materials together, ensuring full contact. For sheet goods, roll firmly to promote transfer and wetting.
Support, clamp, or brace as needed until the adhesive develops sufficient handling strength.
Cure and working time
Pot life and open time vary by product. Typically, tiles can be adjusted within minutes. Grouting commonly permitted after 24 hours under standard conditions. Cooler temperatures and high humidity will slow curing, while warmer, drier conditions accelerate it. Do not load or finish until the bond has developed adequate strength. Always follow best practice for ventilation and safe handling during cure.
Coverage
Coverage varies based on substrate profile, bead size, and installation method. As a guide, a 300 ml cartridge with a 6 mm round bead can lay several linear meters. For trowel applied adhesives, a notched trowel pattern will influence yield. Plan to have extra on hand for porous or uneven surfaces.
Limitations
Do not apply to surfaces that are visibly wet unless the product specifically allows damp application.
Avoid continuous water immersion unless the product is rated for that exposure.
Not all plastics are compatible; test on polypropylene, polyethylene, and PTFE if required.
Observe maximum service temperature and any movement or vibration limits appropriate to the application.
Clean up
Clean excess adhesive from tile faces immediately with a damp sponge. Hardened material must be removed mechanically. Always read the product label and follow local regulations for disposal of leftover material and containers.
Safety
Read the label before use and keep out of reach of children. Use in a well ventilated area. Wear protective gloves and eye protection. If on skin, wash with soap and water. If in eyes, rinse cautiously and seek medical advice if irritation persists. Do not ingest. Refer to the product Safety Data Sheet for detailed information.
Storage
Store upright in a cool, dry place away from direct sunlight and heat sources. Keep the cap or nozzle tightly closed when not in use. Do not allow to freeze unless the product literature states it is freeze-thaw stable. Rotate stock to use older product first.
Troubleshooting
Poor adhesion: Check surface prep, remove contaminants, and reapply with firm pressure.
Slow cure: Verify temperature and humidity. Increase airflow or allow more time.
Excess squeeze-out: Reduce bead size or spread more evenly. Clean residue before it skins.
Frequently asked questions
Can I paint over it? Many adhesives can be overcoated once cured. Test a small area with your paint system first.
Is it suitable outdoors? Check the product label for outdoor rating. Protect fresh adhesive from rain until cured.
What is the service temperature range? Typical service ranges suit most building environments. Avoid direct flame or extreme heat.
How do I remove cured material? Mechanical methods are usually required. Work carefully to avoid damaging surrounding finishes.
Why buy from Glues Australia
We curate a focused range so you can choose faster and build better. Every product listing includes practical how to detail, compatibility guidance, and straightforward support from a team that understands trade requirements. Order with confidence and get your project moving.
In Stock
Express Post: 1-3 Days | Standard Post: 2-5 Days
Dunlop Premixed Resaflex Tile Adhesive
Ready to use, flexible and tough ceramic tile adhesive for dependable indoor tiling. Ideal for interior walls and fibre-cement sheet residential floors. No mixing required, spreads smoothly, and delivers a secure bond when applied at the correct bed thickness.
Key Benefits
Ready mixed convenience for faster start and less mess
Flexible bond that helps accommodate minor movement
Non-slump paste with excellent grab on vertical surfaces
Suitable for common interior wall substrates and fibre-cement sheet floors
Where To Use
Walls: Interior applications on cement render, plasterboard, and fibre-cement sheet
Floors: Residential fibre-cement sheet floors
Tiles: Ceramic and similar porous tiles
Surface Preparation
Surfaces must be flat, clean, dry and firmly fixed. Remove dust, oil, grease and loose materials.
Prime porous surfaces like cement render and fibre-cement sheet, and any base jointing compound on plasterboard, then allow to dry.
Remove water based paints completely. If paint integrity is uncertain, roughen or remove.
Application
Use an appropriate notched trowel: as a guide 6 mm for walls, 10 mm for floors.
Spread only as much as you can tile within open time, typically about 1 m² at a time. Ensure no skin has formed.
Bed tiles into a 1.5 mm to 6 mm adhesive layer. Press and slide to ensure full contact.
Clean excess adhesive from tile faces and joints before it sets.
Coverage Guide
Tile Size
Notch Size
Approx. Coverage per kg
Up to 150 x 150 mm
4.5 mm
~0.7 m²
150 x 150 to 250 x 250 mm
6 to 8 mm
~0.5 m²
250 x 250 mm and over
10 to 12 mm
~0.3 m²
Coverage varies with substrate condition, trowel angle and application technique.
Drying and Grouting
Typical set time is about 24 hours at 23°C and 50% relative humidity. Allow longer for dense tiles or cool and humid conditions.
Grout after adhesive has set, usually after 24 hours.
Movement Joints
Provide joints around perimeters and at intervals consistent with good tiling practice, for example at about 5 m on floors and about 3.5 m along walls.
Keep joints about 6 mm wide and free of adhesive and grout. Fill with a suitable flexible sealant.
Limitations
Not suitable over concrete where extended drying can occur.
Not for areas subject to water immersion such as pools.
Do not use for non-porous tiles over non-porous substrates or for moisture-sensitive stone.
Final adhesive bed must be at least 1.5 mm and not more than 6 mm thick.
Clean Up
Clean tools and any fresh residue with water before the adhesive sets.
Technical Data
Type
Single part viscous paste
Colour
Grey
Bulk Density
~1.2 g/cm³
pH
~8.5
Slip
0 mm
Extended Open Time
~1.2 MPa after 30 min
Shear Bond Strength
~0.9 MPa
Pack Sizes and Shelf Life
Available in 1 kg, 4 kg, 10 kg and 20 kg pails
Shelf life 12 months in unopened packaging stored in a dry place
Good Practice Tips
Use tile spacers for consistent joints and remove them before grouting.
Prime porous substrates as directed for best results.
Always follow movement joint requirements for long-term performance.
In Stock
Express Post: 1-3 Days | Standard Post: 2-5 Days
Dunlop Pressure Sensitive Carpet Tile Adhesive 2L
Dunlop Carpet Tile Adhesive is a high strength, water based pressure sensitive adhesive designed for carpet tiles and double bonded underlay systems. It tacks off to a clear, dry-to-touch film that grips firmly yet allows tiles to be lifted and replaced for maintenance.
Key features
Pressure sensitive grab for secure hold and easy tile replacement
Water based, low odour, easy to apply
Suitable for smooth or textured tile backings and composition vinyl tiles
Works with double bonded underlays in commercial fitouts
Suitable substrates
Concrete, plywood, fibre cement sheet, compressed fibre cement, and suitable underlay sheets. Subfloors must be dry, smooth, clean, and prepared to AS 1884 requirements including moisture testing.
Coverage
Approx. 10 m² per 2 L using a 1.6 mm V notched trowel
Approx. 14 m² per 2 L using a long nap roller
Drying and traffic
Allow adhesive to become tacky and transparent before laying tiles. Typical tack off time is 2 to 4 hours depending on conditions.
Heavy foot traffic after 24 hours
Avoid wet cleaning or water exposure for 48 hours
Application guide
Prepare the subfloor. Prime very porous substrates if required. Treat rising damp or green concrete with a suitable moisture barrier.
Apply adhesive evenly:
Textured backs, composition vinyl tiles, and double bond underlays: 1.6 mm V notched trowel held at about 60 degrees
Smooth backed tiles: long nap roller
Wait until the film is tacky and clear with no transfer to fingertips. Early placement into wet adhesive will create a more permanent bond.
Lay tiles, cut and reposition as required, then roll in both directions with a suitable roller to ensure full contact.
Clean up
Clean tools immediately with warm soapy water. Remove dried residue with mineral turps.
Storage and shelf life
12 months in unopened packaging when stored in a cool, dry place at about 23°C and 50% RH.
Good to know
Do not apply below 15°C or above 30°C surface temperature.
Not suitable for traditional carpet-to-underlay stretch-in installations. For double bond systems, follow the flooring manufacturer’s instructions.
Safety
Wear gloves and eye protection, ensure adequate ventilation, and keep out of reach of children. If eye contact occurs, rinse with water and seek medical advice if irritation persists.
In Stock
Express Post: 1-3 Days | Standard Post: 2-5 Days
DUNLOP®WALL TILE ADHESIVE is a ready-mixed indoor wall tile adhesive. Ideal for all types of ceramic wall tiles and dimensional stones such as marble and granite, it can be used on a number of surfaces which include compressed fibre-cement sheets, plasterboard, cement render and adequately prepared painted surfaces (oil-based paint only). DUNLOP®WALL TILE ADHESIVE has superior flexibility and high grab to support even the heaviest of wall tiles.
SURFACE PREPARATION
Surfaces must be consistently flat and firmly fixed. Clean off dust, oil, grease and all loose contaminating materials or coatings. Ensure surfaces are dry, with no residue or permanent dampness. Prime porous surfaces (e.g. fibre- cement sheets, cement render) with DUNLOP®PRIMER & ADDITIVE beforehand and allow to dry.
Cement Render
Allow to cure for at least 7 days. Render should have a wood float finish.
Plasterboard
There is no need to prime the cardboard surface. However, where sheets are joined, DUNLOP®PRIMER & ADDITIVE must be used over the base jointing compound. Do not use the topping compound in areas which are to be tiled.
Compressed Fibre-Cement Sheets
Remove surface dust with a damp sponge and prime with DUNLOP®PRIMER & ADDITIVE and allow to dry before tiling.
Painted Surfaces
Oil-based paint should be roughened mechanically and loose flaking paint should be removed. Ensure the paint is suitable for tiling over. Thoroughly remove water-based paints. Do not use paint stripper or solvents. Allow surface to dry after cleaning.
MIXING
No mixing required.
APPLICATION
As a general guide use a 6mm notch trowel to spread adhesive achieving a minimum 1mm bed thickness. Do not wet tiles before fixing. If backs of tiles are dusty clean with a damp sponge.
Spread the adhesive with the notches running horizontally across the wall.
Spread only one square metre at a time and ensure a skin has not developed on the adhesive before bedding tiles.
Press and slide the tile into position ensuring the whole of the back of the tile is in good contact with the adhesive.
Use tile spacers if desired to ensure even spacing.
Remove any surplus adhesive on face of tile or between joints before it sets.
Adjustment of tiles should be carried out within 60 minutes of laying (at 23°C and 50% humidity).
COVERAGE
DUNLOP®WALL TILE ADHESIVE will cover approximately 0.5m2per kg. Coverage will vary depending on the condition of the surface being tiled and application technique.
DRYING TIME
DUNLOP®WALL TILE ADHESIVE will dry in approximately 24 hours depending on ambient temperature, porosity of surface and tiles.
MOVEMENT JOINTS
Incorporate movement joints at 3.5m intervals and at internal corners. Any structural movement joints must be carried through to the face of the tiling, at junctions between different background material and at fixtures interrupting the tile surface. These joints should be about 6mm wide and and kept free from adhesive. They should be filled with a high quality flexible material e.g. DUNLOP®COLOURED SILICONE.
GROUTING
Wait until adhesive has set. This takes approximately 24 hours. Remove tile spacers and use DUNLOP®GROUT adding DUNLOP®PRIMER AND ADDITIVE to enhance colour, impart a degree of flexibility and reduce porosity and staining. For easier maintenance seal with DUNLOP®GROUT SEALER.
CLEAN UP
While it is still fresh, DUNLOP®WALL TILE ADHESIVE can be cleaned off with a damp sponge. Tools, hands and material soiled with adhesive can be easily cleaned with water as long as the adhesive is still fresh.
CAUTION
Do not use DUNLOP®WALL TILE ADHESIVE to fix green marble. Do not use DUNLOP®WALL TILE ADHESIVE in
continuous immersion applications e.g. swimming pools, tanks etc.. Do not use DUNLOP®WALL TILE ADHESIVE over non- absorbent substrates and waterproofing membranes due to prolonged drying times.
DUNLOP GUARANTEE
Product is guaranteed for 10 years when installed to manufacturers instructions. Manufactured under a quality system certified as complying with ISO 9001 by an accredited certification body. Material Safety Data Sheets are available
TECHNICAL DATA
Characteristics of product:
Colour: White
Viscosity: 790 000 cps
S.G: 1.47g/cm3
pH: 9.1
Form: Viscous paste
Application Properties: (@23°C and 50% relative humidity) Open Time: 80 mins
Adjustability Time: 60 mins
Mechanical Properties:
Fundamental Characteristics Shear adhesion strength: Shear adhesion strength after aging:
2.5 Mpa
(AS 4992.1)
Minimum requirements 1.0Mpa (D1)
3.5 Mpa
1.0Mpa (D1)
SAFETY
Keep out of the reach of children. If skin contact occurs wash skin thoroughly with running water. If swallowed, give a glass of water and contact Poisons Information Centre. In case of contact with eyes, rinse with plenty of water and contact a Doctor. MSDS available on request.
In Stock
Express Post: 1-3 Days | Standard Post: 2-5 Days
Dunlop Ready-to-Go Coloured Grout is a premium, pre-mixed grout for fast, clean results on walls and floors. No mixing, no mess, just open, apply, and buff for a smooth, long-lasting finish. The formula includes Grout Shield for anti-mould and anti-bacterial protection to help surfaces stay cleaner for longer. Suitable for interior and exterior applications, and available in a wide colour range to match or contrast your tiles.
Ready-mixed convenience, apply straight from the tub
Contains Grout Shield for mould and bacteria resistance
Use on walls & floors, indoors & outdoors*
Ideal for joint widths from 1–5 mm
Great for rejuvenating old grout (min. removal depth: 1 mm walls, 2 mm floors)
*Always follow the data sheet guidance for your specific area and exposure.
Where to Use
Ceramic, porcelain and most glazed tiles
Bathrooms, kitchens, splashbacks, laundries, living areas
Light-duty exterior tiled areas (check exposure & substrate)
This grout is designed for typical domestic and light commercial tiling where a smooth, uniform finish is desired.
Colours & Finish
Available in a contemporary colour palette (e.g. whites and greys) to complement most tile styles. Use Dunlop’s colour selector to visualise combinations before you start.
Coverage
Coverage varies by tile size, joint width and depth. As a guide (per kg) of grout:
Tile size (L×W×Thickness)
Joint width 1.5 mm
Joint width 3 mm
Joint width 5 mm
25×25×4 mm mosaics
≈1.04 m²/kg
≈0.52 m²/kg
≈0.31 m²/kg
100×100×8 mm
≈2.08 m²/kg
≈1.04 m²/kg
≈0.63 m²/kg
200×200×8 mm
≈4.17 m²/kg
≈2.08 m²/kg
≈1.25 m²/kg
Tip: Allow an extra 10–15% for wastage due to technique, tile type and site conditions.
Directions (Summary)
Prep: Ensure joints are clean, dry, and free from dust, adhesive residue and contaminants. For rejuvenation, remove at least 1 mm (walls) or 2 mm (floors) of old grout.
Apply: Using a rubber grout float, force grout firmly into joints at a 45° angle.
Strike & shape: Allow grout to firm in the joint (~15 mins). Shape joints as required.
Clean: Wipe diagonally with a dense, damp sponge, rinsing frequently. Use minimal water to reduce shade variation and shrinkage.
Buff: When touch-dry (typically 6–24 hrs), buff tile faces with a clean, dry cloth.
Drying & Use
Initial set at ~24 hrs at 23 °C / 50% RH
Shower walls can be exposed to water after ~24 hrs
Clean-Up & Storage
Clean tools and residue with water while the grout is still wet. Reseal the tub between uses to prevent skinning. Store upright in a cool, dry place.
Safety
Read the Safety Data Sheet before use and follow PPE guidance. Avoid contact with eyes and prolonged skin contact. Keep out of reach of children.
In Stock
Express Post: 1-3 Days | Standard Post: 2-5 Days
Dunlop Ready-To-Go Vinyl Flooring Spray Adhesive is a fast and tidy spray-on adhesive for installing vinyl sheet, vinyl tiles, and vinyl planks with vinyl backing over concrete, underlayment grade plywood, metal, and fibreglass. It delivers an even spray pattern, strong bond, and immediate traffic readiness once rolled.
Why choose this adhesive
Quick, clean spray application that saves time
High initial grab for reliable placement
Dry to touch in about 10 to 40 minutes
Up to 3 hours open time once tacky
Ready for immediate foot traffic after rolling
Heat weld flooring 1 hour after installation
Suitable with underfloor heating systems
Water based acrylic blend with very low odour
Suitable substrates
Concrete, underlayment grade plywood, metal, and fibreglass. Use on vinyl-backed sheet, tiles, and planks.
Not suitable for
Cushion-backed flooring products.
Surface preparation
Ensure the substrate is flat, dry, and free from dust, oil, paint, old adhesive, wax, curing compounds, sealers, and hardeners.
Lightly damp-mop concrete to remove fine dust before application.
Correct surface imperfections before installation to avoid telegraphing.
How to use
Ventilate and mask the area to protect adjacent surfaces from overspray.
Shake the can well and remove the blue safety tab.
Hold the can upright 50 to 76 cm above the substrate and spray in smooth, even passes to achieve a uniform frosted look.
Avoid heavy patches and overspray. Lightly re-spray missed areas if needed.
Allow to dry until no adhesive transfers to the fingertips.
Lay the vinyl and roll firmly within 1 hour using a suitable heavy roller to ensure full contact.
The floor is ready for immediate use once rolled. Heat welding can commence after 1 hour.
Key technical data
Chemical type: water based acrylic blend
Dry to touch: approximately 10 to 40 minutes
Open time after tack: up to 3 hours
Traffic allowance: immediate after rolling
Underfloor heating: compatible
Appearance when sprayed: milky white frost
Storage and safety
Store between 10°C and 50°C. Avoid freezing and direct sunlight.
Pressurised dispenser. Do not pierce or burn the can, even when empty.
Use in a well ventilated area and avoid contact with eyes and skin.
Tip: Wipe any overspray from adjacent surfaces with a damp cloth before it dries.
In Stock
Express Post: 1-3 Days | Standard Post: 2-5 Days
Dunlop Revive & Shine
Dunlop Revive & Shine is a neutral, multipurpose cleaner and maintainer that enhances the appearance of sealed floors. Designed for use on timber, vinyl, and laminate floors, this product reduces the appearance of scuffing, increases durability, and improves gloss levels. For best results, use monthly to keep your floors looking their best.
Key Benefits:
Cleans and maintains timber, vinyl, and laminate flooring
Provides extra durability, wear resistance, and shine
Increases slip resistance
Reduces the appearance of scuffing
Ideal for monthly maintenance
Suitable For Use On:
Timber, vinyl, and laminate flooring
Surface Type:
Floors
Location:
Indoor
Colour & Sizes:
Colour: Milky (Dries Clear)
Size: 500ml
Item Code: 19882
Directions for Use:
Dilution: Mix 20mL of Dunlop Revive & Shine per 1L of warm water in a bucket.
Cleaning: Mop the floor with the solution.
Spills: For spills, hose down the area and wash with large amounts of water.
Note: The use of Personal Protective Equipment is recommended during application.
Dunlop Revive & Shine is perfect for keeping your timber, vinyl, and laminate floors looking like new, providing enhanced shine, durability, and slip resistance.
In Stock
Express Post: 1-3 Days | Standard Post: 2-5 Days
Dunlop Roof Repair Waterproofing Adhesive 310ml
Seal, stick and stop leaks on the spot. This highly flexible, silane modified adhesive and sealant bonds and seals even in wet conditions, making it a smart fix for urgent roof, gutter and pond repairs.
Why you will love it
Works in the wet and can be applied underwater for minor repairs
Flexible waterproof seal for joints, cracks and patches
Strong adhesive grab for quick spot fixes
Paintable once cured to match surrounding surfaces
Low mess clean up while wet
Ideal surfaces
Concrete, wall panels, timber, waterproofing membranes, ceramic tiles, aluminium, plastics, metal, polystyrene foam, glass and glazed tiles.
Typical uses
Emergency roof and gutter leak sealing
Sealing laps, flashings and penetrations
Pond edge and minor underwater touch ups
General crack and joint sealing around the home
Spot fixing where fast, reliable adhesion is needed
Directions
Prep: Ensure the surface is firm and free of dust, oil and loose residues. Slightly damp surfaces are acceptable.
Load: Remove the aluminium seal, pierce the nozzle membrane, fit and trim the nozzle, then place the cartridge in a caulking gun.
Apply as a sealant: Gun a continuous bead over the joint or crack and allow to cure.
Apply as an adhesive: Gun bead lines or spots, then press parts together within 7 to 10 minutes at 23°C, before skinning starts. For spot fixing, keep glue points 25 to 30 cm apart.
Clean up: Wipe away any excess while wet with a clean cloth.
Good to know
Application temperature: 5°C to 35°C
Dry and cure times vary with substrate and climate. Higher humidity shortens open time, lower humidity extends it.
Colour: Grey. Can be over painted once dry. Always test paint compatibility on a small area first.
Shelf life: 12 months in unopened packaging stored in a cool, dry place
Packaging: 310 ml cartridge
Safety
Wear gloves and eye protection. Avoid inhaling vapours and ensure good ventilation. If in eyes, rinse with running water and seek medical advice. Keep out of reach of children.
Warranty
Backed by a 10 year product guarantee when used as directed. This is in addition to your rights under the Australian Consumer Law.
Notes
Do a trial application for underwater or constantly wet repairs, as long term stability depends on the specific situation.
Not for chemical resistant applications.
Remove any skinned layer in the nozzle before reusing an opened cartridge.
In Stock
Express Post: 1-3 Days | Standard Post: 2-5 Days
An effective and easy-to-use neutral cleaner designed to remove general household dirt, grime, and oils from tiles and grout. Ideal for daily use, this cleaner is powerful enough to tackle grease in kitchens and bathrooms while being gentle enough for regular application.
Key Benefits:
Powerful cleaner for tiles and grout
Effectively removes grease in kitchens and bathrooms
Regular use reduces mould and mildew growth
Suitable for general-purpose surface cleaning
Cost-effective when diluted and applied by spray
Easy to use for everyday cleaning
Use On:
Tiles, grout, and general household surfaces
Surface Type:
Walls and floors
Location:
Indoor and outdoor use
Colour & Sizes:
Size: 1L
Item Code: 22504
Coverage:
Wipe On: Dilute 10ml per 1L of water
Spray On: Dilute 6ml per 1L of water
Directions for Use:
Test First: Before the first application of Dunlop Tile & Grout Cleaner, test a small amount of product in an inconspicuous area to ensure the desired result.
Dilution: Mix 10mL of Dunlop Tile & Grout Cleaner per 1L of water. For best results, use hot water.
Application: For general cleaning, apply the cleaner using a mop. For stubborn dirt, use an appropriate scourer or scrubbing pad that won't scratch the tile surface.
Keep your tiles and grout clean and fresh with this powerful, easy-to-use cleaner, perfect for daily household maintenance.
In Stock
Express Post: 1-3 Days | Standard Post: 2-5 Days
This versatile adhesive is specially formulated for fixing most tile types, offering excellent flexibility and suitability for various surfaces.
Key Features:
Suitable for most tile types
Can be applied over a variety of surfaces
Suitable for interior timber (with proper preparation)
Highly flexible
Tile Types:
Ceramic tiles
Fully vitrified tiles
Mosaics
Porcelain tiles
Natural stone (excluding moisture-sensitive stone)
Suitable Surfaces:
Cement render and concrete
Fibre-cement sheets
Existing ceramic and vinyl tiles
Dunlop Undertile Waterproofing
Metal surfaces
Oil-based painted surfaces
Plasterboard
Indoor timber (must be adequately prepared)
Application Areas:
Walls and floors
Indoor and outdoor use (as long as there’s no standing water and proper water run-off is ensured)
Coverage:
Tile Size
Trowel Size
Coverage
Up to 250 x 250mm
6-8mm
0.8m²/kg
250 x 250mm and larger
10-12mm
0.5m²/kg
In Stock
Express Post: 1-3 Days | Standard Post: 2-5 Days
Dunlop Tile-All Plus Premixed Tile Adhesive 310ml Tile-All Plus is a single component, silane modified polymer adhesive and neutral curing sealant. It offers high initial tack, strong bonding and excellent flexibility. Use it for fast, reliable repairs in showers, kitchens and bathrooms, for replacing tiles, fitting accessories and finishing joints. It can even be used for minor repairs underwater. Why you will like it High initial grab for confident positioning Flexible bond that resists movement and vibration Neutral cure for a low odour application experience Works as both an adhesive and a sealant Paintable after drying with most common paints (test first) Where to use it Showers, kitchens and bathrooms Replacing loose tiles and fitting trims or accessories Finishing expansion and connection joints Minor underwater fixes on suitable surfaces Suitable materials Glass, tiles, ceramics, timber, plastics, metals, concrete, wall panels, waterproofing membranes, aluminium, polystyrene foam, and glazed tiles. Always ensure surfaces are sound, clean and free from dust, oil, grease and coatings. Slightly damp substrates are acceptable. How to use Remove the aluminium seal at the base of the cartridge. Pierce the inner membrane, fit the nozzle and trim to the required bead size. Apply in stripes to the substrate or the item being fixed. Press parts together firmly within 7 to 10 minutes at 20°C, before skinning begins. For spot fixing, keep glue points 25 to 30 cm apart and confirm the item weight is appropriate. Avoid application below 5°C or above 35°C. Good to know Open time varies with temperature, humidity and substrate. Higher humidity shortens open time. If reusing, remove any skinned layer from the nozzle before the next application. Spills can be wiped away while wet with a clean cloth. Not recommended for chemical resistant applications. Cleanup and storage Clean excess while wet with a cloth. Shelf life is up to 12 months in unopened packaging stored in a cool, dry place at around 23°C and 50 percent relative humidity. Safety Use in a well ventilated area. Avoid skin and eye contact. If contact occurs, flush eyes with water for at least 15 minutes and seek medical advice. Wash skin with soap and water. If inhalation discomfort occurs, move to fresh air. If swallowed, drink water in small portions and seek medical advice. Keep out of reach of children.
In Stock
Express Post: 1-3 Days | Standard Post: 2-5 Days
High-Performance Multipurpose Wall & Floor Tile Adhesive
This versatile adhesive is designed for fixing almost all tile types to a wide range of challenging surfaces, including water features and swimming pools.
Key Features:
Suitable for both walls and floors
Can be applied over difficult surfaces, including water features
Allows tiling over existing tiles
Compatible with most types of ceramic and natural stone (excluding moisture-sensitive stone)
Tile Types:
Ceramic tiles
Fully vitrified tiles
Natural stone (excluding moisture-sensitive stone)
Mosaics
Porcelain
Suitable Surfaces:
Existing tiles
Glazed ceramic tiles
Metal
Roughened fibreglass
Timber (particleboard only)
Application Areas:
Walls and floors
Indoor and outdoor
Water features and swimming pools
Coverage:
Tile Size
Trowel Size
Coverage
Up to 250 x 250mm
6-8mm
0.4m²/kg
250 x 250mm and larger
10-12mm
0.25m²/kg
In Stock
Express Post: 1-3 Days | Standard Post: 2-5 Days
Dunlop Trade Resaflex Rapidset Tile Adhesive 15kg is a high quality, fast setting, rubber modified cement-based adhesive designed for rapid installation and early grouting. It delivers strong adhesion on walls and floors and is suitable for interior applications and exterior areas with satisfactory drainage.
Key benefits
Ready to grout in about 3 hours at 23°C and 50% RH
Rubber modified formulation for strong bond and improved workability
Classified C1FES1
Suitable bed thickness from 1.5 mm up to 10 mm
Wall and floor use, interior and exterior (with correct falls and drainage)
Suitable tiles
Ceramic, porcelain, vitrified and mosaics
Non moisture sensitive stone
Suitable substrates
Render, plasterboard, fibre cement sheet walls
Compressed fibre cement sheet floors, concrete floors
Existing tiles for interior applications
Mixing and use
Water addition: 5.5 L to 6.0 L per 15 kg bag
Pot life: about 40 minutes at 23°C and 50% RH
Trowel guidance: 6 x 6 x 6 mm on walls to achieve about 1.5 mm bed. 10 x 10 x 10 mm on floors to achieve about 2.5 mm bed
Back buttering recommended for deeply keyed tiles and tiles larger than 450 mm on any edge
Grouting: typically after about 3 hours at 23°C and 50% RH
Coverage guide
Trowel size
Approximate coverage
6 mm
About 0.6 m² per kg (about 9 m² per 15 kg)
10 mm
About 0.4 m² per kg (about 6 m² per 15 kg)
Movement joints
Include movement joints in line with AS 3958 and around perimeters, penetrations and changes in direction. Fill with a suitable flexible sealant.
Clean up
Clean tools and residue with water while the adhesive is wet.
Limitations
Not suitable for continuous immersion such as swimming pools
Not for moisture sensitive or translucent stone
Do not tile directly over timber floors
Safety
Wear gloves, eye and face protection. Avoid breathing dust. In case of contact with eyes, rinse with water and seek medical advice. Keep out of reach of children.
Technical details are based on manufacturer guidance at standard conditions. Actual times and coverage vary with temperature, humidity, tile and substrate.
In Stock
Express Post: 1-3 Days | Standard Post: 2-5 Days
Dunlop Trade Resaflex Rapidset Tile Adhesive 5 kg
Overview
Dunlop Trade Resaflex Rapidset Tile Adhesive 5 kg is a high quality tile adhesive designed to deliver consistent, reliable bonding performance for trade professionals and serious DIYers. It is formulated for dependable adhesion, easy application, and clean finishing so you can complete jobs with confidence and minimal rework.
Why choose this product
Reliable bond performance supported by proven chemistry and rigorous quality control.
Smooth, predictable application that helps reduce mess and cleanup time.
Versatile adhesion profile suited to a wide range of substrates and project types.
Clear guidance on surface preparation, application method, and curing to help achieve the best possible result.
Suitable for residential fit-outs, maintenance, repairs, and light commercial projects.
Suitable materials
ceramic tiles
porcelain tiles
mosaics
stone suitable for porous adhesives
most interior substrates
Typical applications
General installation, repair, and maintenance where a durable bond is required.
Interior work that benefits from a neat finish and tidy joints.
Projects where dependable initial grab and high final strength are important.
Surface preparation
Ensure all surfaces are clean, sound, and dry. Remove dust, oil, release agents, laitance, and any loose or flaky material. For dense or non-porous surfaces, light abrasion improves key. Test adhesion on a small area if you are unsure about compatibility. Observe local safety requirements when sanding or cutting.
Application
Check ambient and substrate temperature. Ideal application between 10°C and 30°C. Protect from freezing and rapid drying.
Cut the nozzle to the required bead size or prepare the container according to the product type.
Apply an even bead or spread with a suitable trowel where required. Avoid trapping air.
Press the materials together, ensuring full contact. For sheet goods, roll firmly to promote transfer and wetting.
Support, clamp, or brace as needed until the adhesive develops sufficient handling strength.
Cure and working time
Pot life and open time vary by product. Typically, tiles can be adjusted within minutes. Grouting commonly permitted after 24 hours under standard conditions. Cooler temperatures and high humidity will slow curing, while warmer, drier conditions accelerate it. Do not load or finish until the bond has developed adequate strength. Always follow best practice for ventilation and safe handling during cure.
Coverage
Coverage varies based on substrate profile, bead size, and installation method. As a guide, a 300 ml cartridge with a 6 mm round bead can lay several linear meters. For trowel applied adhesives, a notched trowel pattern will influence yield. Plan to have extra on hand for porous or uneven surfaces.
Limitations
Do not apply to surfaces that are visibly wet unless the product specifically allows damp application.
Avoid continuous water immersion unless the product is rated for that exposure.
Not all plastics are compatible; test on polypropylene, polyethylene, and PTFE if required.
Observe maximum service temperature and any movement or vibration limits appropriate to the application.
Clean up
Clean excess adhesive from tile faces immediately with a damp sponge. Hardened material must be removed mechanically. Always read the product label and follow local regulations for disposal of leftover material and containers.
Safety
Read the label before use and keep out of reach of children. Use in a well ventilated area. Wear protective gloves and eye protection. If on skin, wash with soap and water. If in eyes, rinse cautiously and seek medical advice if irritation persists. Do not ingest. Refer to the product Safety Data Sheet for detailed information.
Storage
Store upright in a cool, dry place away from direct sunlight and heat sources. Keep the cap or nozzle tightly closed when not in use. Do not allow to freeze unless the product literature states it is freeze-thaw stable. Rotate stock to use older product first.
Troubleshooting
Poor adhesion: Check surface prep, remove contaminants, and reapply with firm pressure.
Slow cure: Verify temperature and humidity. Increase airflow or allow more time.
Excess squeeze-out: Reduce bead size or spread more evenly. Clean residue before it skins.
Frequently asked questions
Can I paint over it? Many adhesives can be overcoated once cured. Test a small area with your paint system first.
Is it suitable outdoors? Check the product label for outdoor rating. Protect fresh adhesive from rain until cured.
What is the service temperature range? Typical service ranges suit most building environments. Avoid direct flame or extreme heat.
How do I remove cured material? Mechanical methods are usually required. Work carefully to avoid damaging surrounding finishes.
Why buy from Glues Australia
We curate a focused range so you can choose faster and build better. Every product listing includes practical how to detail, compatibility guidance, and straightforward support from a team that understands trade requirements. Order with confidence and get your project moving.
In Stock
Express Post: 1-3 Days | Standard Post: 2-5 Days
Dunlop Trade Resaflex Tile Adhesive 5 kg
Overview
Dunlop Trade Resaflex Tile Adhesive 5 kg is a high quality tile adhesive designed to deliver consistent, reliable bonding performance for trade professionals and serious DIYers. It is formulated for dependable adhesion, easy application, and clean finishing so you can complete jobs with confidence and minimal rework.
Why choose this product
Reliable bond performance supported by proven chemistry and rigorous quality control.
Smooth, predictable application that helps reduce mess and cleanup time.
Versatile adhesion profile suited to a wide range of substrates and project types.
Clear guidance on surface preparation, application method, and curing to help achieve the best possible result.
Suitable for residential fit-outs, maintenance, repairs, and light commercial projects.
Suitable materials
ceramic tiles
porcelain tiles
mosaics
stone suitable for porous adhesives
most interior substrates
Typical applications
General installation, repair, and maintenance where a durable bond is required.
Interior work that benefits from a neat finish and tidy joints.
Projects where dependable initial grab and high final strength are important.
Surface preparation
Ensure all surfaces are clean, sound, and dry. Remove dust, oil, release agents, laitance, and any loose or flaky material. For dense or non-porous surfaces, light abrasion improves key. Test adhesion on a small area if you are unsure about compatibility. Observe local safety requirements when sanding or cutting.
Application
Check ambient and substrate temperature. Ideal application between 10°C and 30°C. Protect from freezing and rapid drying.
Cut the nozzle to the required bead size or prepare the container according to the product type.
Apply an even bead or spread with a suitable trowel where required. Avoid trapping air.
Press the materials together, ensuring full contact. For sheet goods, roll firmly to promote transfer and wetting.
Support, clamp, or brace as needed until the adhesive develops sufficient handling strength.
Cure and working time
Pot life and open time vary by product. Typically, tiles can be adjusted within minutes. Grouting commonly permitted after 24 hours under standard conditions. Cooler temperatures and high humidity will slow curing, while warmer, drier conditions accelerate it. Do not load or finish until the bond has developed adequate strength. Always follow best practice for ventilation and safe handling during cure.
Coverage
Coverage varies based on substrate profile, bead size, and installation method. As a guide, a 300 ml cartridge with a 6 mm round bead can lay several linear meters. For trowel applied adhesives, a notched trowel pattern will influence yield. Plan to have extra on hand for porous or uneven surfaces.
Limitations
Do not apply to surfaces that are visibly wet unless the product specifically allows damp application.
Avoid continuous water immersion unless the product is rated for that exposure.
Not all plastics are compatible; test on polypropylene, polyethylene, and PTFE if required.
Observe maximum service temperature and any movement or vibration limits appropriate to the application.
Clean up
Clean excess adhesive from tile faces immediately with a damp sponge. Hardened material must be removed mechanically. Always read the product label and follow local regulations for disposal of leftover material and containers.
Safety
Read the label before use and keep out of reach of children. Use in a well ventilated area. Wear protective gloves and eye protection. If on skin, wash with soap and water. If in eyes, rinse cautiously and seek medical advice if irritation persists. Do not ingest. Refer to the product Safety Data Sheet for detailed information.
Storage
Store upright in a cool, dry place away from direct sunlight and heat sources. Keep the cap or nozzle tightly closed when not in use. Do not allow to freeze unless the product literature states it is freeze-thaw stable. Rotate stock to use older product first.
Troubleshooting
Poor adhesion: Check surface prep, remove contaminants, and reapply with firm pressure.
Slow cure: Verify temperature and humidity. Increase airflow or allow more time.
Excess squeeze-out: Reduce bead size or spread more evenly. Clean residue before it skins.
Frequently asked questions
Can I paint over it? Many adhesives can be overcoated once cured. Test a small area with your paint system first.
Is it suitable outdoors? Check the product label for outdoor rating. Protect fresh adhesive from rain until cured.
What is the service temperature range? Typical service ranges suit most building environments. Avoid direct flame or extreme heat.
How do I remove cured material? Mechanical methods are usually required. Work carefully to avoid damaging surrounding finishes.
Why buy from Glues Australia
We curate a focused range so you can choose faster and build better. Every product listing includes practical how to detail, compatibility guidance, and straightforward support from a team that understands trade requirements. Order with confidence and get your project moving.
In Stock
Express Post: 1-3 Days | Standard Post: 2-5 Days
Fast, reliable bond for vinyl sheet and tiles
Dunlop Vinyl Adhesive is a water based, high strength adhesive that spreads easily and delivers dependable bonds for vinyl sheet and vinyl tile on most concrete and timber subfloors. Ideal for installers and serious DIYers who want clean application and solid performance.
Key features
High initial grab for confident placement
Easy to spread with smooth, low odour application
Suitable for vinyl sheet and vinyl tile on concrete and timber subfloors
Approximate coverage: 4 to 5 m² per litre, depending on surface and technique
Tack time: 5 to 15 minutes at 23°C and 50% RH
Sets in 24 hours for light foot traffic and finishing
Where to use
Interior installations of vinyl sheet and vinyl tile
Most prepared concrete and timber subfloors
Surface preparation
Ensure surfaces are dry, smooth, clean and free of dust, oil, paint or contaminants that could limit adhesion.
Prime highly porous concrete or timber with a suitable primer as directed by the manufacturer.
Level or repair imperfections with a compatible floor leveller or floor repair compound before bonding.
Application
Apply an even coat to the subfloor using a 1.6 × 1.6 × 1.6 mm V notched trowel.
Allow adhesive to become tacky before laying vinyl. Typical tack time is about 10 minutes, longer in cool conditions and shorter in warm conditions. Do not allow a skin to form.
Lay the vinyl into the adhesive.
Roll firmly in both directions to ensure full transfer to the back of the vinyl.
Clean up
Clean tools and spills immediately with warm soapy water.
Remove dried adhesive with mineral turps.
Conditions and storage
Apply between 8°C and 35°C with adequate ventilation.
Shelf life: 12 months in unopened container stored at approximately 20°C.
Good to know
Use a roller after placement to improve bond and minimise bubbles.
Coverage varies with subfloor condition, porosity and trowel technique.
Warranty
Product is guaranteed for 10 years when installed in accordance with the manufacturer’s instructions.
In Stock
Express Post: 1-3 Days | Standard Post: 2-5 Days
Dunlop Wall Tile Adhesive 15 kg
OverviewDunlop Wall Tile Adhesive 15 kg is a high quality tile adhesive designed to deliver consistent, reliable bonding performance for trade professionals and serious DIYers. It is formulated for dependable adhesion, easy application, and clean finishing so you can complete jobs with confidence and minimal rework.
Why choose this product
Reliable bond performance supported by proven chemistry and rigorous quality control.
Smooth, predictable application that helps reduce mess and cleanup time.
Versatile adhesion profile suited to a wide range of substrates and project types.
Clear guidance on surface preparation, application method, and curing to help achieve the best possible result.
Suitable for residential fit-outs, maintenance, repairs, and light commercial projects.
Suitable materials
ceramic tiles
porcelain tiles
mosaics
stone suitable for porous adhesives
most interior substrates
Typical applications
General installation, repair, and maintenance where a durable bond is required.
Interior work that benefits from a neat finish and tidy joints.
Projects where dependable initial grab and high final strength are important.
Surface preparation
Ensure all surfaces are clean, sound, and dry. Remove dust, oil, release agents, laitance, and any loose or flaky material. For dense or non-porous surfaces, light abrasion improves key. Test adhesion on a small area if you are unsure about compatibility. Observe local safety requirements when sanding or cutting.
Application
Check ambient and substrate temperature. Ideal application between 10°C and 30°C. Protect from freezing and rapid drying.
Cut the nozzle to the required bead size or prepare the container according to the product type.
Apply an even bead or spread with a suitable trowel where required. Avoid trapping air.
Press the materials together, ensuring full contact. For sheet goods, roll firmly to promote transfer and wetting.
Support, clamp, or brace as needed until the adhesive develops sufficient handling strength.
Cure and working time
Pot life and open time vary by product. Typically, tiles can be adjusted within minutes. Grouting commonly permitted after 24 hours under standard conditions. Cooler temperatures and high humidity will slow curing, while warmer, drier conditions accelerate it. Do not load or finish until the bond has developed adequate strength. Always follow best practice for ventilation and safe handling during cure.
Coverage
Coverage varies based on substrate profile, bead size, and installation method. As a guide, a 300 ml cartridge with a 6 mm round bead can lay several linear meters. For trowel applied adhesives, a notched trowel pattern will influence yield. Plan to have extra on hand for porous or uneven surfaces.
Limitations
Do not apply to surfaces that are visibly wet unless the product specifically allows damp application.
Avoid continuous water immersion unless the product is rated for that exposure.
Not all plastics are compatible; test on polypropylene, polyethylene, and PTFE if required.
Observe maximum service temperature and any movement or vibration limits appropriate to the application.
Clean up
Clean excess adhesive from tile faces immediately with a damp sponge. Hardened material must be removed mechanically. Always read the product label and follow local regulations for disposal of leftover material and containers.
Safety
Read the label before use and keep out of reach of children. Use in a well ventilated area. Wear protective gloves and eye protection. If on skin, wash with soap and water. If in eyes, rinse cautiously and seek medical advice if irritation persists. Do not ingest. Refer to the product Safety Data Sheet for detailed information.
Storage
Store upright in a cool, dry place away from direct sunlight and heat sources. Keep the cap or nozzle tightly closed when not in use. Do not allow to freeze unless the product literature states it is freeze-thaw stable. Rotate stock to use older product first.
Troubleshooting
Poor adhesion: Check surface prep, remove contaminants, and reapply with firm pressure.
Slow cure: Verify temperature and humidity. Increase airflow or allow more time.
Excess squeeze-out: Reduce bead size or spread more evenly. Clean residue before it skins.
Frequently asked questions
Can I paint over it? Many adhesives can be overcoated once cured. Test a small area with your paint system first.Is it suitable outdoors? Check the product label for outdoor rating. Protect fresh adhesive from rain until cured.What is the service temperature range? Typical service ranges suit most building environments. Avoid direct flame or extreme heat.How do I remove cured material? Mechanical methods are usually required. Work carefully to avoid damaging surrounding finishes.
Why buy from Glues Australia
We curate a focused range so you can choose faster and build better. Every product listing includes practical how to detail, compatibility guidance, and straightforward support from a team that understands trade requirements. Order with confidence and get your project moving.
In Stock
Express Post: 1-3 Days | Standard Post: 2-5 Days
Dunlop Wall Tile Adhesive 5.5 kg
Overview
Dunlop Wall Tile Adhesive 5.5 kg is a high quality tile adhesive designed to deliver consistent, reliable bonding performance for trade professionals and serious DIYers. It is formulated for dependable adhesion, easy application, and clean finishing so you can complete jobs with confidence and minimal rework.
Why choose this product
Reliable bond performance supported by proven chemistry and rigorous quality control.
Smooth, predictable application that helps reduce mess and cleanup time.
Versatile adhesion profile suited to a wide range of substrates and project types.
Clear guidance on surface preparation, application method, and curing to help achieve the best possible result.
Suitable for residential fit-outs, maintenance, repairs, and light commercial projects.
Suitable materials
ceramic tiles
porcelain tiles
mosaics
stone suitable for porous adhesives
most interior substrates
Typical applications
General installation, repair, and maintenance where a durable bond is required.
Interior work that benefits from a neat finish and tidy joints.
Projects where dependable initial grab and high final strength are important.
Surface preparation
Ensure all surfaces are clean, sound, and dry. Remove dust, oil, release agents, laitance, and any loose or flaky material. For dense or non-porous surfaces, light abrasion improves key. Test adhesion on a small area if you are unsure about compatibility. Observe local safety requirements when sanding or cutting.
Application
Check ambient and substrate temperature. Ideal application between 10°C and 30°C. Protect from freezing and rapid drying.
Cut the nozzle to the required bead size or prepare the container according to the product type.
Apply an even bead or spread with a suitable trowel where required. Avoid trapping air.
Press the materials together, ensuring full contact. For sheet goods, roll firmly to promote transfer and wetting.
Support, clamp, or brace as needed until the adhesive develops sufficient handling strength.
Cure and working time
Pot life and open time vary by product. Typically, tiles can be adjusted within minutes. Grouting commonly permitted after 24 hours under standard conditions. Cooler temperatures and high humidity will slow curing, while warmer, drier conditions accelerate it. Do not load or finish until the bond has developed adequate strength. Always follow best practice for ventilation and safe handling during cure.
Coverage
Coverage varies based on substrate profile, bead size, and installation method. As a guide, a 300 ml cartridge with a 6 mm round bead can lay several linear meters. For trowel applied adhesives, a notched trowel pattern will influence yield. Plan to have extra on hand for porous or uneven surfaces.
Limitations
Do not apply to surfaces that are visibly wet unless the product specifically allows damp application.
Avoid continuous water immersion unless the product is rated for that exposure.
Not all plastics are compatible; test on polypropylene, polyethylene, and PTFE if required.
Observe maximum service temperature and any movement or vibration limits appropriate to the application.
Clean up
Clean excess adhesive from tile faces immediately with a damp sponge. Hardened material must be removed mechanically. Always read the product label and follow local regulations for disposal of leftover material and containers.
Safety
Read the label before use and keep out of reach of children. Use in a well ventilated area. Wear protective gloves and eye protection. If on skin, wash with soap and water. If in eyes, rinse cautiously and seek medical advice if irritation persists. Do not ingest. Refer to the product Safety Data Sheet for detailed information.
Storage
Store upright in a cool, dry place away from direct sunlight and heat sources. Keep the cap or nozzle tightly closed when not in use. Do not allow to freeze unless the product literature states it is freeze-thaw stable. Rotate stock to use older product first.
Troubleshooting
Poor adhesion: Check surface prep, remove contaminants, and reapply with firm pressure.
Slow cure: Verify temperature and humidity. Increase airflow or allow more time.
Excess squeeze-out: Reduce bead size or spread more evenly. Clean residue before it skins.
Frequently asked questions
Can I paint over it? Many adhesives can be overcoated once cured. Test a small area with your paint system first.
Is it suitable outdoors? Check the product label for outdoor rating. Protect fresh adhesive from rain until cured.
What is the service temperature range? Typical service ranges suit most building environments. Avoid direct flame or extreme heat.
How do I remove cured material? Mechanical methods are usually required. Work carefully to avoid damaging surrounding finishes.
Why buy from Glues Australia
We curate a focused range so you can choose faster and build better. Every product listing includes practical how to detail, compatibility guidance, and straightforward support from a team that understands trade requirements. Order with confidence and get your project moving.
In Stock
Express Post: 1-3 Days | Standard Post: 2-5 Days
Earl’s MiracleWipes – Innovative, Professional-Grade Cleaning Wipes
Meet the jobsite and workshop essential that takes on the messes others can’t. MiracleWipes® are purpose-built to remove tough contaminants like oil-based paint, latex paint, epoxy, spray paint, stain, grease, oils, adhesives, ink, and grime from hands, tools, and surfaces. The unique absorbent-lock design grabs and traps residue so it doesn’t smear, while the low-solvent formula is surface and skin safe when used as directed. Dual-texture wipes (scrub on one side, smooth on the other) give you the control to lift heavy build-up then finish clean. Seeing is believing!
Why You’ll Love It
Removes paint & epoxy fast: Cuts through wet and semi-cured paints, epoxies, stains, grease and more.
Absorb & lock technology: Traps mess in the wipe to reduce smearing and re-depositing.
Dual-texture performance: Textured side agitates; smooth side finishes clean.
Low solvent, professional grade: Powerful on mess, considerate on common jobsite materials.
Surface & skin safe: Designed for hands, tools, and non-porous surfaces when used as directed.
Large wipe size: 12" × 6" sheets give you more cleaning area per pull.
Clean, no-rinse finish: Leaves no heavy, oily residue; dries quickly.
Smart canister: One-at-a-time dispense with a tight snap-seal lid to keep wipes fresh.
Where It Works
Ideal for use on:
Hands & skin: Great for cleanup after painting or epoxy work (avoid eyes, mouth, and broken skin).
Tools & equipment: Brushes, rollers, spray guns, trowels, mixers, blades, scrapers.
Common surfaces: Metals, coated plastics, laminates, sealed wood, glass, tiles, stone benchtops (sealed), vinyl & PVC.
Prep before painting: Wipe down to remove dust, light oils, fingerprints and shop grime prior to coating.
Always test on an inconspicuous area first. Not recommended for unfinished leather, delicate textiles, or uncured high-gloss finishes.
How To Use
Open the snap-seal lid and pull one wipe through the dispenser.
Use the textured side first to loosen paint, epoxy, grease, or grime.
Flip to the smooth side to lift away residue and finish clean.
For stubborn spots, hold the wipe against the area briefly, then wipe again. Repeat with a fresh wipe if needed.
Close the lid firmly after each use to prevent drying out. Dispose of wipes in the bin—do not flush.
Pro Tips
Epoxy cleanup: Tackle while epoxy is wet or green for fastest results.
Surface prep: After wiping, allow to air dry, then apply coatings per product directions.
Electronics & sensitive parts: Power down first; use a lightly damp section of the wipe and avoid pooling liquid.
Frequently Asked Questions
Will MiracleWipes remove fully cured epoxy?They excel on wet and semi-cured residues. Fully cured epoxy typically requires mechanical removal; wipes help with final cleanup.
Are they safe on skin?Yes when used as directed on hands. Avoid contact with eyes and broken skin. Rinse with water after heavy use if desired.
Do they leave residue before painting?The low-residue formula dries quickly. For best coating adhesion, allow the surface to dry or give a quick final wipe with a clean, dry cloth.
Can I use them on automotive paint or delicate finishes?Test first in a hidden spot, especially on fresh or uncured coatings.
Are the wipes flushable?No. Dispose of used wipes in general waste.
What’s In The Pack
Count: 90 pre-moistened, dual-texture wipes
Wipe size: 12" × 6" (approx. 30.5 × 15.2 cm)
Dispenser: Resealable snap-seal canister
Storage & Handling
Keep lid closed to prevent drying. Store upright in a cool, dry place.
Keep out of reach of children. Use in a well-ventilated area.
Do not ingest. Do not flush.
Specifications
Brand
Earl’s
Product
MiracleWipes® – Innovative Cleaning Wipes
Primary Use
Removal of paint (oil & latex), epoxy, spray paint, stain, grease, oils, adhesives, inks, and grime
Wipe Construction
Dual-texture (scrub + smooth), high-absorbency lock design
Wipe Size
12" × 6" (approx. 30.5 × 15.2 cm)
Pack Size
90 wipes per canister
Solvent Level
Low solvent
Skin/Surface Safety
Surface & skin safe when used as directed
Residue
Low-residue, fast-dry
Country of Manufacture
Made in the USA
Dispensing
One-at-a-time pull through snap-seal lid
Disposal
General waste only; do not flush
Suggested Applications
Trade & DIY paint cleanup (rollers, brushes, sprayers, trays)
Epoxy projects (boats, composites, woodwork, crafts)
Auto & equipment maintenance (oils, grease, grime)
Site prep and tidy between coats
Workshops, garages, construction, facilities maintenance
In Stock
Express Post: 1-3 Days | Standard Post: 2-5 Days
Earl’s MulTfill is a premium, ready-to-use multi-purpose filler designed for fast, clean, and durable repairs across interior and exterior projects. The heavy-bodied formula spreads smoothly, levels cleanly, and dries hard without shrinking, sinking, cracking, or falling out. With zero VOCs and no acrylics, latex, or solvents, it’s a low-odour choice for homes, workshops, and job sites. Clean-up is simple with water, and once dry MulTfill sands easily to a fine, paint-ready surface.
Why you’ll love it
Ready from the tub: no mixing, no mess, no wastage — just open, apply, and close.
Zero VOCs: stable, low odour and user-friendly.
Non-sinking, non-shrinking: fills stay flush and true.
Won’t fall out: dries hard for lasting repairs.
Paintable finish: accepts most coatings for a seamless result.
Sands like a dream: refined finish without clogging when sanded dry.
Long shelf life: keep the lid sealed and it’s ready when you are.
Where it works
Use MulTfill on common building materials including wood (including weathered and damaged sections once sound), masonry, plasterboard, cement sheet, concrete, and primed metal. It’s ideal for nail holes, dents, shallow voids, corner repairs, skim touch-ups, and general surface preparation before painting.
Colour options
White, Teak (Cypress), Ebony, Grey, Jarrah, Merbau, Walnut.
How to use
Prep: Ensure the area is clean, dry, and sound. Remove loose material and dust. For best glide, lightly wet your putty knife.
Apply: Press firmly to fill the defect and smooth off. For deep voids, apply in layers up to 6 mm per pass, allowing each layer to dry before the next.
Sand: Once fully dry, sand with 120 grit or finer to achieve a smooth, level surface.
Coat: Prime if required, then paint. For clear finishes, tint the filler with suitable colorants or oxides before application to harmonise with surrounding material.
Cleanup & care: Clean tools with water. If product thickens in the tub, add a few drops of clean water and stir until smooth. Always reseal promptly.
Pro tips
Feather edges wide when blending across boards or wall patches.
On exterior jobs, protect from rain during cure and overcoat appropriately for exposure.
Tinting before clear coats helps the repair visually disappear on timber substrates.
Specifications
Brand
Earl’s
Product Type
Multi-purpose paintable putty / filler (water-based)
Use
Interior and exterior
VOC
Zero VOC
Contains
No acrylic, latex, or solvents
Substrates
Wood, masonry, plasterboard, cement sheet, concrete, primed metal
Application Thickness
Up to 6 mm per layer; allow to dry between layers
Sanding
Dry sand; 120 grit or finer
Overcoating
Accepts most paints; for clear coats, tint filler first for best colour match
Clean-up
Water
Colours
White; Teak (Cypress), Ebony, Grey, Jarrah, Merbau, Walnut
Pack Sizes
140 g, 600 g, 1 kg, 2 kg, 3 kg (varies by colour)
Shelf Life
Up to 5 years if sealed and stored correctly
Country of Origin
Australia
Storage
Keep container tightly closed when not in use. Store in a cool, dry place out of direct sun. Avoid prolonged freezing. If product thickens, add a few drops of water and mix to restore spreadability.
What’s in the tub
A smooth-spreading, heavy-bodied filler that levels cleanly, sands easily, and delivers a paint-ready finish across interior and exterior surfaces — with no mixing, no fuss, and no strong odour.
In Stock
Express Post: 1-3 Days | Standard Post: 2-5 Days
Earl’s MulTflex® Exterior Flexible Filler is a unique, single-pack, ready-to-use flexible filler and adhesive formulated for lasting repairs on timber and masonry. It delivers a durable, non-shrinking, non-sinking finish that won’t crack with vibration and won’t fall out, making it ideal for exterior maintenance where movement and weather can defeat ordinary fillers. Paintable when dry and formulated with no volatile organic compounds (No VOCs), it’s a dependable, low-odour solution for professional results at home or on site. Proudly 100% Australian made and owned.
Why you’ll love it
Exterior-grade flexibility: absorbs movement and vibration without cracking.
Non-shrink & non-sink: holds profile and edge detail after cure.
Won’t fall out: engineered adhesion for long-term durability.
Ready to use: straight from the tub — no mixing, no mess, no waste.
Paintable: achieves a seamless, colour-matched finish once dry.
No VOCs: low odour, solvent-free formula.
Interior / Exterior: versatile enough for both.
Proudly Australian: made and owned in Australia.
Where it works
Use Earl’s MulTflex® to repair and rebuild on a wide range of common building substrates:
Timber: decks, window frames, trims, fascia, general carpentry repairs.
Masonry: brick, block, render and patching mortar-like defects.
Plasterboard: exterior-exposed linings under cover and general patching.
Metals & gutters: non-structural filling and profiling (clean, sound, free of rust).
Around pipes & penetrations: neat, gap-free finishing before painting.
Glass & surrounds: edge repairs and feathering prior to topcoating.
Ideal projects
Rebuilding weathered or rotten timber edges before repainting.
Filling cracks and surface imperfections in rendered walls.
Profiling and feathering joints and transitions for a paint-ready finish.
General exterior maintenance where a flexible, paintable filler is essential.
Directions
Surface Preparation
Remove loose or flaking material, dirt, dust, oil, grease and chalky paint. Substrates must be sound.
Ensure surfaces are dry and free from visible moisture. Treat rust and stabilize friable areas as required.
For best mechanical key, lightly abrade glossy surfaces and remove dust.
Application
Open the tub and use directly. If the surface of the product begins to dry, add a few drops of water and re-mix gently. Keep the container tightly sealed when not in use.
Apply with a filling knife or trowel, pressing firmly to ensure full contact with the substrate.
Build up in thin layers for deep repairs, allowing each layer to firm before adding the next.
For a satin-smooth finish, tool the final pass with a wet knife or brush to reduce post-work finishing.
Finishing & Painting
Allow to dry fully. Dry time varies with film thickness, temperature and humidity.
Once dry, apply a suitable primer/undercoat if required by your paint system, then topcoat.
Use quality exterior paints for weather-exposed areas.
Clean-Up & Storage
Clean tools and splashes with water while wet.
Reseal immediately after use to minimise skinning and reduce waste.
Store upright with lid sealed. Do not allow contents to dry out.
Good to know
Formulation is unaffected by normal temperature swings and resists cracking with vibration.
Designed for exterior flexibility yet also suitable for interior touch-ups.
For best results on deep voids, fill in multiple light applications rather than one heavy pass.
Specifications
Brand
Earl’s
Product
MulTflex® Exterior Flexible Filler
Type
Single-pack, ready-to-use flexible filler & adhesive
Use
Interior / Exterior
Paintable
Yes, once fully dry
VOC Content
No VOCs (as supplied)
Shrink / Sink
Non-shrinking, non-sinking
Flexibility
Resists cracking with vibration and movement
Clean-Up
Water (while wet)
Substrates
Timber, masonry, render, plasterboard, metals, gutters, around pipes, glass
Finish
Satin-smooth when tooled with a wet knife or brush
Packaging
Ready-to-use tub
Country of Origin
100% Australian made & owned
Limitations
Do not apply to unsound, dusty or actively corroding surfaces without proper preparation.
Dry and cure times depend on depth and conditions; confirm dryness before painting.
Not intended for structural repairs.
Pro Tips
Feather edges wide for invisible paint blending on weathered timber and render.
Keep a small cup of clean water nearby to maintain a smooth final pass.
Deep cavities: bridge with successive thin layers for the most stable result.
In Stock
Express Post: 1-3 Days | Standard Post: 2-5 Days
Colours to suit almost any timberWaxstix are so easy to use and so handy for quick repairs to scratched or damaged timber. Waxstix can be coated and stained. Plus, Waxstix contain no beeswax so they will not leave any white ring marking otherwise known as the "halo effect".
For most small scratches, simply rub the stick over the damaged area. For larger, deeper indentations (where TIMBERMATE water-based Woodfiller cannot be used), heat a knife blade with a flame or a soldering iron or stove lighter and fill the damaged area with hot wax. Remove excess wax by rubbing with the smooth side of sandpaper, a piece of cardboard or an old credit card. Use a cotton cloth to buff and remove excess wax.
In Stock
Express Post: 1-3 Days | Standard Post: 2-5 Days
Earl’s Wood Hardener - Restore Soft, Rotted Timber Like New
Bring weakened, decayed timber back to life with Earl’s Wood Hardener. This water-based consolidator penetrates deep into soft, rotted fibres and bonds them into a tough, stable base that’s ready for filling, sanding, and painting. Use it to save windowsills, frames, posts, decking boards, furniture, fences, and more—without costly tear-outs or replacements.
Why Customers Love It
Repairs instead of replacing: Restores soft, crumbly timber to near original strength so you can patch and repaint.
Water-based formulation: Low odour, no volatile organic compounds, and non-toxic when cured.
Ready to use: Pre-mixed; just shake and apply—no diluting or measuring.
Works inside and out: Ideal for interior and exterior timber exposed to weathering.
Versatile application: Pour, brush, spray, or syringe to saturate deep into affected areas.
Long shelf life: Stays usable for extended periods when stored correctly.
Proudly Australian made: Developed for local conditions and everyday DIY and trade use.
Where to Use
Window sills and sashes, door frames, posts, fences, balustrades, fascia boards, decking edges, outdoor furniture, indoor furniture, trims, mouldings—any non-structural timber showing soft rot or fibre breakdown.
How It Works
The thin, penetrating formula wicks into softened timber fibres. As it cures, it binds those fibres together to form a firm, stable base that can be filled, sanded, and coated. No need to carve out all the rot—thorough saturation does the heavy lifting.
Directions
Prep: Ensure the area is dry. Remove dirt, dust, grease, loose paint, varnish, and flaky wood. Mask adjacent finishes if needed.
Apply: Shake well. Generously pour, brush, spray, or syringe the hardener into the affected timber. Repeatedly saturate to drive product deep into fibres.
Cure: Allow to cure until solid and no longer tacky to the touch. Extremely soft timber may need multiple treatments.
Repair: Fill voids with a compatible wood filler, let set, then sand smooth.
Finish: Prime/seal and paint or coat as desired.
Pro Tip
For deep penetration around a localized patch of rot, mark approximately 75 mm either side of the soft area and drill small holes between those points. Brush, spray, or syringe the hardener into the holes until saturation is achieved.
Clean-Up & Safety
Clean tools and drips with water while wet.
Use above 7 °C and in well-ventilated areas.
Non-toxic when cured. Always follow label directions and keep out of reach of children.
Compatibility
Once cured, the hardened substrate accepts most timber fillers and putties. After filling and sanding, it can be primed and top-coated with typical timber paints and finishes. Always test on a small area for compatibility.
Limitations
Not for structural load-bearing repairs.
Not recommended for constant water immersion or areas that cannot be dried prior to application.
Timber must be reasonably sound after consolidation; heavily degraded material may require multiple treatments or replacement.
Specifications
Type
Water-based timber consolidant / hardener
Use
Restoring soft, rotted, non-structural timber prior to filling and painting
Appearance
Low viscosity liquid; dries clear/transparent
Odour / VOC
Low odour; no volatile organic compounds
Application Methods
Pour, brush, spray, or syringe to saturate fibres
Interior / Exterior
Suitable for both
Minimum Application Temperature
Above 7 °C
Cure Indicator
Ready for filling when firm and not tacky to the touch
Clean-Up
Water while wet
Shelf Life
In excess of 2 years when stored sealed in a cool, dry place
Substrates
Soft or rotted timber (non-structural), interior and exterior
Country of Manufacture
Australia
Packaging
Ready-to-use container
What’s in the Box
Earl’s Wood Hardener (ready to use)
Storage
Keep container tightly closed. Store upright in a cool, dry location away from freezing and direct heat. Do not allow product to dry out in the container.
Disposal
Allow residual product to cure before disposal. Follow local waste regulations.
Important Notes
Always read and follow the product label before use. Test on a discreet area to confirm adhesion and finish compatibility. The consolidated timber is not structural and should not be relied upon for load-bearing applications.
In Stock
Express Post: 1-3 Days | Standard Post: 2-5 Days
Earl’s Graffiti Barrier & Remover System – Non-Toxic, Biodegradable
Stop graffiti before it sticks—and remove it fast when it does. This two-part system pairs a sacrificial Graffiti Barrier coating with a powerful, non-caustic Graffiti Remover. Use the Barrier to shield vulnerable surfaces so future tags release easily, and use the Remover to dissolve existing graffiti on common building substrates. Both products are non toxic, contain no caustic soda, and are designed for safe, simple use in domestic or commercial settings.
Why choose this system
Complete solution: Protect plus remove—works as a proactive coating and a reactive cleaner.
Non-toxic & biodegradable: No caustic soda; safer handling and cleanup.
Wide surface compatibility: Brick, cement render, timber fences, stone, metal, garage doors, and signage (always test first).
Fast turnaround: Barrier rolls or brushes on quickly; Remover dissolves graffiti that can be rinsed away with water.
Made for Australian conditions: Practical directions for real-world sites—homes, schools, retail, body corporate assets, and councils.
What’s in the box
Earl’s Graffiti Barrier: A sacrificial, protective coating that forms an invisible* shield to make future clean-downs faster and gentler.
Earl’s Graffiti Remover: A non-caustic cleaner that dissolves graffiti so residues can be scrubbed and rinsed away.
*Appearance may vary by substrate; see Specifications and always test a small area first.
Where to use
Masonry: Bricks, blockwork, stone, concrete/cement render.
Timber & metal: Timber fences, metal doors, garage doors, and metal signage.
High-risk zones: Laneways, rear service doors, fence lines, public-facing walls, and transport corridors.
How it works
The Barrier creates a sacrificial layer. When tagging occurs later, graffiti sits at or near the surface and releases more readily during cleanup. The Remover penetrates and dissolves paints/inks so they can be agitated and rinsed from the substrate, especially effective on porous mineral surfaces and surfaces previously treated with the Barrier.
Directions
1) Apply the Graffiti Barrier (preventive)
Prep: Surface must be clean, dry, sound, and free of dust, oil, or old failing coatings. Mask adjacent areas.
Application: Stir/shake well. Apply sparingly by roller or brush in a single, consistent roll direction.
Coverage: Up to ~6 m²/L on render or dark/porous surfaces (coverage varies by substrate profile and porosity).
Conditions: Do not apply below 12 °C or in very cold/damp conditions.
Appearance: Dries to an opaque protective film; test a small inconspicuous area to confirm finish/visual impact.
2) Use the Graffiti Remover (reactive)
For unpainted mineral surfaces: Spray or liberally apply Remover directly to the graffiti. Allow time for the film to soften/dissolve.
Agitate: Scrub with a stiff bristle brush to lift residues from pores and profiles.
Rinse: Wash off thoroughly with clean water. Repeat on deeply embedded areas if required.
Barrier not previously applied? The Remover can still be used to clean most common surfaces; repeat as necessary.
Pro tips
Always conduct a spot test in an inconspicuous area to verify appearance and cleaning performance.
Highly porous or dark substrates may need additional coats of the Barrier for consistent protection.
Schedule maintenance inspections in high-risk locations so tags are removed promptly, discouraging re-offending.
Clean-up & safety
Use appropriate PPE (gloves/eye protection). Provide ventilation when working in enclosed areas.
Avoid runoff into drains and waterways. Collect residues where practical and dispose of in accordance with local regulations.
Store sealed in a cool, dry place away from direct sun and sources of ignition. Keep out of reach of children.
Specifications
Property
Graffiti Barrier
Graffiti Remover
Function
Sacrificial protective coating to ease future graffiti removal
Non-caustic graffiti dissolver for reactive cleaning
Key claims
Non toxic, non caustic, biodegradable
Non caustic; designed to dissolve graffiti for water rinsing
Suitable substrates
Brick, cement render, stone, timber fences, metal, garage doors
Brick, cement render, stone, timber fences, metal, garage doors, metal signs
Appearance / finish
Dries opaque (test first for visual impact)
Clear liquid cleaner (appearance varies by manufacturer’s batch)
Application method
Roller or brush (single roll direction)
Spray/apply, dwell, scrub, rinse with water
Coverage (guide)
Approx. 6 m²/L on render or dark/porous surfaces (substrate dependent)
Consumption varies with thickness of graffiti and porosity
Application temperature
Do not apply below 12 °C
Use in ambient conditions; avoid extreme heat/cold; ventilate area
Cleanup
Allow to dry; future clean-downs remove tags more easily
Rinse dissolved residues thoroughly with clean water
Typical uses
Preventive protection for high-risk surfaces
Removal of existing tags and markers
In Stock
Express Post: 1-3 Days | Standard Post: 2-5 Days
Earl’s Powder Putty – Mix-to-Use Interior & Exterior Filler
Earl’s Powder Putty is a multi-purpose powder filler for professional and DIY repairs. Just add water, mix only what you need, and achieve a tough, easy-sand finish with no waste and no shrinking.
Brand: Earl’s
Interior and exterior use*
Mix-on-demand convenience
Non-shrinking, smooth finish
Easy sanding and shaping
Indefinite shelf life in dry powder form
Proudly made in Australia
*Exterior applications must be sealed/painted and used on stable substrates.
About Earl’s Powder Putty
Earl’s Powder Putty delivers reliable, high-quality filling for timber, walls, masonry and metal. Because it’s supplied as a dry powder, you can tailor the mix to your task—stiffer for knife-grade filling and sculpting, or looser for fine skim work. The result is a hardwearing repair that sands easily and accepts coatings beautifully.
Where Earl’s Powder Putty Works
Timber & woodwork: doors, frames, skirting, architraves, furniture, cabinetry
Walls & panels: plasterboard and cement sheeting patching and feathering
Masonry & concrete: chips, small holes and surface imperfections
Metals: minor dents and irregularities prior to priming and painting
Floor preparation: quick patching of distressed boards prior to covering
Craft & hobby: architectural details, mouldings and small sculpting tasks
Why Choose Earl’s
No shrink: Formulated to dry without shrinking for flush, invisible repairs.
Mix what you need: Reduce waste and always work with a fresh batch.
Shapes perfectly: Once dry, Earl’s Powder Putty can be cut, carved, sanded or sawn.
Paint-ready: Accepts primers and topcoats after proper dry and prep.
Economical & dependable: Indefinite shelf life in powder form when stored dry.
Directions for Earl’s Powder Putty
Surface prep: Ensure the area is clean, dry and sound. Remove loose material, dust, grease and contaminants. Key glossy surfaces for better adhesion.
Mix: In a clean container, add Earl’s Powder Putty and slowly incorporate clean water. Stir to a smooth, lump-free paste. Adjust water to suit the task.
Apply: Press the mix firmly into the repair with a putty knife or trowel. Slightly overfill to allow for sanding back flush.
Build: For deep repairs, apply in layers, allowing each to firm before adding the next.
Finish: Once dry, sand smooth. The cured filler can be carved or sawn to refine edges and profiles.
Coat: Prime/seal and paint after full dry. For exterior use, always seal with suitable coatings.
Clean-up: Clean tools with water while the product is still wet.
Dry and recoat times vary with temperature, humidity and film thickness. Allow extra time in cool or damp conditions and for deep fills.
Good to Know About Earl’s
Not waterproof by itself: Water and weather resistance requires sealing/painting.
Not flexible: Avoid use where movement, vibration or structural flexing is expected.
Stable substrates only: Ensure exterior bases are sound and well prepared.
Storage: Keep Earl’s Powder Putty dry and tightly closed. Moisture exposure can reduce performance after opening.
Safety: Avoid dust during mixing and sanding. Use PPE and adequate ventilation.
Typical Earl’s Applications
Filling nail and screw holes, chips and minor cracks
Skim patching and feathering edges prior to painting
Rebuilding small decorative profiles and mouldings
Levelling minor surface imperfections before finishing
Specifications
Brand
Earl’s
Product Name
Earl’s Powder Putty
Product Type
Multi-purpose powder filler
Format
Dry powder; mix with clean water
Colour (dry)
Off-white to white; paintable
Use Areas
Interior and exterior* (exterior must be sealed/painted; stable substrates only)
Substrate Compatibility
Wood, plasterboard, cement sheeting, concrete, masonry, properly prepared metal
Shrinkage
Non-shrinking when used as directed
Sandability
Easy sanding once fully dry
Paintability
Prime/seal and paint after full dry
Water Resistance
Requires sealing; product itself is not waterproof
Shelf Life (powder)
Indefinite when stored cool, dry and sealed
Clean-up
Water while wet
Tools
Putty knife, trowel, mixing stick or paddle, sanding block
Country of Origin
Australia
Limitations of Earl’s Powder Putty
Do not use as a flexible gap filler or where structural movement is expected.
Always prime/seal before exposure to moisture or exterior weather.
Deep repairs may require multiple layers with adequate drying between coats.
Not for permanently wet, submerged or high-movement joints.
FAQs – Earl’s Powder Putty
Can I mix a large batch and store it?Mix only what you can use within the working time. Discard any mix that begins to stiffen or set.
Can I screw or nail into it?For non-structural tasks, light fixings may be possible in sufficiently thick, fully cured areas. Pre-drill as needed and test first.
Is it paintable?Yes. Once dry and sanded, prime or seal the repair and finish with your chosen coating system.
Always follow label directions. Test on a small, inconspicuous area to confirm compatibility and finish.

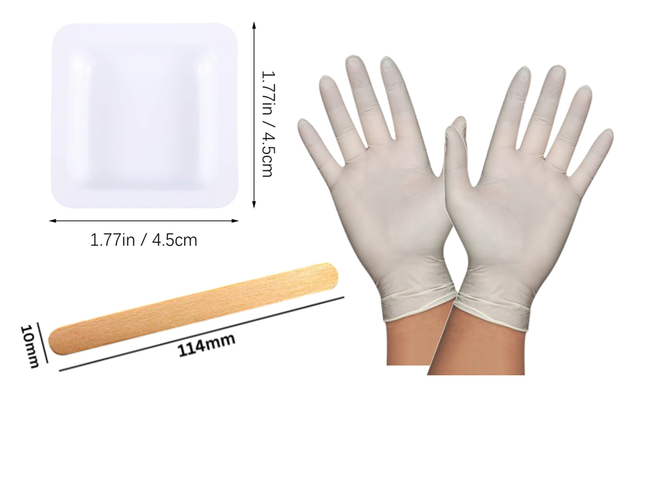
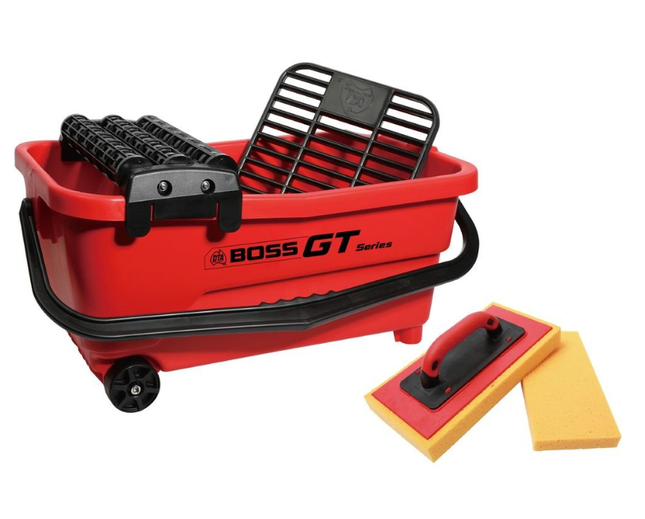


![Waxstix Timber repair wax touch-up crayons [Baltic Pine]](//gluesaustralia.com.au/cdn/shop/files/9315284510000.png?v=1754724098&width=645)
![Waxstix Timber repair wax touch-up crayons [Cedar]](//gluesaustralia.com.au/cdn/shop/files/9315284510017.png?v=1754724098&width=645)


![Waxstix Timber repair wax touch-up crayons [Baltic Pine]](http://gluesaustralia.com.au/cdn/shop/files/9315284510000.png?v=1754724098&width=645)
![Waxstix Timber repair wax touch-up crayons [Cedar]](http://gluesaustralia.com.au/cdn/shop/files/9315284510017.png?v=1754724098&width=645)


